Project Life Tuesday: My Planning Process

Hi Project Lifers!

I thought I would do something different for my Project Life Tuesday post and show you my planning process for my pages. Right now I am 6 weeks behind the current week. I am not freaking out but I do want to make sure I am staying organized so that I don’t loose thoughts or photos that I want to include in past weeks. The key to staying on top of your album and not getting so frustrated that you want to quit is to stay organized.

At the beginning of the year I started off so excited to do my first year of Project life. I made a spiral bound planner that I had printed at staples and I was ready to go! I completed each weekly spread the monday after the week ended and I did this for the first month, No sweat right? Ah then life happened, got busy and I was two weeks behind… still chugging along but then it got to be three weeks….and I had yet to use the planner I had made.

Now there are a lot of people out there that really prefer the paper organizers over electronic gadgets. I have learned that I am not one of them. I just don’t carry around much other than my iPhone and my iPad and with 5 kids, I am on the go a lot. Having done away with the whole weekly paper planner idea, I was just printing photos and figuring out how to arrange them all as I worked on each individual layout. This ended up being a pretty long process for me. First I had to edit my photos then I had to figure out where they were going then I would have to print them in the right size. Only after that was all done could I really begin to scrapbook. Sometimes after spending an hour or so doing that, I had other things around the house I needed to tend do and Kids that needed my attention, so the actual scrapbooking part had to wait. This made me sad because the actual putting it all together scrapbooking part is what I really enjoy. I needed to figure out a better way to get this done and not give up.

I think I did!

On my ipad I have an app called Paper by 53. I LOVE this app because I love to sketch, doodle, and I even use it to take notes with during church on sundays. It is a free app but if you want more “tools” you can buy them individually. I have them all but I only use the basic free version tools for what I am now doing for project life. I also use an app on my iphone called Project 365 pro to log one photo a day. This is a great reference for me when I am behind (more on that later)

Paper by 53 for your Project Life Planning @thecraftypickle.com

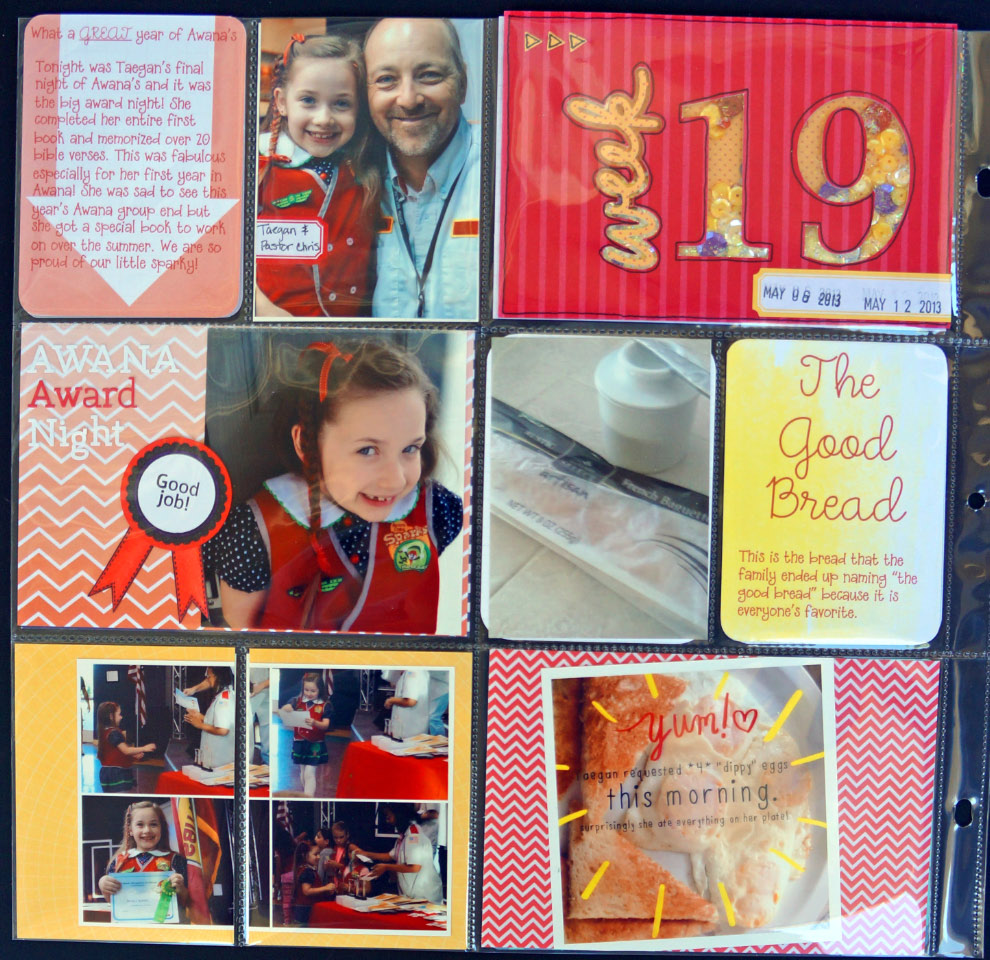
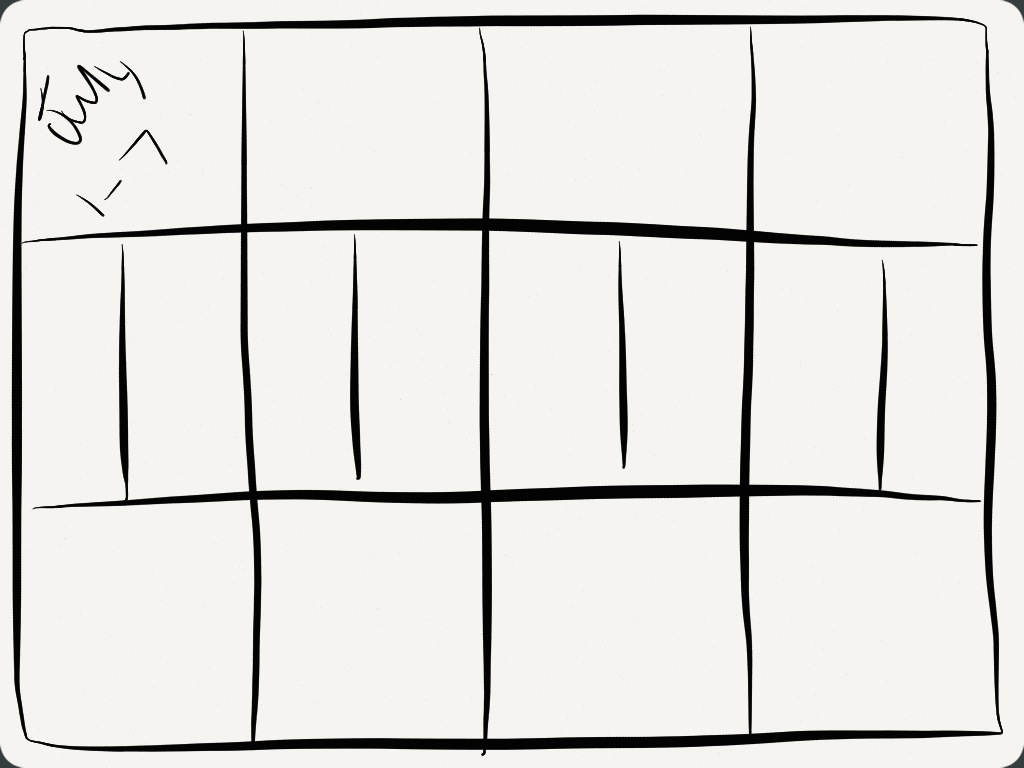
Turns out this app is PERFECT for sketching (in my case scribbling) out your project life pages! After church this sunday I sat down with my iphone and my ipad while I watched the girls play in the pool, and I started planning all my pages that I was behind with. In roughly an hour I had 6 weeks worth of pages sketched out (inserts too!). I can’t believe how quick and easy it was. Now all that I need to do is print the photos from my phone in the sizes I already planned out and pop them in their planned spaces. I effectively have taken, what I consider the work part, out of the planning process, and now I can get to the FUN part much quicker! Below is a few screenshots of my scribbly plans, I am sure yours will be much more legible and neat, LOL.

Project Life Planning @thecraftypickle.com

Project Life Planning process @thecraftypickle.com

photo (4)  See, I am even ready for this week! Bring on July!

Project 365 pro for project life planning @thecraftypickle.comI mentioned before an app that I use on my phone called Project 356 pro (there also is a free version) I love this app because you can plug in a-photo-a-day which helps me referance what happend on what day when I am going back and planning out a page. It has an added bonus of being able to save a 4×6 calendar like photo with all of your photos from that month that you plugged in.

The one other thing that I do is create a marker within my photo album and instagram to show me when another week is starting. I am also listing upcoming highlights that I know will occur in the coming week. I made the weekly marker below using the app “a beautiful mess” which is one of my favorite apps. I have also used the app “Typic pro” quite a bit with other weekly markers. Here is my marker I created today for this coming week.

New week marker for PL on my iphone @thecraftypickle.com

I hope this inspires those of you that feel unorganized and behind. You can get caught up, you can stay current, and you can make the project life process even more simple!

Looking for more project life inspiration? As always, I am linking up with The Mom Creative who shares her album every week and links up with several other talented project lifers.

Project Life Tuesdays @TheMomCreative.com

Have a FANTASTIC photo-filled week!

Make-A-Card Monday: Stamping on Patterned paper.

Hi Friends!

Today for Make-A-Card Monday I am working with a technique used in the “Inked” class I am taking at Studio Calico. I am so excited for this class because I always love to learn new ways to use my ever-growing stamp collection.

Today the talented Nichole Magouirk shared how to effectively stamp on patterned paper. It reminded me of my old school scrapping paper-piecing days and I had so much fun with this. I can’t believe I haven’t thought about using stamping and patterned paper together like this before. It’s really very simple and I adore the results. Sort of like coloring with paper instead of markers, crayons, or paint.

For my own take on this challenge I chose a kite in the clouds stamp by Paper Smooches along with a sentiment from a Studio Calico kit stamp. This card is great for someone who needs a little encouragement. Could also be great as a graduation or promotion card.

Stamping on Patterned paper @thecraftypickle.com

For my patterned paper I used scraps of the seen and noted collection by Pebbles. I love the bright colors  with the primary aqua and red focus colors. The card came together quickly (about 30 minutes total). This particular stamp fits inside a 3×4 project life card perfectly as well so I am thinking of repeating the same stamp with patterned papers I use in my Project life spread  for a great filler card.

I hope your week is off to a great start!

Happy Crafting!
Taniesa

Traditional Thursday: Layouts featuring Pebbles, Crate Paper, and American Crafts.

Today I thought I would share a few scrapbook pages that I have been working on. It’s been nice working on my project life album, but sometimes I want to do traditional layouts as well. So I picked up a few of my favorite lines from Pebbles, Crate Paper, and American crafts and decided to dive in!

First, I adore the Pebbles Lakeside line! It was so perfect for some photos that I had that I just couldn’t find the right look for and had set them aside.

This is a simple layout I did with all Lakeside papers and embellishments:

Working Lakeside with Pebbles @thecraftypickle.comWorking Lakeside with Pebbles @thecraftypickle.com

I cut a portion of the chalkboard 12×12 paper to use as a sign embellishment and attached it to some wood grain cardstock. I then added a few pop dots for added dimension along with a small popsicle stick I rubbed on a dark brown ink pad. The wooden sign, tags, and little bird are all embellishments from the same Lakeside line by Pebbles.

For a different look on this next layout, I used the same Lakeside line but pulled more of the floral papers and the sheet music paper as a background. It was the sheet music paper in this line that inspired me to create this layout in the first place. It worked perfectly for a girl scout camping photo of my daughter at the “singing tree”. I really wanted to pop the floral patterns in the paper so I matted each on black cardstock. The title was done on the silhouette as well as the music notes. To get the outline effect of the title as well as the shadow piece on “singing” I used the offset option in the silhouette software.

Working Lakeside with Pebbles @thecraftypickle.com

Those chalkboard alpha stickers… yep, amazing! I rubbed regular white chalk on them and erased to give them a more used chalkboard look. I am in love with these alpha stickers and I know I will be using them again on some school related pages soon!

Working Lakeside with Pebbles @thecraftypickle.com

Next my little girl really wanted me to put her ear-piercing experience in her album (she was scared at the time but now loves to show off her *bling* and loves looking at these photos.) I created another simple quick layout using some American Crafts Mayberry papers and some American Crafts POW glitter paper.

Ear Piercing Experiance @thecraftypickle.com

If you haven’t worked with the POW Glitter Paper yet its amazing in the silhouette. It cuts so crisp and smooth and the glitter doesn’t come off the paper like some other glitter papers. I love making sparkly die cuts!

Ear Piercing Experiance @thecraftypickle.com

Finally, this last layout has to be one of my favorites, mostly because of the photos of these two precious little girls. I decided to pull papers from the beautiful new ThePier collection by Crate Paper. I love the soft tones in the papers and embellishments offered in this collection. I wanted to keep the colors soft as to not overpower the photos which I really want to be center focus.

ThePier @thecraftypickle.com

The washi tape strip on the left was cut from a 12×12 washi paper sheet. I also used one of the slide frames from the collection to draw the eye to the center photo (isn’t her expression priceless?) The little green squares were all punched out using a 6×6 piece of ombre paper from ThePier 6×6 paper pad that I had and I attached peach matte sequins to the squares using a clear liquid adhesive. The sequins reminded me of seashells 🙂

ThePier @thecraftypickle.com

I was stuck for a while after working on the sequins portion and then last night at 2am I remembered a layout that I saw from April Foster that used the amazing Noah alpha stamps and the watercolor effect she used.(Yes I wake up in the middle of the night and think about scrapbooking, don’t you?) I shortened the popular quote by a couple of words to make sure it all would fit and I painted in the letters using three different colors of Mister Huey’s (Cameo, Shell, and Dewey) I mixed in a little bit of the shell color with the other two colors to give each letter color variation. I was really happy with how it came out.

I hope you enjoyed my Traditional Thursday layout share. Definitely click around on the links provided to check out these amazing collections!

Happy Crafting!3

Project Life Tuesday: Week 20…. wow, seriously!?!? Week 20!!!!!

Hi Project Lifers!

I seriously cannot believe how fast this year is going by! I just completed week 20 and went back flipping through the entire album so far. I was just amazed at how it seemed like I just started my album. It really is a treasure having something simple like Project Life that helps you slow down and really treasure the everyday because otherwise we might miss some pretty important moments and memories in all our busy-ness. Maybe you are new to the Project Life concept. If so I recommend you go HERE to Becky Higgins website, Creator of the Project Life system.

This was a calm at home week for us. The biggest excitement was that my 6-year-old little girl was allowed to have her first sleepover. Our sweet neighbor came over and I got to experience giggly girls who were up wayyyy too late LOL.

Project Life: Week 20 @thecraftypickle.com

This week I largely used a combination of Becky Higgins Blush core kit and Dear Lizzy: Fifth and Frolic. Both matched up perfectly to one another and went along with the overall theme of the week.

Project Life: Week 20 @thecraftypickle.com

The left side focuses mostly on our week. A few random things including a photo of our home that I have been trying to find a spot for in the album. Beings that I didn’t take a lot of photos this particular week it fit perfectly. I fell in love with the Dear Lizzy line and was so pleased that it seemed to be made to match with the Blush core kit.

Project Life: Week 20 @thecraftypickle.com

The little house was fussy-cut out of a 12×12 sheet of the Dear Lizzy paper and the arrows were apart of the tear strip. The background “card” behind the house was another sheet of paper from the same collection. I stamped a sentiment from the Technique Tuesday : AE Studio “Memories of Home” set. It was straight but I curved it on my stamping block to fit on the card insert.

Project Life: Week 20 @thecraftypickle.com

For the title card I used a card from the Blush kit and stamped “week” several times along the bottom in two different ink colors. The lighter seafoam color was just a second stamping of the darker ink without re-inking. The beautiful glitter thickers are also from Dear Lizzy but from the Neapolitan line, Can you tell how much I *LOVE* her designs and colors? The little file tab was stamped and heat embossed with Aqua ZING embossing powder.

Project Life: Week 20 @thecraftypickle.com

A few of the photos this week were edited using the “A Beautiful Mess” app. If you haven’t checked it out its amazing! I definitely recommend purchasing the app and the add-on designs. So much fun! The coffee cup card is from the Studio Calico Project Life monthly kit.

Project Life Week 20 @thecraftypickle.com

The right side was all about the sleepover. Aren’t those seafoam polkadot thickers adorable?

Project Life: Week 20 @thecraftypickle.com

Perfect color and perfect font. I had been hoarding these cuties for a while, So happy I had the perfect opportunity to use them.

Project Life: Week 20 @thecraftypickle.com

Again, some more editing using the “A Beautiful Mess” app and more of the Dear Lizzy paper (same sheet of paper called Bowtie Boulevard.)

Project Life: Week 20 @thecraftypickle.comAnd finally a fun speech bubble to highlight the final words to wrap up my daughters sleepover experience. She was out like a light until lunchtime!

Hopefully you all have a special place in your album to document your home along with all that happens in it. I am grateful for my home where we create meaningful everyday memories, where we come together as a family.

Looking for more project life inspiration? As always, I am linking up with The Mom Creative who shares her album every week and links up with several other talented project lifers.

Project Life Tuesdays @TheMomCreative.com

I hope you all have a wonderful week! Don’t forget to snap photos of those little moments along the way!

Happy Crafting!

Make-A-Card Monday!

Mondays are usually my least favorite day of the week. Nothing brightens someone’s day more than happy mail, especially on a Monday! So today I whipped up a few adorable cards that can be adapted to whatever sentiment you desire. they are simple, quick, and guaranteed to bring a smile to the recipient’s face. My challenge to you today is to make a card, simple or more elaborate, and send it to a special someone by good ol’ snail mail! Please feel free to post a link to your card project in the comments if you would like. I would love to see your card-creations!

My first card is a simple “Hello”:

Make a card Monday @thecraftypickle.com

This card was made using the Pebbles Basics papers and some Pebbles / American Craft’s die cut shapes from the silhouette store. It came together super quick and I love the bright cheery colors. The Pebbles Basics really is a fabulous basic set every cardmaker, scrapbooker, project lifer, and papercrafter should have.

Here are the cut design ID numbers for the Silhouette Shop:

Design ID #20725

Design ID #19946

Design ID #42918

My next card was inspired by the new Pier slide frames. I adore them and thought they made the perfect frame for a shaker card!

Make-a-card Monday @thecraftypickle.com

The paper and the frame are from Crate Paper’s The Pier line and the floral die cut is from Crate Paper’s DIY shop. I added a touch of glitter to the yellow portion of the die cut and the stamp “celebrate” is from Technique Tuesday: AE studio. I added a bit of bakers twine and called it done. This is perfect for any type of celebration. You could even replace the flower die cut for a cupcake or birthday cake if you wanted a more birthday-like card.

Finally for you today, I have a super simple, super quick gift card that is perfect size for a Starbucks, iTunes, or other gift card to tuck inside:

Make-a-card Monday @thecraftypickle.com

The frame was a project life style card cut from a 12×12 sheet from Crate Paper’s The Pier collection. I added a dimensional die cut from American crafts Pretty Party stand outs and simply stamped a “Thanks A Bunch” sentiment from Dear Lizzie that fit perfectly with this card.

Don’t be afraid to mix and match collections, especially from the same manufacture. The colors generally match perfectly and it gives you a chance to really stretch your supplies.

I hope you feel inspired to create a few cards of your own. Spread some smiles with some handmade card love!

Happy Crafting!

I have some pretty exciting news to share!

It’s been a quiet week on my blog but not around my house, we have been busy busy busy! But I do have a very exciting announcement I wanted to share with you all!

http://www.die-namitesblog.com/

I have been asked to join 5 other amazingly talented ladies on the Die-Namites Design Team! I am thrilled and honored to be apart of the team and hope you will help me in congratulating the other ladies that will be wowing you with their talent over the next 6 months. Take a hop to each of their blogs to see some beautiful projects, they really are quite talented!

Taniesa Vlasak – California *USA*  (you are here)

Peggie Lee Baker – New Hampshire *USA*

Susie Moore – Texas *USA*

Lynne Forsythe – New Hampshire *USA*

Lisa Tottle – *Canada*

Dunja Ducker *Germany*

Thank you for sharing in my excitement! I can’t wait to share some very fun DIE-NAMITE projects with you all! You can also visit the Die-Namites Blog HERE.
Happy Crafting!

Project Life: Week Nineteen, including bad days in your album.

Hi Project Lifers!

This week I bring you a pretty challenging layout for me. Not so much of how to embellish or what photos to include but for the first time I had to decide if I was going to include a bad/sad day that happened this week. I debated for a while… which is why I didn’t up posting yesterday like planned. More about that later. First, This is what the entire spread for week 19 looks like:

Project life week 19 @thecraftypickle.com

I knew I wanted my title card to be fun, it’s the one thing that I think I embellish most on my Project Life spreads. I remember back in the early days of scrapping , shaker boxes were really popular. So I thought, hey why not make a shaker card title for my week 19! That is exactly what I did. With the help of my silhouette I created this fun shaker title card filled with glitter, sequins, and buttons.

Project life week 19 @thecraftypickle.com

Here is a close up of the left side with the title card in the page protector.

Project life week 19 @thecraftypickle.com

If you are a iPhone user you might have had the chance to play with the new app “A Beautiful Mess” I love this app and its so fun to add a little bit of whimsy and journaling on your photos.

Project life week 19 @thecraftypickle.com

Here is a close up of the right side.

Project life week 19 @thecraftypickle.com

A couple of things about this side of the layout. First on the top left card that says OPEN House I used a stamp from studio calico that said OPENME. I took a piece of washi tape and covered the “me” before inking it up. It was a nice way to get more use out of this stamp and not have to cut apart my stamps.

Second, for the book fair card I used a page from an old dictionary on top of a white plain project life card. Sometimes the most effective embellishments can be very simple.

And lastly, the hardest part of my layout was the extremely sad day that I had this week. I decided that if I only document our lives in the wonderful everyday moments then I am not being completely truthful and authentic. Everyone has bad days and this was one of mine. I did however hide the journaling which is written on the back of the “A mommy sad day” card. I loved that this particular card from my studio calico monthly kit had journal lines on the back. So the journaling is there for me to reflect but not out there so whoever flips though our family album can read what is very personal to me. I included one of the filter transparencies over the sad selfie photo.

Project life week 19 @thecraftypickle.com

I hope you enjoyed my view of week 19. I promise next week is far more happy!

Project Life Tuesdays @TheMomCreative.com

Make sure you check out TheMomCreative.com for even more Project Life inspiration. There are some fabulously talented ladies that link up to the equally talented Jessica Turner.

Happy Crafting!

Turn your leftover project life cards into greeting cards!

Hi Everyone

Today I thought I would share a few greeting cards I made using leftover journal/filler project life style cards. I made these three cards in less than an hour! They were so simple to make and far more personal than store-bought. The added bonus was being able to use up some cards and supplies I had on hand. There are so many pocket filler cards out there both in 3×4 and 4×6. I gathered up some cards that I wasn’t using to see what I could create. The assortment I grabbed was from different companies. Pebbles, Becky Higgins, Me and My Big Ideas, and the Studio Calico monthly project life kit.

Turn your leftover project life cards into greeting cards @thecraftypickle.com


The first one that I made was this adorable “you are simply wonderful” card from Pebbles. It’s almost that this little filler card was made for a delightful greeting to brighten someones day! I added very little to this card. some background paper, a die cut flower that matched the flowers printed on the card, a few sequins, some yellow string, and some detail on the bee with my glitter pen.

Turn your leftover project life cards into greeting cards @thecraftypickle.com


The second card that I made, I used a card leftover from a Studio Calico pack. It was just a plain card that said “Together”. I stamped the “Let’s Get” with versafine smokey gray ink and colored in the “Together” with some copic markers. There was a lot of empty space on the card so I decided to trim it and use some colorful scrap pieces of pebbles basics paper behind for a fun look. to finish it off I sewed around the edges of the card, Popped the title up with foam dots and added a little car paperclip.

Turn your leftover project life cards into greeting cards @thecraftypickle.com


For my final card I actually used two project life style cards. The gray background card was from a Pebbles pack and the white square was just cut from a grid journaling card from Me and My Big Ideas. I did not alter the bigger card at all as I already loved the scalloped border. On the grid card square I used a paper smooches stamp set called Squeaky Clean and stamped the vacuum and the sentiment “that sucks”. I did a little coloring with my copic markers and added some sequins and pen detailing. I attached it to the bigger card with a bit of Queen and Co. Washi Tape.

Turn your leftover project life cards into greeting cards @thecraftypickle.com


I hope you enjoyed my little card tip for this Monday, and maybe you too can use up any leftover cards you might have in your scrappy stash. Tomorrow I promise I will use my Project Life cards in my actual Project life album!

Until then,

Happy Crafting!

Quick Tip for Friday: Removing the Stick from your Stickers.

Happy Friday Friends!

Quick tip for your scrappy weekend. Sometimes I want to use a sticker or other sticky embellishment but I want to layer it or have part of it NOT sticky. Easy fix! Simply brush on baby powder to the back and it will become un-sticky instantly (and it smells good as a bonus). You can purchase this handy dandy tool from EK Success below or simply have a little container of baby powder (I have a empty mini container that used to hold eyelets to hold my powder) and a paint brush. I keep it close by with my other scrapbooking tools.

Powder tool by EK success

Layering with stickers and labels is great with your project life layouts as it adds that dimensional look but a lot less bulk.

Hope you all have a wonderful Fathers Day weekend!

Happy Crafting!

Silhouette Sketching & The Pickle Product Pick-of-the-Week!

Hi fellow Silhouette users!

Have you fallen in love with the sketch option of your Silhouette like I have? I love that I can journal and draw nearly anything from my Silhouette. I first started “sketching” when I, like many others, was unable to get the famous Studio Calico “Lost Boys” add-on kit which had the over the moon stamp set. The had offered the digital stamp set and I imported it into my silhouette software. I definitely fell in love with the results (you can see where I had posted about it HERE)

After that, I was hooked, I bought every silhouette sketch pen that was on the market. The most popular being the sketch pen starter set.

Silhouette Sketch Pen starter pack

These pens run about $20. While they worked great for me for the first few times, the ink stopped flowing consistently and i ended up with skips in my design and journaling. I did love the free sketch shapes that came with the pens. I found, like gel pens, if you tap the top of the ball point on paper before using it works a little better. Unfortunately I still had the skipping problem so I purchased the ballpoint pen holder also from silhouette.

pen holder silhouette

While this is not a bad solution I was REALLY limited on what pens I could use in it. some ballpoint pens fit and some did not. It left me more frustrated than happy. I still really wanted to utilize the sketch designs I had. I began searching for another option or maybe an aftermarket pen that would fit and that’s when I stumbled upon the Chomas Creations website. She had pen holders of all types for different machines. Now I was skeptical and  hesitant to purchase one of these. I saw YouTube videos using the pen holder and it LOOKED like it would be a good option but I was nervous that I would have the same problems i had already experienced. I decided to give it a chance and purchase the pen holder first (she has a marker holder as well), this is what it looks like:

www.amychomas.com/

I was so pleased with how this little pen holder worked, and I put it to the test with several pens and every time I was very happy with how the sketches came out. Chomas Creations really knocked it out of the park on this one! The pen holder is not some cheap plastic thing but sturdy.

I emailed the owner of the Chomas Creations, Amy, and let her know how much I loved her product. she emailed me back within hours and thanked me for my email. She told me that she was a small home-based business (4 years old now) and they manufacture their product right here in the USA. You can really tell the quality when you hold one of these pen holders. While they could of saved money producing a cheaper product in china they produced a high quality product here in the states that will really last and not fall apart.

Now the only negative thing I could possibly say about this pen holder is that it does not hold ALL pens but it does hold most. My favorite pens to use for silhouette sketching and Amy’s holder is the Staedtler fineliner marker pens and the Signo uniball white gel pen. I got a small set of the Staedtlers at michaels in the art section of the store. You can also purchase them HERE at Jetpens.com (my favorite online pen source) Chomas Creations does carry a marker holder as well that I need to order. I am hoping the marker holder might fit some of the other pens that I have. Did you know you could even put a stylus in the holder and do some dry embossing?

Good stuff, my friends, good stuff! I love supporting small and home-based businesses when I can. Amy told me that there is a sale going on right now for 10% off your total purchase. Just use the code JUNE13 when you check out. I wholeheartedly recommend this “Pickle Product Pick”!

Happy Sketching!