Happy 4th Birthday to Trinity Stamps

It’s hard to believe it has been 4 fantastic years already since we launched Trinity Stamps. Time flys when you are having fun! I have been so blessed to meet so many amazing people on this journey so far. I am so proud of the growth of this little company and overjoyed for the opportunity to help fuel creativity and spread happy mail smiles.

I have a few projects to share with you! I don’t get a lot of time in my craft room with being so busy behind the scenes but I took a few days off to create and it felt SO nice! Here are a few of the cards that I made with the newest release!

Easy Peasy

This adorable stamp, illustrated by my friend Dani @ Love,Dani Studios is one of my favorites. It’s a saying my kids used to use all the time so I thought it would make a perfect encouragement card for one of them.

I heat embossed the sentiment with white embossing powder and used my watercolors to paint the inside and outside of the sentiment. I cut it out using the coordinating die set as well as the bonus lemon and pea pod dies for the inside of the card. I used the Lemon and Leaves stencil set to create the background behind the sentiment cut out. The sentiment on the inside, “You got this”, came from the 4×8 A sentiment for almost everything stamp set. I really love the blue and the yellow together with the added pop of the green, don’t you?
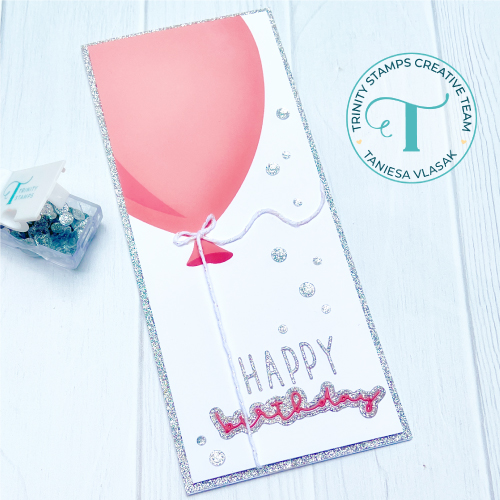
Swirly Birthday

I made this quick slimline birthday card using the new Slimline Swirly Birthday sentiment and some balloons from the new Celebration Balloons die set. The background was made using the Trinity Stamps Puffy Cloud stencil and some Tumbled Glass distress oxide ink. Once the ink dried on the background I sprayed some shimmery glitter spray from my stash.

I cut out several balloons from the Celebration Balloons Die set and then I added the letters for HAPPY using the Trinity Stamps Graham Cracker Alphabet Die Set cut out of gold glitter cardstock. I cut the Swirly Birthday sentiment out of the same gold cardstock as well as each of the colors I used for the balloons.

I stacked all of the layers of the Swirly birthday sentiment together in rainbow order, leaving the glitter piece for the top. This added dimension as well as a fun stacked rainbow effect from the side. I tied on metallic gold embroidery thread to the balloons and secured the string with tape on the backside of the card.

Celebration Balloon Birthday Slimline Card

This time I used the Balloon celebration stencil set to make another slimline card. I used the largest balloon in the stencil set and some Saltwater Taffy Distress Oxide ink. For the shadow layer I used Festive Berries Distress Oxide ink. I cut out the panel using the Trinity Stamps Slimline Modern Embossed Die set and mounted it on a panel of silver glitter cardstock. The sentiment was cut out using the Graham Cracker Alphabet Die set as well as the Simply Sentimental: Birthday coordinating die set. I added a sprinkling of the new Silver Sparkle Glitter Rhinestones and some white sparkle twine for the balloon string.

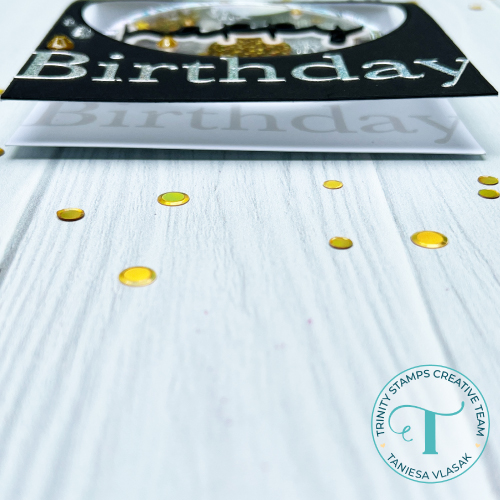
Party Balloons Hot Foil Layered Shaker Card

For this A-2 sized card I used the Cut & Foil Party Balloons die set. I never realized how easy it was to foil on transparency. It was SO fun. I just played around with different foils and different balloons on the Spellbinders foil transparency. I picked out a few of my favorite silver and gold balloon pieces and cut two circles. I took another piece of white cardstock and foiled balloons on that for the background making a third circle. I stacked these layers together with thin foam strips and added some Oh My Stars and Gold Stars Confetti in the two circle stacks.

Because this circle stack was so thick and I didn’t want the foam tape showing on the side, I cut a thin strip of holographic paper to wrap around the outside. I also cut a circle frame out of holographic cardstock using the Trinity Stamps Modern Embossed Circle Stack Die Set to layer on top.

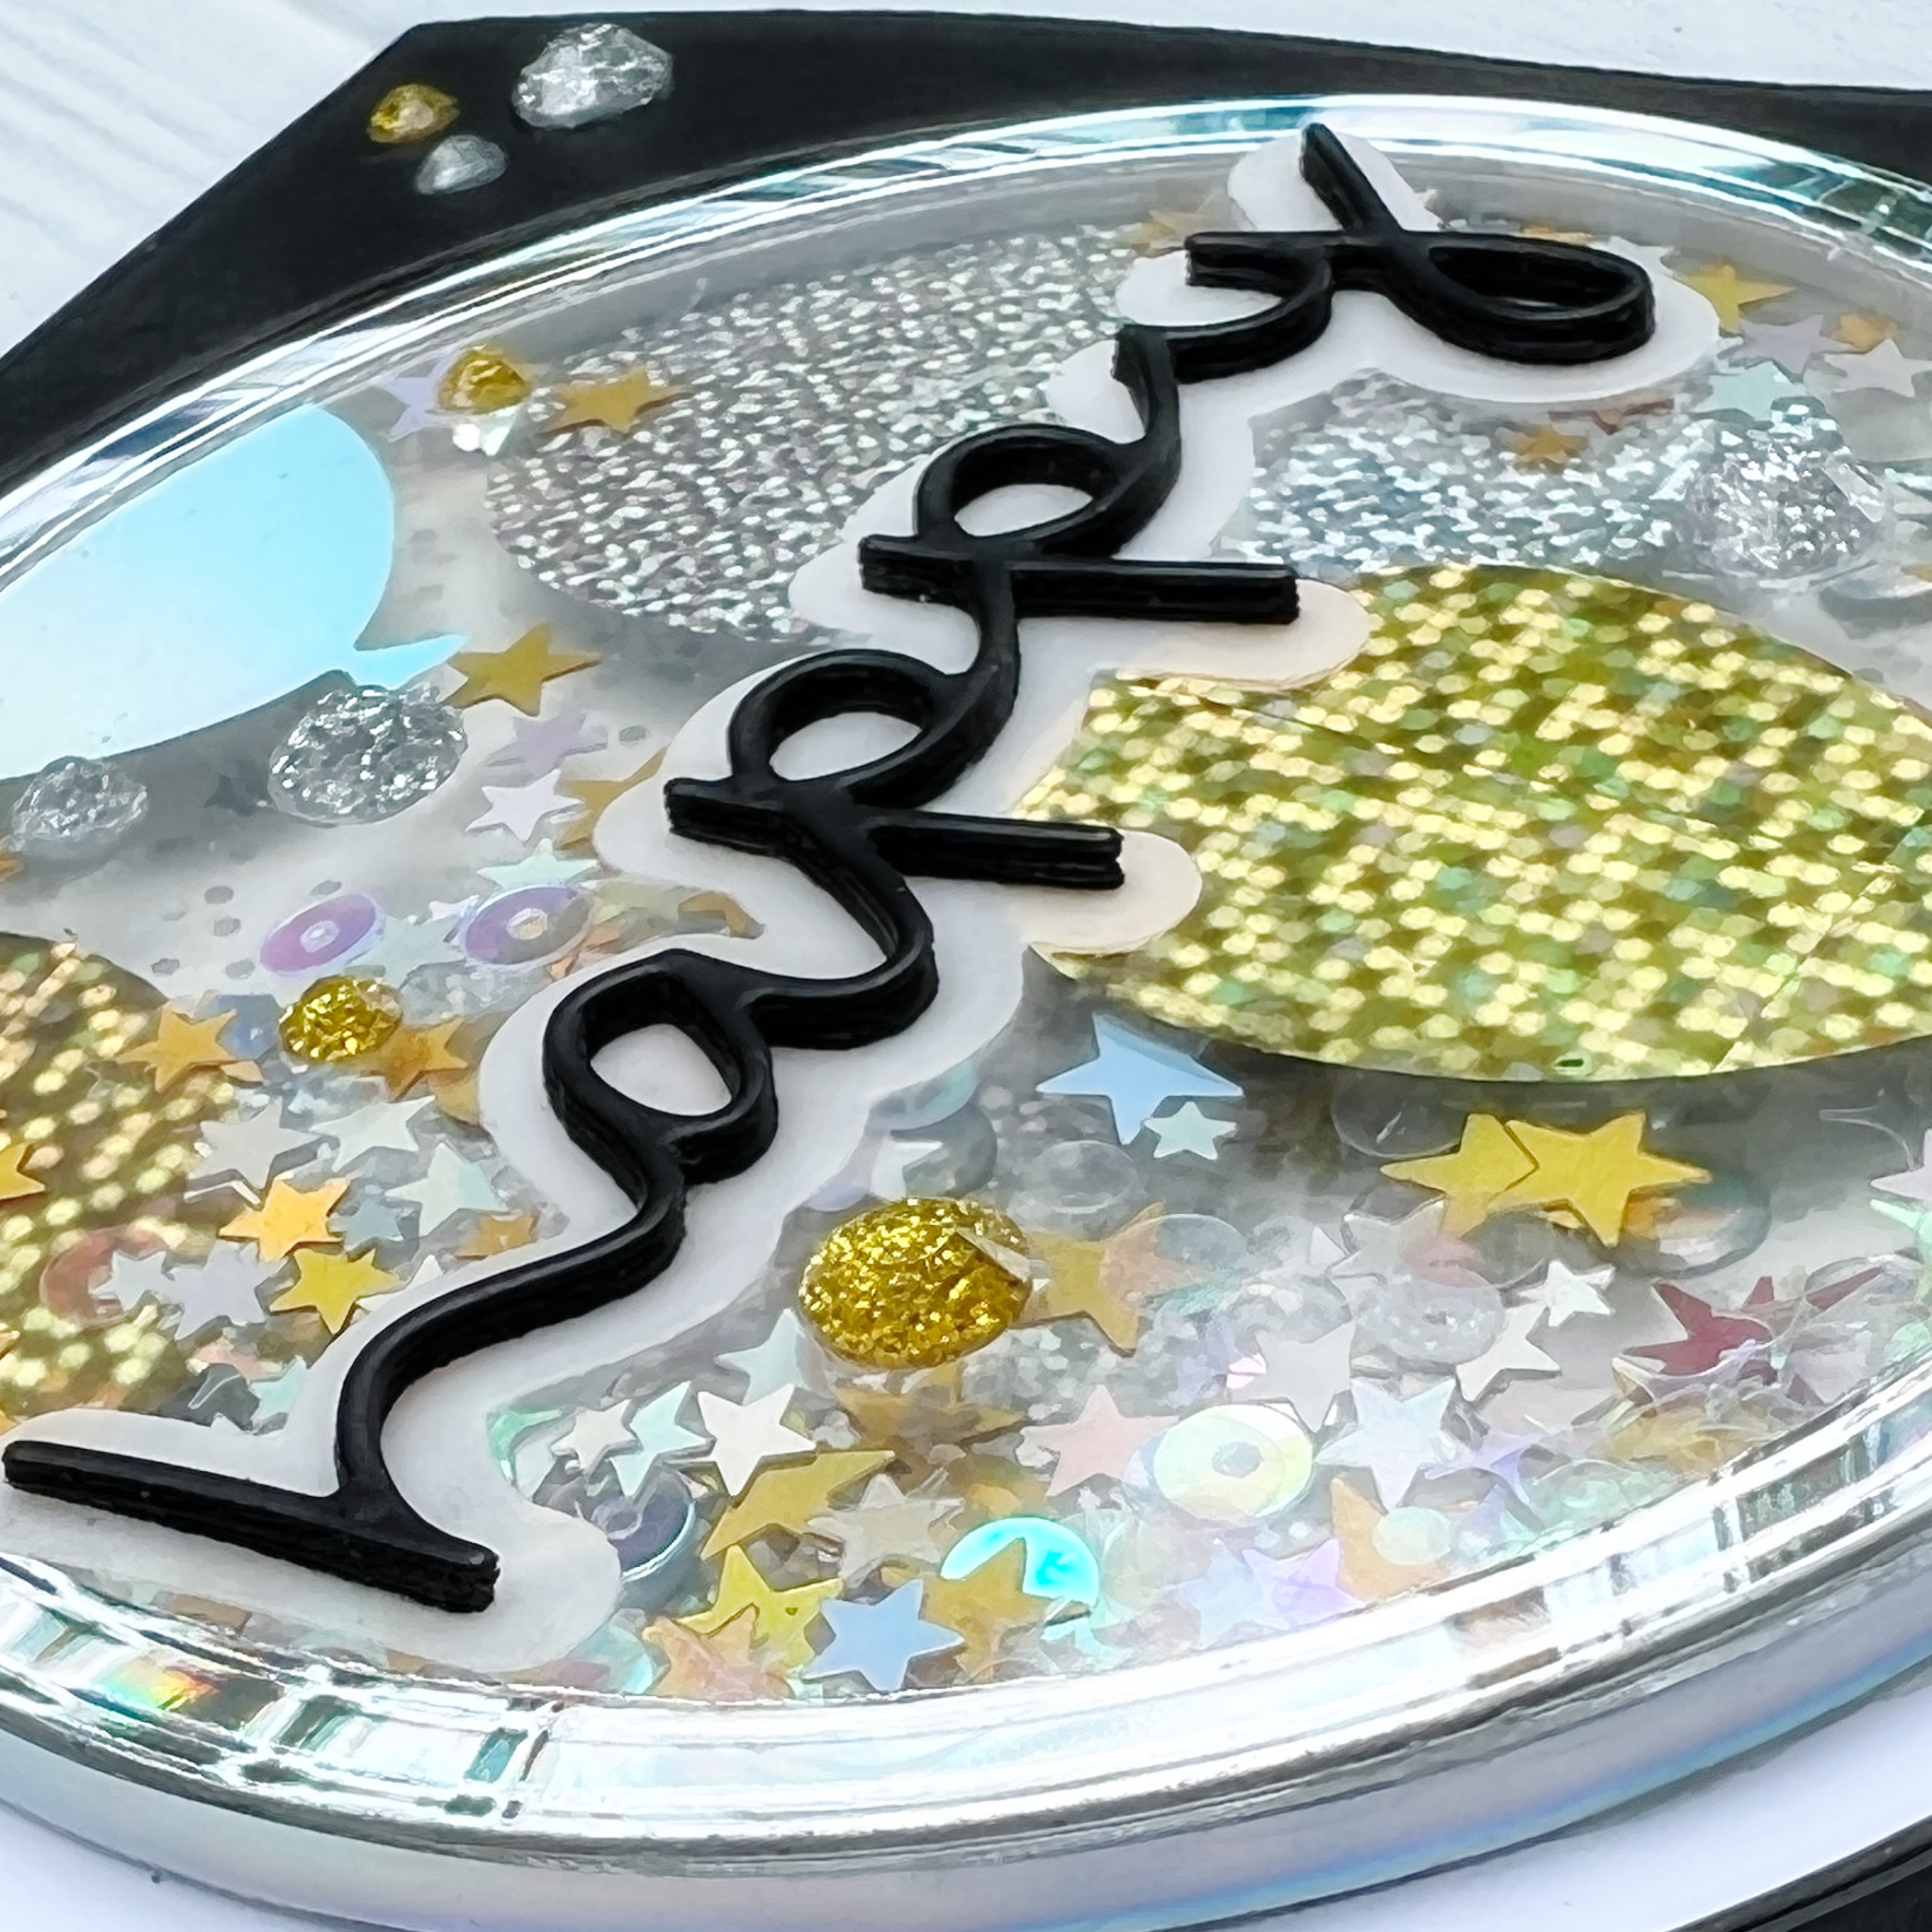
I added the word Happy from the Simply Sentimental: Happy Coordinating Die set (stacked three layers) along with the shadow layer in vellum. The bottom Birthday sentiment was cut out of the same holographic cardstock using the Simply Sentimental: Birthday Coordinating Die Set.

I stamped the same font style birthday sentiment on the inside using the 4×8 Simply Sentimental:Birthday stamp set in a light gray ink. I finished off the card with a few Silver Sparkle Glitter Rhinestones and Golden Glass Glitter Rhinestones. This card was a little more time consuming than the rest but lots of fun to make!

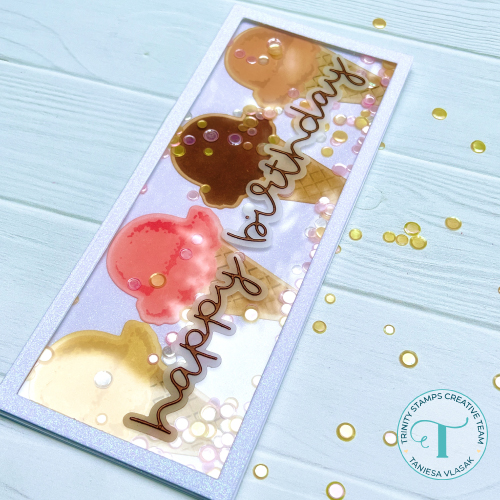
Little Layered Ice Cream Cone Slimline Shaker

For this card I used my distress oxide inks and the Little Layered Ice Cream Cone stencil (and coordinating die) to make some yummy ice cream cones. I cut out the ice cream cones and layered them on some white glitter cardstock. I had to trim the bottom of the cone just slightly to fit. I cut out a frame using the Slimline Modern Embossed Die Set from the same white glitter cardstock and used that to make a shaker front. For the confetti I used the new Seashore confetti mix along with Strawberry Ice confetti and Rock Candy Confetti. The Happy sentiment is from the Simply Sentimental: Happy Coordinating die set and the Birthday is from the Simply Sentimental:Birthday coordinating Die Set

New Freebie Die, Bitty Botanicals 1

This last card uses the brand new freebie die from Trinity Stamps. This die set comes free with any order totaling $25 or more. There is a series of 4 dies and you can always check on which one is shipping by looking at our sales and promotions page HERE. This card was made using only the dies in this bitty set along with the 4 bar Card and Envelope builder die set and the 4×8 A sentiment for almost anything stamp set. I added a bit of ink blending along the edges of the cut out dies and some Bubble Blower baubles (my favorite embellishment from Trinity Stamps)

There is so much more to see from this brand new release. Visit the Trinity Stamps Shop to see all of the wonderful new release items and head over to the Trinity Stamps Blog to participate in a huge blog hop with fabulous guest designers and of course prizes!

Crafty Hugs,

Taniesa

Trinity Stamp’s Winter Release is here!

Trinity Stamps Blog Hop Banner

I am So excited to tell you that Trinity Stamps has finally released another fabulous line of Stamps, Dies, and LOTS of embellishments. There are also lots of new shop items added (plus more coming this week!).

If you don’t already know, we started the new release off with a blog hop on Friday and the fun is still happening! If you are coming to my blog for the first time be sure to click the links at the bottom of my post to go through both days of blog hop inspiration. Don’t forget to comment along the way because, friends…. there is prizes, FIVE of them. All of them are worth at least $25 (and some a lot more) Winner will be announced HERE on November 10th!

Now on with the show…

Today I am playing with our new Magical Wizards stamp set, a few stamps from the Wizard Friends set, Magical sentiment stamp set, magical sentiment die set, and the stars from the stand-alone castle builder die set. I am also incorporating some sentiments from Caffeinated Sentiments.

I was inspired by a Starbucks gift card I found. I thought it was absolutely perfect to pair with the Trinity Magical Wizards + Series.

So I started coloring the wizard’s head from Magical Wizards, and then one of the robes from wizard friends. I did some simple copic coloring and because I didn’t want white showing around my image, I opted to fussy cut instead of die cut. I cut the body off except for a piece that will glue behind the robe. I attached the two pieces with my Nuvo Smooth Precision glue and voila! Wizard is (almost) card ready!

Taniesa Vlasak for Trinity Stamps Winter Release9

I had made a green background by blending some various shades of Distress Oxide ink and then to make a floor to ground our character, I blended some ink into cardstock then ran it through a WRMK woodgrain embossing folder. I tried doing this with markers and drawing the floor in but it was taking away from my wizard scene too much so this was a much more subtle option.

Taniesa Vlasak for Trinity Stamps Winter Release10

I put some foam tape on the back of the wizard and set him and the floor piece aside.

Then came the embossing. I took several colors of WOW embossing and embossed all of the star, sparkle, and shine images from all three sets (Magical Wizards, Wizard Friends, and Magical Sentiments). As I was making my way through the swirl of stars and swooshes, I die cut different sizes of hearts from the Castle Builder die set.

Taniesa Vlasak for Trinity Stamps Winter Release11

once all the stamping and embossing was done, I took a damp rag and went along the stary magic trail and gave it even more texture. There were a few spots that still needed something so I took my embossing pen and added some dots here and there.

Taniesa Vlasak for Trinity Stamps Winter Release2

I added a sentiment from Caffeinated Sentiments, one of my personal fave… it was so appropriate given the fact a gift card was going inside.

Taniesa Vlasak for Trinity Stamps Winter Release3

I added a little Midas Touch Aqua Shimmer pen by Nuvo to the red part of the robe the wizard is wearing and I even embossed his wand gold.

Taniesa Vlasak for Trinity Stamps Winter Release1

Such a fun card right. I made the card 3×6 to fit these gold envelops I picked up at my local stamping store. I like the fun size, a nice change from the A-2 cards I usually make… But wait, there’s MORE!

Taniesa Vlasak for Trinity Stamps Winter Release5

Remember about that gift card I was telling you about? Bam! you’re magical! how perfect is THAT! I did a little stamp surgery so that I could make the sentiment ” Coffee and friends make a magical blend) In the Caffeinated sentiments, there is one that says Coffee & Friends make the perfect blend. All I had to do was snip off the make and the blend.

Taniesa Vlasak for Trinity Stamps Winter Release7

I stamped the first part directly to the card and the make a & Blend was stamped on a strip of white cardstock and then cut. I die cut the two layers of the magical sentiment die set (you can also use the stamp set to stamp in that shadow layer die) I glued those pieces to a very simple gold glitter pocket I made to hold the card.

Taniesa Vlasak for Trinity Stamps Winter Release6

Starbucks usually has fun seasonal and celebratory gift cards and so does a lot of other places, especially this year. How much fun is it to receive a gift inside a handmade card (which is a gift also!) Now is a great time to make a few of these types of cards to have on hand when you need to gift a card to someone.

Taniesa Vlasak for Trinity Stamps Winter Release8

I hope you enjoyed my little card today AND this awesome blog hop! These girls blow me away with their talent and I couldn’t be more excited to work with them all!

I am the last stop on the hop today BUT if you haven’t stopped by every blog on the hop today I have included a list below. Don’t forget those Monday Blog Hop stops either, more chances to win, more inspiration to be had!

blog graphic for monday bloggers

Monday Blog hop List

Taniesa Vlasak

(aka ME, you are already here, MUAH!)

& because I don’t want you to miss a thing…
here is the list from Friday’s hop!

Trinity Stamps blog post can be found HERE and the winner announcement will be posted HERE on November 10th!

Thank you for stopping by today! When you comment below I would love to know what you thought of our blog hop AND as an added bonus for making it this far, I have a $15 Trinity Stamps Gift certificate especially for one of YOU! YAY, MORE PRIZES! So come on and say HI, I know I haven’t blogged in FOR EVER, but now that you see all our great stamps you know why 🙂

Taniesa Vlasak | TheCraftyPickle.com

Trinity Stamp’s GRAND OPENING blog hop!

Hi Friends!
Whew, It has been a very LONG time since I last posted here on the Crafty Pickle blog! Some of you might have been wondering where I went off to? Am I still crafting? Am I still BREATHING? LOL well, I assure you I am in fact breathing, however, I haven’t been crafting near as much as I would like but all for a really good reason! I have been busy preparing to launch a brand new company…

New Release! New Stamp Company! www.trinitystamps.com

Trinity Stamps has been on my heart for years and finally… today is the BIG day! It’s our official grand opening! We are launching with 9 new stamps and 8 matching dies! If you haven’t already seen the entire release you have to check it out at http://www.TrinityStamps.com.

Lady Liberty: A 3x4 stamp set from www.Trinitystamps.com

Hello Sweet Friend: a 4x6 stamp set by www.trinitystamps.com

Affiliate links used where applicable at no cost to you. Thank you for supporting this blog!

 For today’s blog hop I created a project with the adorable 3×4 Lady Liberty stamp set. I also snuck in a sentiment from the Hello Sweet Friend stamp set. I thought the scripty font fit well with this little lady!

Taniesa Vlasak for Trinity Stamps 5

I colored her with some aqua copics, I thought it was fitting with it being Trinity Stamps Signature color! I used BG10, BG11, BG23, and a little bit of BG49 in the darkest shadows. Coloring this image was a breeze! Davina, the artist behind this particular stamp has made it very easy to color, She has drawn all of the folds and pleats for you. It made this very enjoyable to color! I can’t wait for the 30 day coloring challenge (which starts tomorrow! YAY!) so I can color the rest of the Trinity Stamp’s new release!

Taniesa Vlasak for Trinity Stamps

After I colored Lady Liberty and cut her out using the matching Die… I created a background scene by cutting some cityscape dies I had on hand and I used distress oxide inks plus a stencil to do some fun fireworks in the background. After coloring the background of where the fireworks were going to be, I laid down the stencil and used some Bo Bunny glitter paste. I love how sparkly everything is!

Taniesa Vlasak for Trinity Stamps 3

Once the background was dry, I added some rhinestones as well as some stars and other confetti from the Trinity Stamps Lady Liberty confetti mix. I love all the cute tiny stars, especially the 4 point ones!

Taniesa Vlasak for Trinity Stamps 11

To finish it all up I stamped the Missing You sentiment in Versamark ink and heat embossed in white. Everything was accented by a little silver glitter paper. I think it tied it all in nicely, don’t you?

I also created a fun birthday coffee card using the Coffee with Character stamp set and dies  as well as the caffeinated sentiments stamp set for the Coffee Lovers Blog hop. That post can be found on the Trinity Stamps blog HERE but here is a photo of the card project.

Frappy Birthday to you by Taniesa Vlasak for Trinity Stamps www.trinitystamps.com

Frappy Birthday to you by Taniesa for Trinity Stamps www.trinitystamps.com


To celebrate the Trinity Stamps grand opening, we are having a fantastic blog hop packed with amazing talent & inspiration. So please hop along with us to be inspired! If you began with my blog today you can start at the beginning HERE! Otherwise, head on over to the blog of the very Talented Thi Lam!

Be sure to visit each blog & leave a comment to be entered to win!!! We are giving away a $50 gift card to the Trinity Stamps store, a $20 gift card to Therm-o-web, $25 Ellen Hutson Gift Card, $25 Simon Says Stamp Gift Card, 2 ink pad bundles from Imagine Crafts, and a $25 gift card to WOW Embossing. There are plenty of chances to win one of these fantastic prizes. Thank you so much to all the Sponsors!!  The winners will be posted on our blog on June 5th.

Here is our fantastic lineup:

Trinity Stamps

Amy Tsuruta

Carly Minner

Jo Ann Danchik 

Jodi Collins 

Kelly Latevola 

Lisa Cisneros

Melissa Bickford 

Shanna Slater

Taniesa Vlasak *you are here*

Thi Lam

Thank you so much for stopping by to see our fantastic release & inspiring blog hop. Be sure to visit the store to pick up the items on your wishlist!


Thank you so much for stopping by. I really hope you love our new company and new release as much as I do. I look forward to seeing what all of you create with Trinity Stamps!

Happy Hopping!

Taniesa Vlasak | TheCraftyPickle.com

My *Favorite* Essentials by Ellen brand product!

Hi Friends!

It is one of my favorite companies anniversary, Ellen Hutson is celebrating 11 years in business (YAY! Congrat’s to Ellen and her wonderful and kind staff!) and to celebrate there is a week-long blog hop! If you are already hopping along you will find the next person in the hop at the bottom of the post (as well as the rest of the talented ladies inspiring you today!)

So for our project we are all picking our favorite Essentials by Ellen product and sharing that with you. Let me tell you, Picking my favorite product is like picking a favorite child it simply cannot be done. So, I am cheating a little and sharing one of my favorite stamp sets (and all the cute additions that have come to the essentials by Ellen line that expand it’s use!) All Inside! It all started with my love of this stamp set (and matching die that has cut outs for his hands!):

Here is a look at the All inside stamp set and it’s matching die:

I also used the Bear Ware Stamp set (flowers) which you can see here:

There is also a matching die set to Bear Ware:

And here is my first project using this cute bear!

I kept this card fairly simple. I stamped the floral bunch and added extra flowers to make the bouquet even bigger. Then I inked up the bear, wiped off the excess ink where the flowers were in the way (you could mask this instead if you wanted) and stamped him down. I used versafine sepia ink for the stamping but for the coloring of all the images, I used my Daniel Smith watercolors. The sentiment came from another Essentials by Ellen stamp set called “Lovely“.

Next card I did uses the same All Inside stamp and die set but this time I incorporated the Bear Ware 2 stamp and die set as well as the Warm Fuzzies stamp set:


I also grabbed a couple of stamps and dies from the Leading Ladies: Cozy Lady stamp and die set (coffee cup and leaves). You can find those by clicking HERE.

Here is the Autumn project I did using these fun stamps and dies:

All my stamping and coloring was done with Distress Oxide inks, Versafine Sepia ink, and the scarf and coffee cup were painted with Daniel Smith watercolor paints. I stamped the Happy Fall lightly in the upper corner using the Delicata Golden Glitz ink. and accented everything with some Gold Stickles.

If that wasn’t bear-cuteness-overload for you, here is the new Bear Hugs die. The same adorable bear as “All Inside” but made bigger and with stitching holes so you can make your own felt plushie or other adorable projects!

Here is this new Favorite die of mine!

and here is a couple of plush ornaments I made with the die.

These cute bears were all made with scraps of fabric and felt that I had. Don’t limit yourself just to felt with this guy, That white fuzzy fabric was perfect for a white polar bear! I gave her a little MFT Snowflake to hold while the cozy little brown bear got dressed up with a scarf and a Starbucks gift card that I found in the shape of a leaf. How perfect was that! This die has started a felt stitching addiction in my house and I am hoping that Ellen carries more in the future!

Thanks so much for stopping by! I hope you were inspired to create some fun Bear projects! Next on the blog hop is the talented Nichol!

Here is the entire blog hop line up for Sunday 11/19/17

Karolyn Loncon
Brandi Kincaid
Sandy Allnock
Taniesa Vlasak <— You are here 🙂
Nichol Spohr

See you all again Soon!


Season’s Tweetings, Friends!

Hi Crafty Friends!!
   The Honey Bee Stamps Holiday Release is now available in the store. To celebrate the new release, we are having the Season’s Tweetings Blog Hop. So please get comfy and hop along with us!
 Forgive me for the short blog post today as I just had surgery on my right hand (makes typing a bit more difficult than I thought it would).  I do have a few projects I completed using the new Honey Bee Stamps Holiday release that I hope will inspire you.
This first project uses the new Come Let us adore him stamp and new rainbow crystal embellishments.
This next project features the  Large Ornament and Snowglobe die!
 The final card today is using the same large ornament and snow globe die but this time I made a shaker card filled with the new snow shaker mix and the cute little bird and snowbird from the Seasons Tweetings stamp set!
I hope you found these projects inspiring! All new products are available in the Honey Bee Stamps shop —–> Here! (affiliate links used at no cost to you. Thank you for supporting this blog!)
  Be sure to visit each blog & leave a comment to be entered to win!!! We will be giving away a $50 gift card to the Honey Bee Stamps store. The winner will be posted on our blog Monday, November 13th.
The Blog Hop lineup is:

Boo Bees Card!

Hi Friends!

Stopping in to share a super fast Halloween card that is sure to get a few giggles!


The Honey Bee Stamp set that I am using today is the Busy Bee’s Stamp setDisclaimer: Affiliate links are used in this post at no additional cost to you, Thank you for supporting my blog!

 I also used the Bee stamp from the Bee-YOU-Tiful sentiment set and the “boo” letters came from the older Hand Lettered alpha alphabet which is now retired (but as I am writing this, it is still available in the honey bee stamps shop, HERE!)

Here is a close up look at today’s card.

This is a one layer card. To get the speech bubbles on either side of the card as well as the eyes, I used paper punches and masking paper. First I masked off the bee’s side and pressed the masks down where I would want them. Then I took Black Soot Distress Oxide ink and with a blending tool covered that section of the card completely. I did one full layer (then had to run one of the kids to their activity) then did a second layer. I noticed I got a really nice coverage this way.

I removed the existing masking paper and then stuck a strip of post it tape down the black side so that I could work on the light yellow shading of the bee’s side. I stamped three of the Busy Bees along with some bee-trail dots with Versafine onyx black ink (I forgot I was copic coloring at this point so if you color with alcohol ink you will want to use an alcohol safe black ink pad like Memento Tuxedo Black ink. If you color with watercolor or any other medium versafine is my go-to black ink)

I colored in my little bees with some copics in shades of Yellow and Neutral greys for the black of the bees. I used a little BG11 (Moon White) for the bottom of the wings and then coated all of the wings with the Nuvo Clear Glitter Gloss brush pen. This gave a subtle shimmer.

I placed the speech bubble mask down above the bees and with a finger dabber went around the bubble as well as around the white areas around the bees and card with the lightest shade in THIS ink pad (Ombre butter to orange by Hero Arts) Then I removed the mask and I stamped the word Bee from the Bee-YOU-Tiful stamp set using Nuvo Clear ink. To get the S i took THIS embossing pen and connected the S freehand. I embossed this with the Nuvo Gold Enchantment embossing powder. On the other side I stamped the BOO using the Hand lettered alpha in the same clear ink and embossed with WOW black  glint glitter embossing powder.

I found that I got a few spots of stray embossing powder and a ink smudge. Rather than start the card over again I lightly sanded those spots using this Tombow Sanding Eraser and then if there were any marks leftover I covered it with my white gel pen.

You can stamp the inside of the card with “HAPPY HALLOWEEN” by using the Honey Bee Stamps “Hey, Pumpkin” stamp set

That’s it. This card is super simple and comes together in less than 10 minutes! I think it would be a fun card to use for breast cancer awareness month as well! I hope I was able to inspire you and give you a little giggle with my Boo Bees card today!

Thanks so much for stopping by!

A *BRIGHT* idea using Honey Bee Stamps! World Cardmaking Day Blog Hop

Hi Friends!

 This is one of two posts I have for you today! If you are looking for the KatScrappiness.com Blog hop Click —>HERE<—Affiliate links are included in this post where available at NO cost to you. Thank you so much for supporting this blog!

Happy World Cardmaking Day!

You should have arrived here from Nichol’s Blog! If you get lost you can always go back to the beginning —> HERE <—

 I am so excited to be participating in a super fun blog hop featuring Chibitronics and Honey Bee Stamps!

Interactive cards are always fun but there is just something magical about a card that lights up. This fun card was inspired by my sweet Niece who has an adorable black Kitty named Oreo. I am going to send it to her with a few Halloween treats, I hope she loves it!

To start I took a piece of the brand new Hey, Pumpkin stamp set from Honey Bee Stamps and stamped it on some white cardstock with some Copic Safe ink. Then, I blended some distress oxide ink over the stamped image with Antique Linen, Fossilized Amber, Spiced Marmalade, Fired Brick, Seedless preserves, and Faded Jeans to get a setting sun/ twilight kind of look. On this same blended ink background, I extended the branches a bit of the stamped image trees and added dots of random fall copic marker colors to give the effect of leaves. I blended in some Vintage photo Distress Oxide ink below the trees over the stamped image.

Then I stamped the same image onto two more pieces of cardstock as well as stamped out the little witch hat as well. I colored the images with copic markers first and then did some further shading with my colored pencils. I used my Faber-Castell Polychromos colored pencils here but any brand would work well over copics.


I assembled and glued the colored and fussy cut pieces together and then glued the background piece and main image piece together. After the glue was completely dry, I took a sharp craft knife and cut a Jack-O-Lantern face into the pumpkin. I glued a scrap of heavy vellum behind the Jack-O-Lantern’s face so that it would defuse the lights a bit. I stamped a little leaf from the Honey Bee Stamps Seasonal Sweeties stamp set as well as the “Push Here” text using the KatScrappiness.com Interactive Card Instructions mini stamp set. Both were stamped using the Nuvo Clear Mark embossing ink pad and then  heat embossed with WOW Rich Pale Gold embossing powder. I also stamped the You Are Purrfect in the same way and made a little flag banner that I glued to the top of the card panel. I placed two foam dots underneath so that it would stay with a rippled look.

With the card panel finished all that was left was Chibitronics fun! For the first time I used the Chibitronics effects stickers. I knew that I wanted to have the pumpkin appear to have a candle inside that flickers. It turned out that the Twinkle effect sticker mixed with one Yellow and one Orange LED sticker was the perfect combination. I took another piece of cardstock cut to the same size as my card panel and stamped the main image in exactly the same spot. I drew out where all my stickers would go as well as the copper tape. Once I had the tape down I used my teflon bone folder to really get the tape smooth and then put the stickers on top, also burnishing down the edges to get a really good contact. There wasn’t anything super special about this method and I simply followed THIS PRINTABLE that was available on the chibitronics website. I highly recommend practicing at least once with your circuit plan. Copper tape is really inexpensive (Check HERE for extra tape that is really reasonable) and worth practicing instead of doing it directly on your project first and not getting it right (Ask me how I know THAT one lol)

Once I was happy with how the layout of my Circuit was. I put a double layer of foam tape around my battery as well as the rest of the card. I did not cover the stickers at all with the foam tape however. Now my Jack-O-Lantern has a realistic candle lit glow. How fun is that! Check out the clip below to see it in action!

I hope you were inspired to light up some of your cards or projects! Your next stop on this bright blog hop adventure is the blog of Tiffany Au! If you get lost head on to the Honey Bee Stamps blog to see the full list!

Thanks for joining me on World Cardmaking Day! Be sure to comment on all of the blog posts for your chance to win a Honey Bee Stamps $25 gift certificate or a Chibitronics Starter Kit! Also, Honey Bee Stamps is having a 20% off sale TODAY 10/7/17 ONLY! Use Code WCMD20 at checkout! Now is a great time to stock up on your cardmaking essentials and pick up some new release stamp and dies too! Click —>HERE<— to shop now!

World Cardmaking Day Challenge with KatScrappiness.com!

Hi Friends!

This is one of two blog posts for today. 

 If you are looking for the Blog Hop post that features Chibitronics and Honey Bee Stamps click  —>HERE<—


Thank you so much for joining in on the World Cardmaking Day fun with KatScrappiness.com!

Today all of the designers are participating in a fun blog hop with their take on the first Kat Scrappiness Mood Board Challenge! There will be lots of prizes to be won and several chances to win. Make sure you comment on all the designers blog posts today for several chances to win and then make a card (or any project) inspired from our mood board and link up to the Kat Scrappiness blog before Monday October 9th for a chance at winning one of several prizes! Winners will be announced on that blog post Tuesday October 10th by Noon PST. Don’t forget you can get 15% off in the KatScrappiness.com shop today only! Use Code “IMAKECARDS” at checkout!

Here is the Mood Board that is apart of the challenge and what has inspired my project today!

And here is my card inspired by the images above:

I just love the adorable layered owl die from Katscrappiness.com so I decided to gather some paper scraps I had leftover from the 6×6 paper collection “Hello Fall” By echo park. I absolutely love these patterned papers and it fit so well with today’s challenge!

I added some Distress oxide ink for added dimension as well as some eyebrows with a black marker. I also darkened the center of the eyes with a black glitter pen. Then I pieced everything together for the little owl.

I took several pieces of patterned paper and a piece of vellum and cut different size Ovals from the Kat Scrappiness Never ending Oval die set and layered them together with a mix of doubled up thick cardstock spacers or foam tape in between. This allowed room to place little leaves and sequins in between the layers as well as a hand cut branch that I colored with Distress oxide ink.

I hope you have been inspired by my little owl card today! Below is the list of all the designers participating in the blog hop, Make sure you stop by and see what project(s) they have to inspire you today!

Kat Scrappiness Designers (Blog Hop Links)

Taniesa

Maria

Hannah

Heidi

Jess

Angeline

To go to the Kat Scrappiness Shop Click HERE and save 15% off your total purchase today (10/7/17) only! To go to the Mood Board Challenge blog post click HERE and enter your card for a chance to win fabulous prizes!

Thanks for stopping by… Happy World CARDMAKING Day!

Hop for Hope featuring products from Ellen Hutson

Hi Friends!

Happy first day of October! It’s time for cozy sweaters and all things Pumpkin…. but also it is time for breast cancer awareness.

As you may have seen before, Ellen Hutson has an exclusive Courage stamp and die set that helps in the fundraising efforts to find a cure for breast cancer. Aside from the stamp set being absolutely beautiful, $25 of every stamp/die set combo purchased gets donated to the Breast Cancer Research Foundation. If you don’t already have this gorgeous set I encourage you to get one before they are gone for good.

(affiliate links used where available at no cost to you. Thank you for supporting my blog)

Today the Ellen Hutson design team and friends are gathering together as a little surprise for the wonderful women who have committed so much time and effort into this stamp and die set and who have personally been affected by this horrible disease. I am honored to be among some of the most talented designers in today’s blog hop. If you have missed any of their post you can find the blog hop list at the bottom of this post Or start from the beginning at the Ellen Hutson Classroom.

I have two cards to share. This first card uses the Courage stamp set as well as the Essentials by Ellen Bohemian garden stamp set. I thought that the Flowers in both sets paired nicely with each other.

I Stamped various flowers from both stamp sets using different colors of Distress Oxide inks. Then I misted the entire panel with water and let dry. I repeated this about 4 times with different layers. Once the florals were done I added a bit of texture with a script stamp from Penny Black.

I stamped the Courage sentiment from the stamp set in versafine onyx black ink and once dry I misted the card with sheer shimmer spray which you can sort of see in the photo but in person, it’s just the right amount of shimmer. I added some sparkling clear sequins and then mounted on a piece of pink cardstock then to my white card base. This card was inspired by a video I watched by Julie Ebersol using the Courage stamp set. you can see that Video HERE.

The next card I have uses the Essentials by ellen bed of roses die and the Courage stamp and die set.

I cut the rose panel out of some shiny shimmery pink cardstock and mounted that on a piece of dark pink cardstock. I took the ribbon die and cut that out of some DCWV pink glitter paper and attached that to the rose panel with some foam tape.

For the vellum sentiment strip I used some Essentials by Ellen heavyweight vellum and stamped the sentiment with versafine Onyx black ink. I sprinkled some clear embossing powder on top and heat set. The torn vellum strip is folded and glued down on the back side of the card base.  Once completed I added the panel to a white card base.

I hope you enjoyed my cards for today and got plenty of inspiration from everyone participating in the blog hop! For a closer look at the Courage stamp set, click HERE to take you to the Ellen Hutson store.

I am the last stop on the Hop for Hope but if you missed anyone you can see the full list of participants below.

Taniesa Vlasak (You are here)
 
See you all again soon!

Happy Stamptember! HBS and SSS Colab: Remarkable You

Hi Everyone!

I am quickly stopping by to share a few cards I made using the Honey Bee Stamps and Simon Says Stamp Stamptember Collaboration set: Remarkable YOU!

All of the cards are hand painted using Daniel Smith Watercolors which are now available at Simon Says Stamp and I stamped the sentiments using the new Remarkable you stamp set. There is also a die set available and you can find that HERE. (affiliate links used where available at no charge to you)

For the card with the painted spots I used some of the Leaf stamps that are in the new Honey Bee Stamps Bushel and a Peck stamp set. You can find this at Simon Says Stamp or in the Honey Bee Stamps shop HERE.

On the card above I used some shimmery watercolor over my watercolor painting… the fine tec rainbow and gold pallets are my favorites! Check them all out HERE.

I love the soft green of these cards. I used the leaf again from Honey Bee Stamps Bushel and a peck stamp set to create the stem.

Thank you so much for stopping by! Make sure you check out all of the Stamptember items in the Simon Says Stamp shop HERE.

Have a great weekend!