
Hi Fellow Project Lifers!
Today I am working backwards a bit and showing you my week 24. This week I had a bunch of fun playing with some brand new dies from Die-Namites! You have seen in previous posts that I am very fond of my silhouette die cutting machine, but the one thing I find that I have a hard time with is getting really good intricate cuts from the machine. Thats why these dies rock! There is so much detail that brings a little wow to your project life without bulk. To cut my dies I use an Epic 6 by lifestyle crafts, but any manual die cut machine will work.
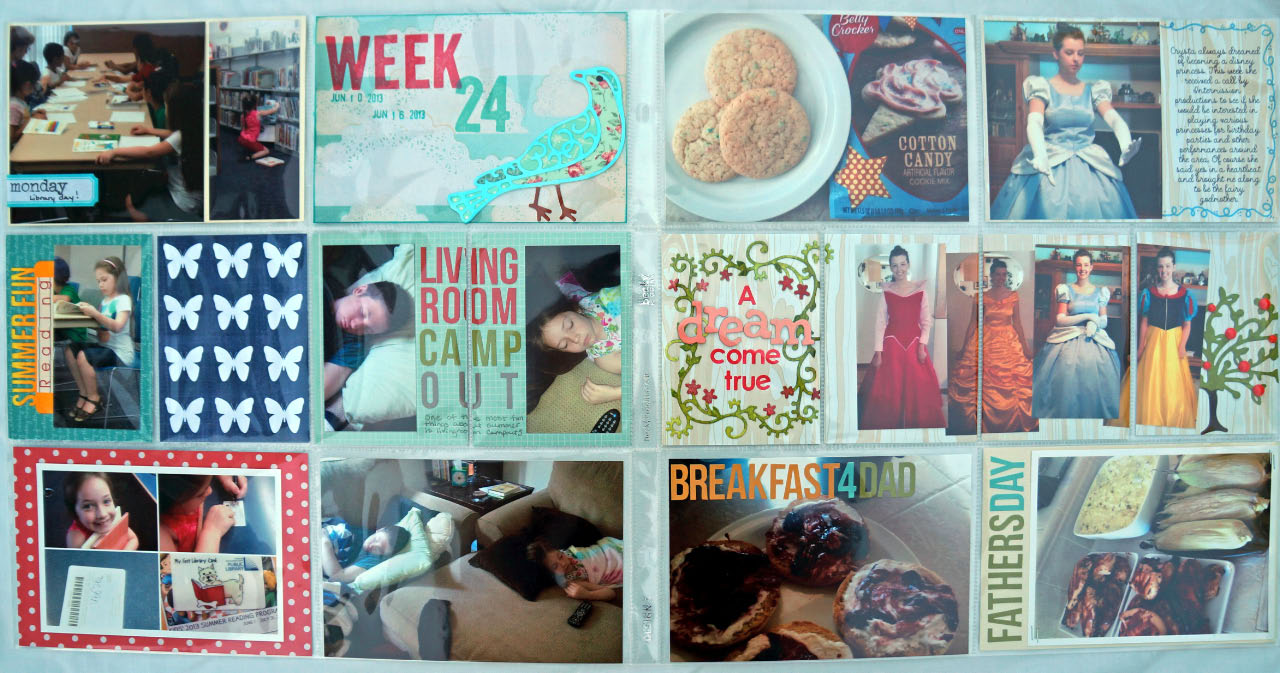
Here is the full two page spread:
And one of just the left hand side:

For my title card I used the Die-Namite’s Scrolly bird design. I originally cut it from a heavy white cardstock and then colored it with a light blue copic marker. I took a piece of cream cardstock and attached various strips of washi tape. I fussy cut the different pieces of washi to fill in the different parts of the bird. It really helped the die cut pop and didn’t add any additional bulk to my pocket. I LOVED the result.
 Here is the second page of my layout:
 For the second half of my project life layout I decided to use the center portion of the page as one 4×12 strip just cutting it in 3×4 sections.
 I used two different Die-Namites dies for this section. The first was the Floral Corner die. I cut two of these corners out of heavy watercolor paper and then played with some greens and pink watercolors. I put the two together to make a little frame around the title. The watercolors add a little more than just coloring with a marker or cutting from cardstock.
 The second die in the last pocket was the Flowering Tree die. I cut this from heavy white cardstock and colored in with copic markers. I added red enamel dots on the tree to mimic apples. I thought this was fitting being next to Snow White. Cutting off the very edge of the die makes the section of the layout flow a bit better.

My oldest daughter had a wonderful opportunity present itself, to be a disney princess for a local production company, these photos of her are her trying on the different costumes.

To check out more about the Die-Namite Dies I have used today and more, please visit the site HERE. A little birdie told me there is some amazing new stuff coming out SOON!
Looking for more project life inspiration? As always, I am linking up with The Mom Creative who shares her album every week and links up with several other talented project lifers.

Have a great week everyone!
Happy Crafting!

great pages, really like how the cut title and photos in the middle rows look purposeful to your design and not just like they were chopped in half. hope that makes sense?! 🙂
It does, Thank you!! Sometimes the pockets are great but sometimes I need more space, cutting the design in half or a photo in half usually works out well for me.
Cool pages and the dies cuts are fabulous!
I loved how you used the die cuts!
Love the scrolly bird and the tree! Very pretty elements to add to the page. I love the photos of the living room camp out, and your daughter getting all dressed up too. Who doesn’t dream of being a princess?! x
Beautiful backing for that bird! Great spread!
Cool pages! Love the butterfly card.
Marie, the butterfly card was one I cut in half and was from the June Scraptastic Project life kit. Check them out if you have a chance!
very lovely inspiring work x