

Hi Friends!
This is one of two posts I have for you today! If you are looking for the KatScrappiness.com Blog hop Click —>HERE<— Affiliate links are included in this post where available at NO cost to you. Thank you so much for supporting this blog!
Happy World Cardmaking Day!
You should have arrived here from Nichol’s Blog! If you get lost you can always go back to the beginning —> HERE <—
I am so excited to be participating in a super fun blog hop featuring Chibitronics and Honey Bee Stamps!

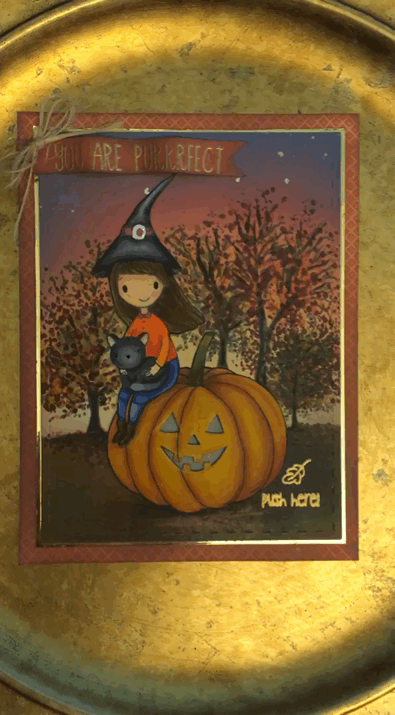
Interactive cards are always fun but there is just something magical about a card that lights up. This fun card was inspired by my sweet Niece who has an adorable black Kitty named Oreo. I am going to send it to her with a few Halloween treats, I hope she loves it!
To start I took a piece of the brand new Hey, Pumpkin stamp set from Honey Bee Stamps and stamped it on some white cardstock with some Copic Safe ink. Then, I blended some distress oxide ink over the stamped image with Antique Linen, Fossilized Amber, Spiced Marmalade, Fired Brick, Seedless preserves, and Faded Jeans to get a setting sun/ twilight kind of look. On this same blended ink background, I extended the branches a bit of the stamped image trees and added dots of random fall copic marker colors to give the effect of leaves. I blended in some Vintage photo Distress Oxide ink below the trees over the stamped image.

Then I stamped the same image onto two more pieces of cardstock as well as stamped out the little witch hat as well. I colored the images with copic markers first and then did some further shading with my colored pencils. I used my Faber-Castell Polychromos colored pencils here but any brand would work well over copics.

I assembled and glued the colored and fussy cut pieces together and then glued the background piece and main image piece together. After the glue was completely dry, I took a sharp craft knife and cut a Jack-O-Lantern face into the pumpkin. I glued a scrap of heavy vellum behind the Jack-O-Lantern’s face so that it would defuse the lights a bit. I stamped a little leaf from the Honey Bee Stamps Seasonal Sweeties stamp set as well as the “Push Here” text using the KatScrappiness.com Interactive Card Instructions mini stamp set. Both were stamped using the Nuvo Clear Mark embossing ink pad and then heat embossed with WOW Rich Pale Gold embossing powder. I also stamped the You Are Purrfect in the same way and made a little flag banner that I glued to the top of the card panel. I placed two foam dots underneath so that it would stay with a rippled look.

With the card panel finished all that was left was Chibitronics fun! For the first time I used the Chibitronics effects stickers. I knew that I wanted to have the pumpkin appear to have a candle inside that flickers. It turned out that the Twinkle effect sticker mixed with one Yellow and one Orange LED sticker was the perfect combination. I took another piece of cardstock cut to the same size as my card panel and stamped the main image in exactly the same spot. I drew out where all my stickers would go as well as the copper tape. Once I had the tape down I used my teflon bone folder to really get the tape smooth and then put the stickers on top, also burnishing down the edges to get a really good contact. There wasn’t anything super special about this method and I simply followed THIS PRINTABLE that was available on the chibitronics website. I highly recommend practicing at least once with your circuit plan. Copper tape is really inexpensive (Check HERE for extra tape that is really reasonable) and worth practicing instead of doing it directly on your project first and not getting it right (Ask me how I know THAT one lol)


Once I was happy with how the layout of my Circuit was. I put a double layer of foam tape around my battery as well as the rest of the card. I did not cover the stickers at all with the foam tape however. Now my Jack-O-Lantern has a realistic candle lit glow. How fun is that! Check out the clip below to see it in action!
I hope you were inspired to light up some of your cards or projects! Your next stop on this bright blog hop adventure is the blog of Tiffany Au! If you get lost head on to the Honey Bee Stamps blog to see the full list!
Thanks for joining me on World Cardmaking Day! Be sure to comment on all of the blog posts for your chance to win a Honey Bee Stamps $25 gift certificate or a Chibitronics Starter Kit! Also, Honey Bee Stamps is having a 20% off sale TODAY 10/7/17 ONLY! Use Code WCMD20 at checkout! Now is a great time to stock up on your cardmaking essentials and pick up some new release stamp and dies too! Click —>HERE<— to shop now!


Wow–your coloring is awesome and so fun that the pumpkin lights up–perfect for your niece.
What a beautiful card… your coloring is amazing and I love the lit jack-o-lantern!
wow the colors on this card are stunning – just eye-popping:)
Love how you made the trees, so creative!
Absolutely beautiful card. The scene is awesome.
This may be my favorite lighted scene yet….a jack ‘o lantern. LOVE it! AND happy World Cardmaking Day…..it
is my favorite holiday. 😉
Your little girl is adorable! And the background is awesome especially lighted up. Thank you for sharing your creativity.
Adorable card. Your coloring is AAHHMazing! What a fun interactive card with the lighted Jack0Lantern. Love it.
Stunning card. I love the trees and the colouring.
So cute! Love this card.
Very cool! Happy World CardMaking Day!
Absolutely adorable, and fabulous coloring! Love this sweet card! So special with the fun light-up Jack o’ lantern face!
Love this card and I love that the pumkpin lights up! Perfect for Halloween.
Beautiful, the coloring is phenomenal!
So cute!
Gorgeous cards and the lights really add so much fun!
Twinkle!!! Love it.
That’s an adorable Halloween card, your niece will love it for sure !
This is wonderful! Your card is fabulous and adding the lights is just, wow!! Thank You! Happy World Cardmaking Day!!
This is super cute and I love that you created a jack-o-lantern!! Your coloring is awesome and this interactive card is so fun! I would LOVE to get a card like this!!
Adorable card for just about any body. It is so cut and I love the press here button to turn the lites on.
Wow, everything about this card is absolutely wonderful. The design, coloring, color palette, just wonderful.
Wow! Awesome and super cool Halloween card!!! Love it!!!
Oh this is so cute!
Very BRIGHT idea! Love your light up jack-o-lantern and Fall scene. How did you get the light to flicker?
Hi Kim! Thank you for your kind comments. To get the lights to flicker I used the Twinkle effects sticker from the Chibitronics effects sticker pack. The twinkle gave the perfect candle flicker. I used a yellow and a orange led sticker one just above the nose and one just below the mouth 🙂
Love the coloring on this card. Great job.
Love the background and your coloring!! Amazing job!
WOW that was amazing!!! First time I see your amazing creations 😍😍😍