
Happy Wednesday everyone! Today I am going to show you how I have tackled a problem I had been having for a while. For 14 years I have accumulated A LOT of crafting supplies. I have a pretty good memory of what I have, but when it comes to a few things If i don’t see it I wont use it, you know that whole out of sight out of mind thing. Also, I can’t tell you how many times I have purchased duplicates of washi, ink mist, stamps, etc… So I took a binder I had purchased from staples a while back for another use (it’s about 8×10) a great size for on my desk but also to throw in my bag if I happen to go out shopping.
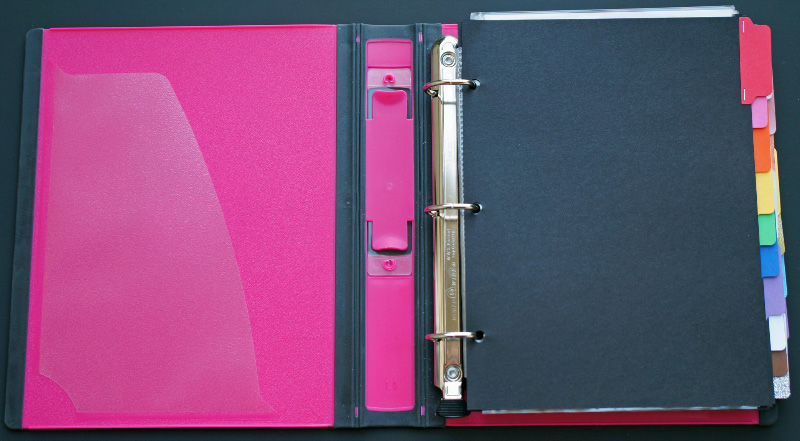
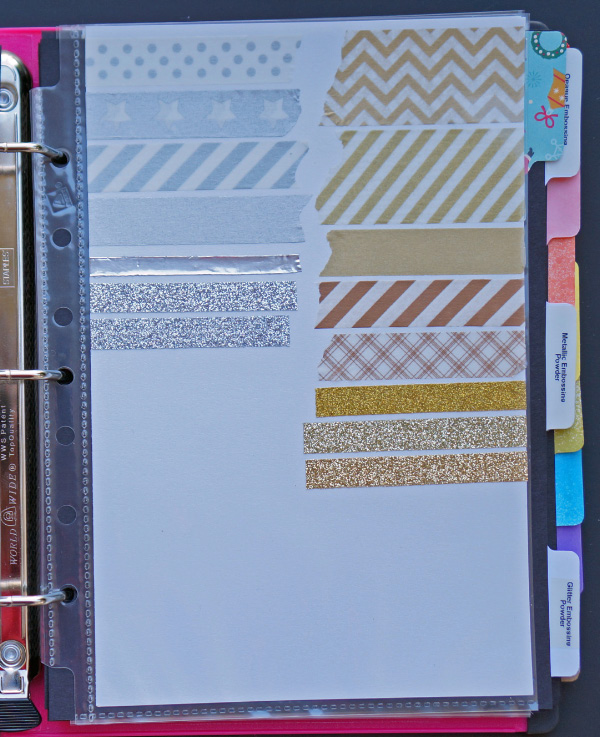
I made my own dividers (the ones that were sized for the binder were too small compared to the page protectors) I just stapled on a color tab to make it easy to flip to what I needed. The first section is washi tape. Washi tape is a pattered roll of tape that is easily torn and also doesn’t stick to your paper if you try to peel it off. It does become quite an addiction. If i happen to have a tape that has multiple colors that stand out I might put a sample in each color section. Below are a few pictures of some of the washi samples. I use front and back of each page. Whenever I get a new roll I will not put it away until I put a sample in my book.


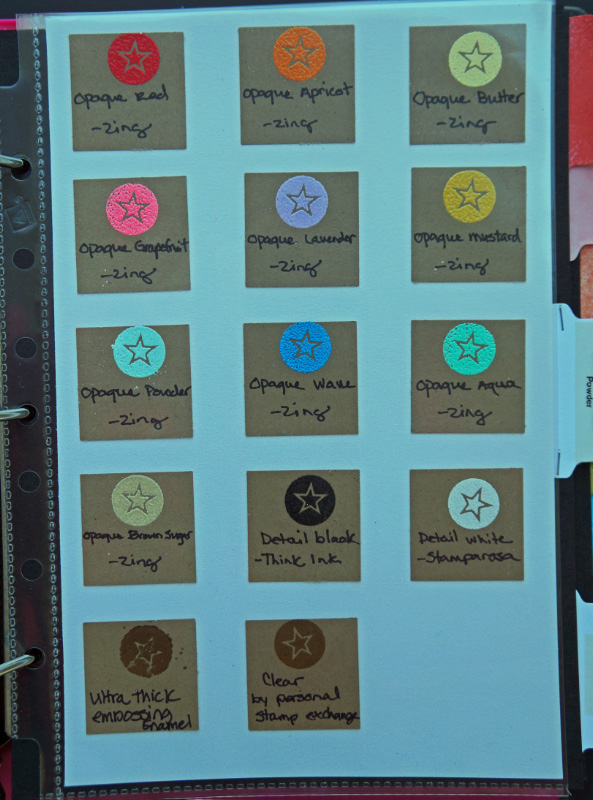
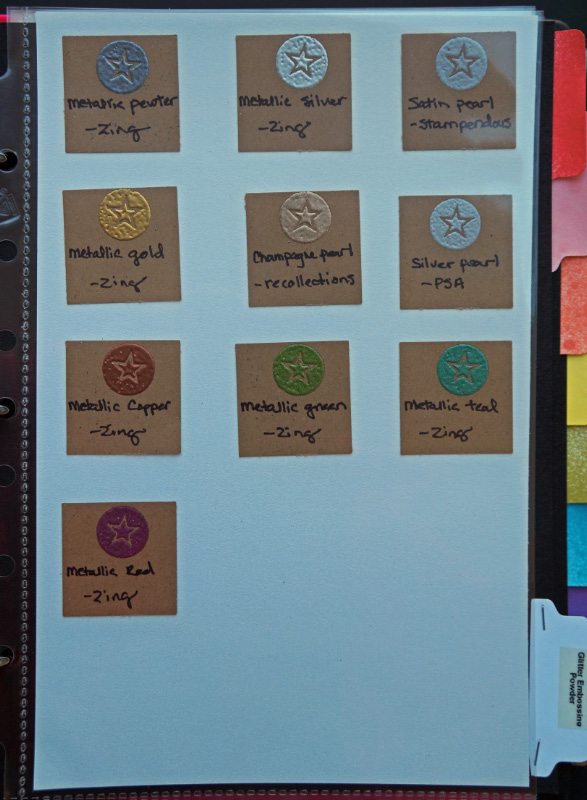
Next up, Embossing powder. I haven’t used embossing powder much in the past but find myself using it more lately. It has been really hard remembering what colors I have. I split it into three sections, Opaque, Metallic, and Glitter. I stamped all samples with the same stamp and versamark ink to show differences in how it shows up compared to another. Most of my powders are by American Crafts (Zing) which are my favorite but there are a few other brands as well so I listed them in case I run out and need more.

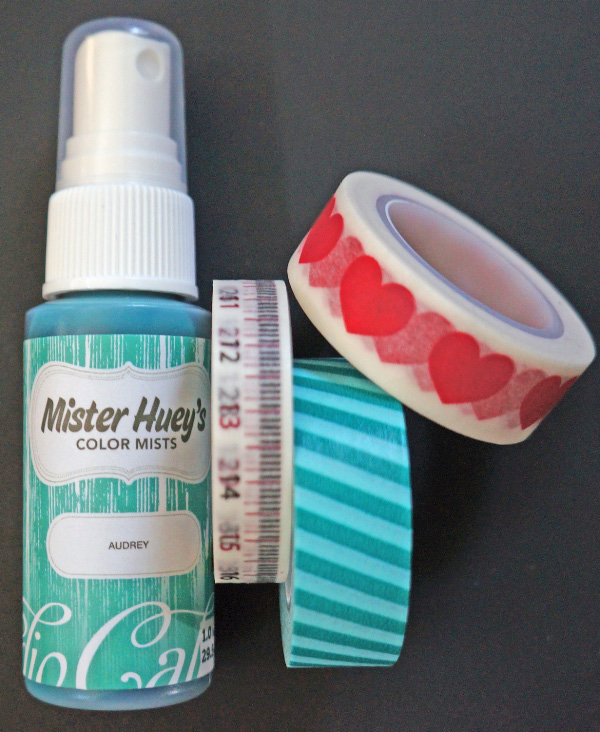
Last in the little binder is my ink mists. Oh how I love misting, but I have purchased a few duplicates and it is always nice to have a dried sample so you know what color you are getting. Most of my mists are from Studio Calico (Mister Huey’s) but I noted down which is which along with the color name to make things easy to find.


I’m really pleased with how it all came together and in the short time I have had it completed it has helped me quite a bit. I am still working on my stamp binder (a different binder that is 8 1/2 x 11) I have a LOT of stamps so this will probably take me a while. I finished all my wood mounted stamps and I am working on the clear stamps next. I snapped a few pictures of what I am doing though, so you get an idea.


I think stamping my clear sets will go by a lot faster. I used versafine black ink and white cardstock to do all my stamp samples.
I hope this has inspired you to do a little supply organization, in whatever way works for you. If you have any other creative suggestions I would love to hear about them!
And now for a little giveaway! As I said, I accumulated some duplicates before putting this binder together and I would like to share a few things with someone (see photo below). Please enter a comment below with your location, and if you have any organizational tips I would love to hear that as well! and a winner will be chosen Friday Feb.8th around 12pm PST. This is open to anyone (even international!)

wow! that is awesome. Total organization!
Wow! I am blown away by this! I love the idea of having one location to find all you have. I think I may try this with my own supplies. Thanks so much for sharing this great idea.
I love this binder with everything in it!! Thanks for sharing, I think I need to do something like this too.
Everything looks so organized! Is it A5 size? That size is easy to carry in your handbag. I need to make a binder like this for all my blogging notes- you have inspired me!
Yes, Zoe! It’s the A5 size 🙂 I am so glad you found some inspiration!
I really like how you made a binder to organize your colors! I created a binder for all of my acrylic stamps. I used baseball size pockets as well as the avery assorted photo pocket pages. I only have 2 Mr. Hueys and I organized them along with my glitter on the Making Memories Embellishment Center from M’s.
Love your binder. I really need to reorganize my room, right now it’s a hot mess! Thanks for sharing this.
my compliments! very organized!!!!
that binder is amazing! I am an organization wanna be…I love it but can never get there myself! I need to create a binder with my stamps…I have so many and they are tucked away and I never use them because I don’t remeber what I have or where I stored them.
Wowsers what a great system! I think I will tackle my stash like this, it’s only been 6 months since I started but I’m already feeling a little overwhelmed! I’m in the UK by the way and am thinking of doing this sort of a thing in an A5 filofax I have lying around 🙂 I too have to see all my stuff to use it, and am having trouble with patterned paper & embellishments this way, do you have any tips for these? Thanks for the chance to win!
Your binder idea is so smart! I also rely on memory most of the time, but I know it is a big help to have things where I can see them. My washi is now stored on a spinning rack (cropper hopper) and so is my glitter tape and small AC ribbons. All my other ribbon is wound on clothespins and stored in old-fashioned candy jars. For my mists, I spray each color on a small rectangle, and once they are dry, I punch a hole in the top and add it to a binder ring – it’s like a little flipchart keyring.
Thanks for sharing your tips & for the chance to win!
Great work!
I don’t have any idea, because I never do scrapbooking before, even I always want to start, but I don’t have inspirations or ideas or anything interesting in my life to be put in a scrapbook, I want to start though :3
This is such a great idea and a super way to know what you have.
one of my scrapper friend had something like that too! i organise my mist collection in 2″x2″ stack of cards and tie it with a ring, so i can see how colors mix
Cheryl, Malaysia
cheryl131091 at yahoo dot com
Love it!!! Thanks for the inspiration and the chance to win!
Laney, Montreal
Thanks for the chance to win and the great ideas – love the family pic at the bottom of you blog too, Kate UK
This is the best source of supply organization I have seen in such a very long time. I think I’ll have to copy cat your great idea! Thank you so much for sharing! 🙂
What a great idea. I have been thinking of doing something like this with a spare Smash book I have. Now I know what I am starting today.
Wow! This is such a great idea and it is doable even for the unorganized like me! Thanks for sharing
this is a great way to stay organized. I find it’s a never ending process, don’t you.
I absolutely LOVE your binder. I may have to lift this idea once my room makeover is complete.
Great idea! I have no organizational tips for you but could really use all the help I can get!
What a great give away from TN
Great idea to keep the washi samples in there with your embossing powders and mist colors!! Need to do this. stat. Thanks for the chance to win 🙂
from HI
Love your reference notebook. We could all use one of these. I have no new organization tips…I need all the help I can get. I’d love your duplicates. Thanks for a chance. Kathy, eastern shore of Maryland
So awesome. I’m envious of your organizational abilities. 🙂
um this is genius!!!!
I currently keep all my washi in an old metal Hostess lunch box, my pattern papers are sorted by collections, stamps are sorted by wood mount or acrylic each style in a bin (most acrylics in thier original packaging as I used to design for a local store and needed the names and barcodes for projects). I presently only have a few mists so they are in a small basket in my scrap space.
oops, Oklahoma
That is amazing organization!
Vera, Guam
great idea! and it’s convenient that it is smaller size. I’m in Massachusetts:)
WOW. That is impressive!!! I don’t really need any organization, since I own so little. Everything I have is (and has to be) stored in a Raskog cart from Ikea. Plus, I own zero mist 🙂
I forgot: Italy.
Very impressive. Now, don’t forget to go back and remove something or mark rebuy when you run out 🙂
Wow…I need to do something like this! Thanks for the inspiration!
Fran
Ohio
Great idea! I need to do a little more organizing myself! Canada
Great idea!! I just found a notebook in my stash that would be perfect for this 🙂 I’m thinking to do color samples of my Prima Chalks, like you did with the embossing powder.
Snowy greetings from Sweden 🙂
That is awesome that you have everything right at your fingertips to view! What a great time savor! TFS! And thanks for the chance to win some goodies! I live in Arkansas.
Oh wow! that is fab, I would love to have a go at organising my supplies like this if you don’t mind me copying? I’ve signed up to follow your bl Xxx Louise
This is a great idea! I don’t have enough stuff to forget what I own yet, but I might start the binder off now and add to it as I add to my collection! Thanks for the chance to win too. Jennifer, UK
great idea! i’ve got several sets of swatches of my mr hueys but that’s about it…not too much washi plus it’s on a shelf i can see. but i have soooo many stamps that something like that might be nice. also i liked seeing the embossing powders done. might be nice for my stamp inks too…oh the possibilities!!!!!
Great org!
I have my washi color sorted, much like yours, and store it out in plain sight on several white picture ledges. It eliminates myneed for the swatches, and looks like a decorative element (the rolls all stand up sideways, so the patterns are easy to see and, unlike the rolls on a stick, are easily removed one at a time)
Now, mist swatches i could use….
And i gave up on stamp records, i’ve tried….. Whew.
I’m in Germany.
Eva
What an awesome system – I am totally going to steal it. how long did it take to put together the ink and tape binder?
I’m from the SF Bay Area, CA.
I love your binder. I’m quite new to papercrafting (just started PL this year, haven’t scrapbooked or anything before) so I am at the beginning edge of collecting supplies. I’m currently working on figuring out how I want to organize digital items in ACDSee. 🙂
I love your binder idea and I’m already starting to collect clear stamps, I can see myself doing what you have done for a stamp binder 🙂
Thank you for the ideas!
What a fantastic idea! I think I’ll buy one of those Martha Stewart binders that are on sale for $2 right now and do this. Thanks!