Organizing December Daily, Desk Maid system review, AND A GIVEAWAY!

Happy Friday!!!

I don’t know about all of you but I am SOOOO ready for the weekend!

Today I am reviewing the Desk Maid system from Totally Tiffany. I recently moved and the new home had a bonus room that was a perfect craft studio. I did have the challenge of limited wall space and a bunch of built-in shelving nooks. I have always had a lot of success organizing with shelves on my wall but this would be a bit different. I was searching for ideas on the internet and came across the new Desk Maid system. Intrigued by it I talked to the kind folks at Totally Tiffany and they graciously sent me a 4 piece set to try out as well as their clip and create rotating board.

I am also showing my December Daily organization at the bottom of the post…. It’s a long post day, friends… but fill of good stuff and a giveaway! Read on!

Here is the Desk Maid collection…

This is the 4 piece set full of supplies. (as shown on the Totally Tiffany website)
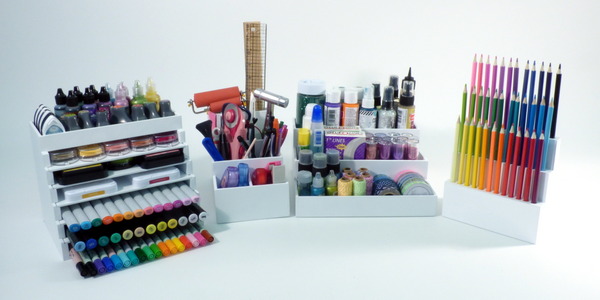
Totally Tiffany Desk Maid system

After receiving the full Desk Maid set I knew that this was going to be a fantastic solution for my built-in shelving issue. I loved the product SO Much that I turned around the next day and ordered 6 more 4-piece sets!

I am still in process of organizing my room but I got a big chunk done, and thanks to the Desk Maid system I was able to condense what was in three of these built-in shelving units to ONE! Seriously… it was crazy how much space this saved! Take a look!

Organizing with Desk Maid | Totally Tiffany Desk Maid review by Taniesa Vlasak


Organizing with Desk Maid | Totally Tiffany Desk Maid review by Taniesa Vlasak

It’s like candy for my eyes!  I love seeing my supplies, it helps me remember to use them. I love having my coloring supplies and tools right at hand. And while it is stored in this shelving unit, I can easily take whichever Desk Maid unit(s) back to my work table when needed. It keeps it nice and tidy and when I am done I just put the Desk Maid organizer back on the shelf and my work table stays uncluttered.

These pieces have a ton of versatility. You don’t JUST have to organize your craft supplies (think kitchen organization, makeup, office supplies, and more). You can even use them for specific project organization. You will see how I used the Pen & Ink Palace, Tool Caddy, and the Clip & Create Rotating Design Board to organize my December Daily supplies for this year further down in my post.

The Pen and Ink Palace holds all 80 colors of Zig Real Brush markers with room for your watercolor safe ink pad, an acrylic block, swatch chart, and more room at the top, I have a opalescent watercolor set in the top of mine.

Organizing with Desk Maid | Totally Tiffany Desk Maid review by Taniesa Vlasak

Organizing with Desk Maid | Totally Tiffany Desk Maid review by Taniesa Vlasak

On that same shelf you will see 5 Tool Towers all lined up in a pretty little row. This houses like items together of pens, paintbrushes, ink blending brushes, water brushes, markers, blending stumps and gamsol, chalk pastel pencils, watercolor pencils, and various tools. Easy to see what I have, easy to grab, and easy to put away!

Organizing with Desk Maid | Totally Tiffany Desk Maid review by Taniesa Vlasak

Organizing with Desk Maid | Totally Tiffany Desk Maid review by Taniesa Vlasak

The next shelf down holds my Gelatos, Distress crayons, PITT Markers in one Pen & Ink Palace, A tool caddy sits to the right of that with some specific project tools that I am working with now, and to the right of that is three Pencil Perches holding all of my Faber-Castell Polychromos pencils.

Remember that I had said these shelving units are deep? they get deeper as you go lower because of the wall angels. Because I had so much space behind these units, I placed product behind that I don’t necessarily grab all the time.

Organizing with Desk Maid | Totally Tiffany Desk Maid review by Taniesa Vlasak

Behind the Pen & Ink Palace I have two Stadium Arrangers filled with embossing powders, reinkers, and mists.

Organizing with Desk Maid | Totally Tiffany Desk Maid review by Taniesa Vlasak

In the center and to the left (behind the pencils) is another two stadium arrangers that I am still working on filling. The back is currently holding washi tape and the one more in the front has some empty 5×7 Iris cases that I am planning on using for some kit organization. In the middle of these 4 stadium arrangers I have placed a lazy susan and several ink tins from Tim Holtz. These hold my Distress ink cubes, Altenew Crisp Ink cubes and Some hero arts and Simon Says Stamp ink cubes.

Organizing with Desk Maid | Totally Tiffany Desk Maid review by Taniesa Vlasak

I can spin the ink around to find what I am looking for if needed. I mostly use these smaller ones for traveling and my large ink pads at home but they are easily accessible if I need them.

totally-tiffany-org-1The Crafty Pickle Organizes!

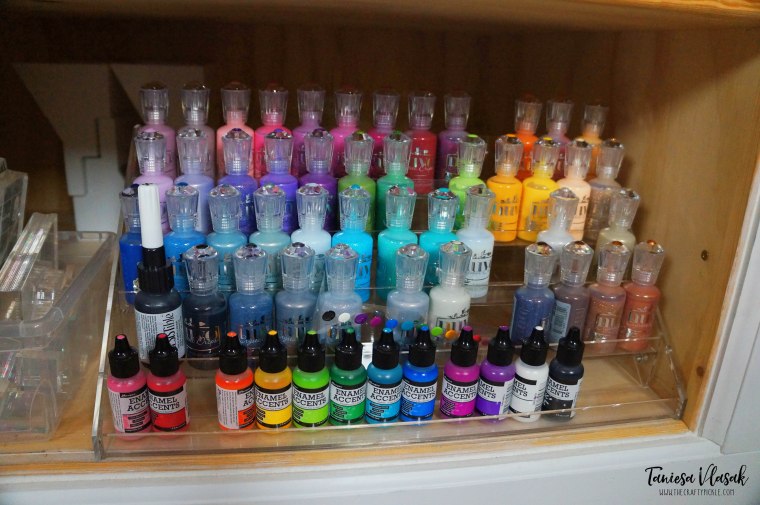
On the last shelf you will see a Pen and Ink Palace that I am using for my December Daily Project on top of the Clip & Create Rotating Board. Beside that I have a plastic box for my acrylic blocks and then an acrylic nail polish rack I picked up from Amazon to hold all my Nuvo Drops and Enamel accents (some are missing because they are in my December Daily supply stash)

In the very back of that shelf is extra organizers I have not used yet and empty containers. I am thinking about using this for back stock of supplies like cardstock, adhesive, etc in the future.  I still need to paint these shelving cubbies, they were unfinished when we purchased the home. I am painting them white which will help the colors and supplies stand out even more.

I think that the Desk Maid system is fantastic for organizing your craft supplies no matter if you keep them on your desk, In your Ikea Kallax, on a shelf, or whatever setup you have. The 4 piece set comes packed so well too! Surrounded by cushion and boxed separately to minimize the risk of damage. I was really impressed by that as well as the quality of the items. I like them white but you could easily paint these lightweight wood organizers any color you wish.

Here is a quick video review I did on the Desk Maid system.

I decided to use two of the pieces of the desk maid system for my december daily organization. Take a look at the quick video where I show you what supplies that I have gathered and organized for my December memory keeping!

I LOVE that this system holds so much and takes up so little space on my desk!

I am super excited because the kind folks at Totally Tiffany have generously donated a 4 piece Desk Maid set for one of you! To enter the giveaway just click the link HERE and you will be taken to a sign up form, That’s it! Easy peasy. Winner will be announced on 11/23 at 6:30 pm Pacific standard time so be sure to check back. I will update the top of this post with the winners name.

I have listed the items that I have shown in today’s post below with links as well. I believe there is a black friday special going on where you get a free glue gun holder with a 4 piece Desk Maid set purchase!

4 piece Desk Maid set

Clip & Create rotating design board

Thank you for stopping by for today’s review and December Daily organization. I have more ideas coming for these great organization pieces so be sure to subscribe to my blog and youtube channel so you don’t miss any organization inspiration!

Have a great and crafty weekend!

Taniesa Vlasak | TheCraftyPickle.com


Organizing Tip: Cling Stamps & 6×6 Paper Pads!

Good Morning!  Today I’d like to share with you one of my favorite organizational products ever!  And it just happens to be the My Acrylix Organizers from Close to My Heart!

ctmh container6As a former consultant for 5 years (and my best customer), and having been a loyal customer ever since, I have amassed quite the My Acrylix stamp collection!  I absolutely LOVE the quality and versatility of the clear cling stamps–and with the CTMH My Acrylix organizers the stamps are so easy to store and access quickly when I want to sit down and craft.  The containers are stackable, have a hinge-top lid with a handle (so you can pack up your favorite sets easily for crops!), and they retail for only $14.95 each. ctmh container1I have added to my container storage as I have added to my stamp collection and it has been well worth the investment to have a cohesive place to keep all my stamps neatly (especially since my craft room is also our family dining room). ctmh container2

Each container stores 15 CTMH stamp sets right in their envelopes!  ctmh container3

And if you have collected other brands of cling stamps, you can make them fit to flip through them and store them in the containers as well.  I ordered Avery Elle clear stamp envelopes to store my sets where the plastic packaging had ripped and they fit right in! ctmh container4

I have also recently discovered that my hoard of 6×6 paper pads will also fit inside of these handy storage boxes–which opens a whole new world of organizational possibilities!  Think about putting together little “kits” with these boxes to make pulling one down and crafting quick and easy without having to dig through your whole stash!  For example, you can put your Fall 6×6 pads, stamp sets, and a few embellishments all in one organizer!  (Each organizer comes with 2 removable dividers that create 3 sections inside.)  ctmh container5

I hope that you learned of a useful product on the market today that will help you get organized and therefore make it easier to access and use more of your stash!  I really couldn’t live without these and it’s a system that really works for me!

Happy Crafting!

~Tabitha

Tabitha sig

The Crafty Pickle’s FIRST Design Team Call!

Be apart of The Crafty Pickle Design Team!


Hi Everyone!

I am excited to announce that I am hosting my first ever design team call for TheCraftyPickle! Design team members will work with TheCraftyPickle Flair buttons, Close to my heart stamps and supplies, and other shop items as they become available.

I am looking for a variety of crafters, Cardmakers, Scrapbookers, Project lifers, Special DIY project makers.

As a design team member you will receive:

  • Free Flair and accessories from my Etsy shop to work with.
  • A discount on all Close To My Heart products, Plus free bonus product as available.
  • Your creative work featured on The Crafty Pickle blog, Etsy example photos, Pinterest, Instagram, Facebook, and other social media.
  • Support and creative connections with our design team in a private facebook group.

What we are expecting of our Designers:

  • Two to three projects per month using Flair and or Current Close To My Heart Products, and to share them on your personal social media (Blog, Pinterest, Facebook, Instagram, etc..
  • An active blog and active presence in other social media such as instagram, facebook, Pinterest, etc…
  • High quality project photography.
  • Participation in Blog hops and group events.
  • Participation in at least one detailed tutorial (text/photos or Video) that will be on The Crafty Pickle blog per month. (this counts as one of your projects)
  • Promote and share The Crafty Pickle products and blog whenever possible using social media.
  • A Three month commitment (starting November) with the option to continue longer if mutually agreed.

This call is open to all crafters, even international.

Sound like fun? Here is what you need to do to apply to be apart of the TCP Design team.

Email the following application to TCraftyPickle@Gmail.com with the subject Design Team Call.

  1. Your name, location, and a short bio of yourself.
  2. Links to your Blog, Facebook, Instagram, Pinterest, and any other social media sites you actively use. Link any craft type forms you are apart of and would post to as well.
  3. List any past or present design team experience (experience is NOT necessary).
  4. Submit at least three projects showcasing your talents especially in the area of using flair buttons and stamping. Using TCP Flair and CTMH stamps are a plus but definitely not a requirement.
  5. Do you own an electronic die cutting machine?
  6. Attach a photo of yourself that could be used on the blog if chosen for the design team.

I am beyond excited to see your projects and form a fantastic team. Due date for your application is October 17th at 11:59pm PST. Every applicant will be notified by October 24th. Followed by an announcement on The Crafty Pickle blog  the following week.

Thanks for stopping by!

Happy Crafting!

The Crafty Pickle

More Embellishment Organization!

Organize your Flair buttons! More @TheCraftyPickle.com

Hi everyone,

It’s been a while but I am back to share an idea of how to organize and store your flair buttons/badges.

I actually struggled with this one and searched for a solution everywhere. At first I had all of mine in a jar but that was a pain to sift though.

I saw ideas of putting them flat in CD cases. Putting them in packaging inside a basket and flipping though them, even putting them in coin page protectors and placing in a binder. All very clever ideas but none of which I thought would work for me.

I knew that they needed to be organized by color. If you have seen my previous posts you know that I organize nearly everything by color. I also knew that I needed something that would have room to add more than my current collection. I didn’t want to have to have multiple cases for one type of embellishment (except washi tape and PL cards, those don’t count ).

While I was at Michaels in the beading section I came across a fantastic sectioned organizer (for bead organization) and it was really reasonable ($5.99) It had more space than a embroidery floss organizer box ($2.99) and I figured it just might work. Here is my little button collection.

Organize your Flair buttons! More @TheCraftyPickle.com

Organize your Flair buttons! More @TheCraftyPickle.comIn addition to organizing by color I have 4 sections dedicated to seasonal buttons. Spring, summer, fall, and winter. There is also multi-colored button sections and spaces for specific themed flair.

Organize your Flair buttons! More @TheCraftyPickle.com

Organize your Flair buttons! More @TheCraftyPickle.com

I think this little case would also be perfect for shaped paperclips, buttons, and wood veneer as well! If you have a larger collection or want a bit more portability I would suggest the Close to my heart small organizer with the foam insert and small craft boxes. I store my wood veneer in those and it works out really well for me.

Thanks for stopping by!

Happy Crafting!

The Crafty Pickle

Rainbows make me HAPPY!

Using a nail polish display to organize your ink mist, glitter, and embossing powder. More at www.thecraftypickle.com

I think Rainbows make most people happy, but they have to make papercrafters ESPECIALLY happy! Which is why I couldn’t wait to show you my organization for my ink mists, Glitter, and embossing powder!

I have played around with organization on these items a few times… nothing really seemed to quite work… and as I was trying out different methods I was accumulating more colors of everything. There is something about a new bottle of Mister Huey that makes me warm and fuzzy inside.

I saw a few ideas around pinterest and organization groups like this one, and i thought spice racks would be just the thing… but I don’t have much wall space in my craft studio so it left me with little options.

Then one day I was browsing Amazon and I found THESE!!!

Using a Nail polish display as storage for ink,glitter, and embossing powder. More at www.TheCraftyPickle.com

Nail polish displays!!! You can find them on amazon HERE, but shop around to find the best deal. Just make sure that if you get more then one and you want them to line up even with each other, you purchase from the same company as the measurements on these guys can vary.

I was so excited when I got them in the mail that I started organizing my things right away…. even when I didn’t have my shelves up yet (still waiting on those). My original plan was just to organize my ink mists *if* the rack happened to work….

Using a nail polish display to organize your ink mist, glitter, and embossing powder. More at www.thecraftypickle.com Using a nail polish display to organize your ink mist, glitter, and embossing powder. More at www.thecraftypickle.com

well, It worked for me! I was so excited, and admittedly, I just stood there for a little while starring at my pretty inky rainbow, ignoring the rest of my disorganized room that I had been working on. Then a couple of days later i was trying to figure out where to stick some of my other supplies like glitter and embossing powder…. they had been in a drawer and a little cabinet but it wasn’t working very well for me. I thought for sure the embossing jars wouldn’t fit on the nail polish display as they were wider…. but they did!

Using a nail polish display to organize your ink mist, glitter, and embossing powder. More at www.thecraftypickle.com

The embossing spinner is the same style I used for my sequins station in a previous post. I keep my most used embossing powders here… White, Clear, Black, Silver, Gold… This I had for a while I just moved the location. If you missed the Sequins Station I posted a while back HERE is the link to that post with all the information on what I used.

Using a nail polish display to organize your ink mist, glitter, and embossing powder. More at www.thecraftypickle.com

I hope you enjoyed my little happy rainbow. If you are looking for even MORE inspiration check out this blog: Life, Scrapbook, Repeat Toni has some awesome ideas she gathered along with her own pretty little rainbow 🙂

I hope you all have a wonderful weekend!
xoxox,

The Crafty Pickle

CTMH Storage solutions: 6×6 paper, Thickers, and Washi Tape.

Hi Everyone,

I know it has been a while since I have blogged. We all got hit with that horrible cold which seemed to consume most of January. Since recouping from that I took on the task of reorganizing and transforming my loft space of my home into my crafty studio. It has taken a few weeks and there is still much more to be done but I am really happy with how things have came out. I hope to be able to do a craft room tour very soon!

Today I wanted to share with you how I am now organizing my 6×6 paper, my washi tape, and how I plan on organizing all of my thickers. I felt that doing a little video would explain better than a few pictures.  Take a look!

I hope you found the video helpful. Hopefully you are inspired to organize your pretty paper things too!

If you missed my previous video on how I organize all of my project life cards by color you can see that video on my previous post here.

If you have any questions please feel free to comment here or send me an email (button on the right hand side of my blog)

If you would like to purchase a CTMH organizer or any Close to my Heart products you can do so on my CTMH website HERE. The link directly to the organizers is HERE.

If you are looking for the free cut file I made specifically for the CTMH cases to help organize your Project Life cards you can find that post HERE.

Thanks for stopping by. Happy organizing!

Project life Re-Organization.

Hi Friends!

I know a number of you have had a lot of questions regarding how I am storing my project life cards. Instead of writing out a long post I made a little video that hopefully will answer some questions and let you see what’s working for me right now.

Here is a little video on how I am organizing my project life and pocket style journaling and filler cards. I am using the medium Close To My Heart organizers which you can see by going to my website HERE <—- that will take you right to the organizers.

The dividers that I had made for my organization were
Pink
Red
Orange
Yellow
Green/Teal
Blue / Aqua
Purple
Gray
Black and white
Brown and Kraft
Multi Color brights
Multi Color muted

Month/Day
Ledger
Numbers
Journaling prompt
Quote filler
Symbols and shapes
Seasons: winter spring summer fall (holidays are in with the season)
Birthday/celebration
Travel
School & Kids life
wedding
Love/hearts

If you have any questions please post a comment, I am happy to answer anything that I can.

Thanks for watching and I hope this has helped you with a few organization ideas of your own!

If you are wanting to puchase the CTMH cases you can visit my CTMH website at www.thecraftypickle.ctmh.com
******Edited to include a link to the divider cut file I made and used in this organizing video and posted on my blog awhile back: Click here for the dividers. The folders that I used were directly from the silhouette store (Design ID #43761)******

The Crafty Pickle


Happy Friday! Let’s get ORGANIZED!

Hi Everyone!
I am on to my next organizing endeavor! this time tackling labels, tags, stickers and other project life supply goodness as well as my Die-namite dies!

Here are some before photos. First is my labels, tags, stickers, etc… that I use primarily for Project Life.

Get organized with help from TheCraftyPickle.com

And here is the drawer I had all of my Dies shoved into.

Get organized with help from TheCraftyPickle.com

What a mess! So I headed to Target (I love Target!) and in the office supply section I found these little gems!

Get organized with help from TheCraftyPickle.com

Now I am focusing on these small ones but there are lots of different size accordion files… you could use different sizes to organize different supplies. These coupon size files came with a little notepad. I took that out to lessen the bulk.

Get organized with help from TheCraftyPickle.com

I created some mini file folders. The first i created using my silhouette…. but I needed to make quite a few, and maybe I was a little lazy, so I just cut the cardstock to size, scored it, folded it, and put a tab on it.

Get organized with help from TheCraftyPickle.com

Then I separated everything into like item piles. A couple of tips to mention. You want to remove any unnecessary excess packaging, this adds extra bulk and sometimes will prevent the item from fitting.

Get organized with help from TheCraftyPickle.com

You also might want to cut down strips of labels to just the label and not the product name or bar code. If you want to retain the info just write on the back with a slick writer.

Get organized with help from TheCraftyPickle.com

For the folders in the sticker, tag, and label files I created one in each to put the items that were loose in, I didn’t want them falling in between the divided sections

Get organized with help from TheCraftyPickle.com

Get organized with help from TheCraftyPickle.com

For the die cut file, I made an individual file folder for each die, also when I use the die I cut a couple of extra shapes and put it in with the die, that way if I just want to grab a cut and not pull out my machine i have it right on hand.

Get organized with help from TheCraftyPickle.com

Get organized with help from TheCraftyPickle.com

And here is some end result photos. I really am enjoying this system, I love that everything is right at my fingertips. For now I am storing the files in the black box I picked up at target seen in the photo, but as I reorganize my IKEA Raskog, I might transfer them over.

Get organized with help from TheCraftyPickle.com

Get organized with help from TheCraftyPickle.com

Get organized with help from TheCraftyPickle.com

Get organized with help from TheCraftyPickle.com

Get organized with help from TheCraftyPickle.com

I hope this provided you with some organization inspiration. I have a pretty big project I am working on next and I can’t wait to share with you all SOON!

Have a fabulous weekend!

The Crafty Pickle

Creating a Sequin Station for your craft space.

Happy Friday everyone!

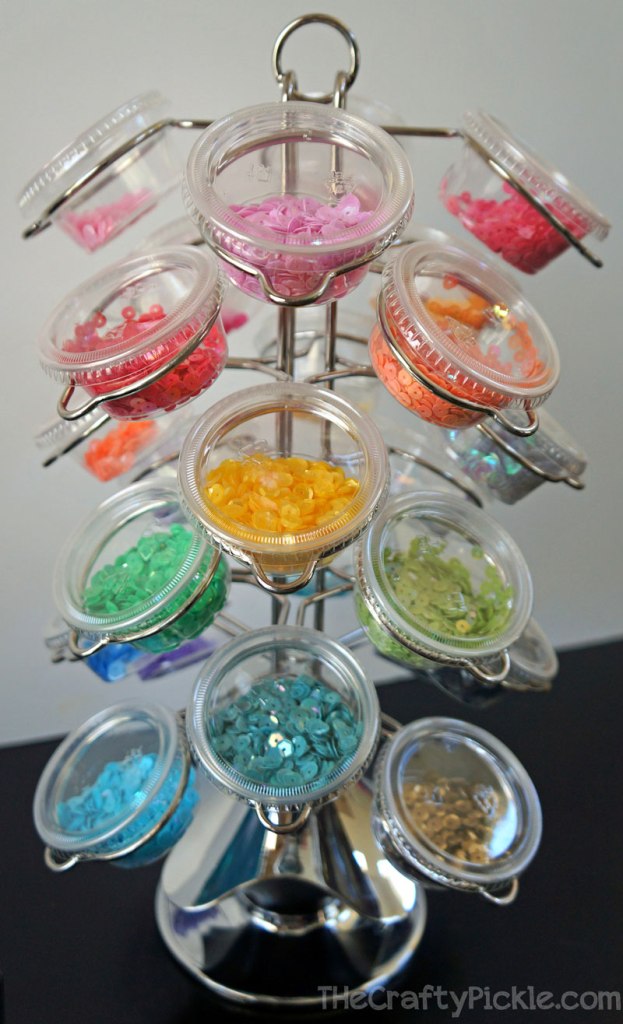
Today I am revisiting a previously posted idea a few months ago that I used for small embellishment storage. Ever since I purchased the sequins in the whimsical Twist shop I have been HOOKED on sequins and use them on a lot of my projects. Getting in and out of the little baggies was getting to be a little bit of a pain so I thought back to that organization blog post I had done, You can see that original post HERE. I thought that it would be nice to have one set up just for sequins so that’s just what I did.

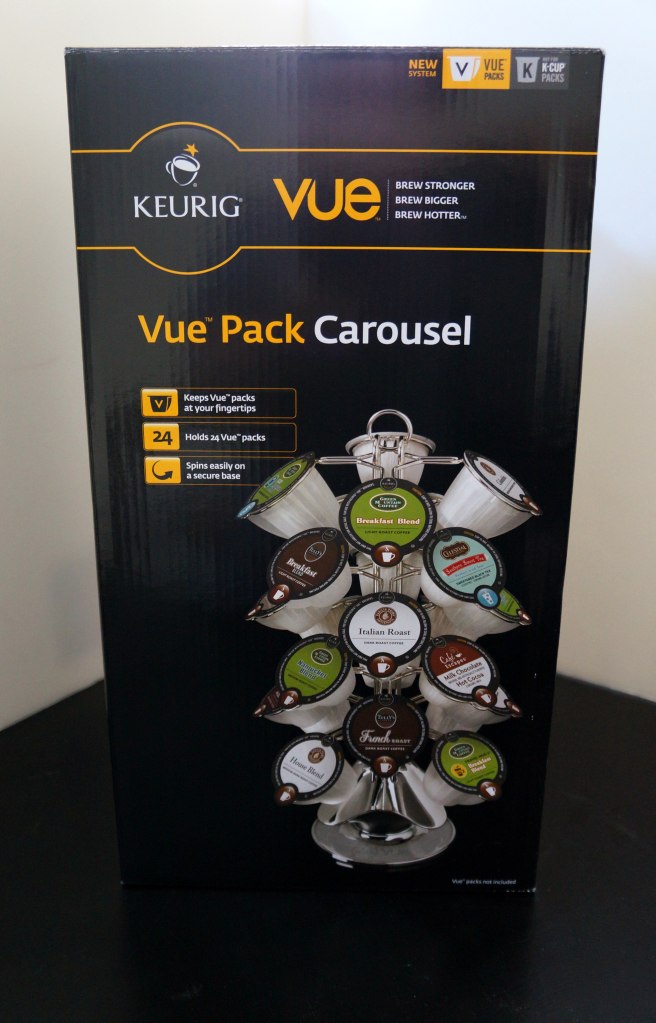
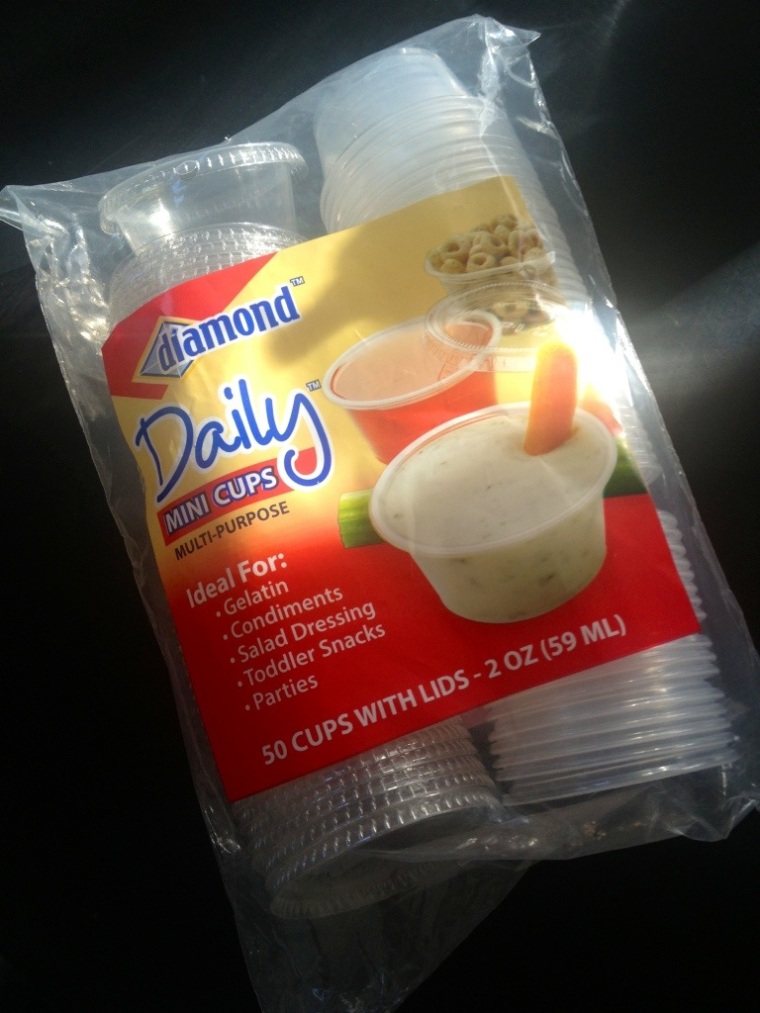
Here is what I used. First a K-Cup storage spinner (I got mine at walmart for about $24 but I have also found the same size on Amazon HERE) and a package of Diamond brand mini condiment cups and lids (I got mine at a grocery store in my area, safeway, for about $3)

Little Bits and Sequin Storage @TheCraftyPickle.com

Cups for storage @ thecraftypickle.com

I emptied all of my sequins in each cup keeping the colors separated, depending on your collection you might want to combine certain colors or shades of the same color.

Sequins-Station @ thecraftypickle.com

sequins-station-close-up @ thecraftypickle.com

Super simple and inexpensive. It takes up very little space and makes using them and clean up a breeze because you’re not dumping the sequins out on your table. The added bonus it looks really pretty out and makes me happy when I look at all the fun color!

Suggestion for those that are going out shopping for your kcup holder, I took one of the mini cups with me to make sure it fit well. There are holders out there that are just a bit too small to hold the cup so to be sure, test it out before you buy it.

Don’t forget to stock up on all the great color sequins that is currently in the Whimsical Twist shop and check back for more fun sequins that will be in the shop soon! While your there don’t forget we have an awesome sale on all your Basic Gray favorites too!!

BasicGray sale @ Whimsical Twist!

I hope you enjoyed this organization inspiration!

Have a Whimsical Weekend!

The Crafty Pickle

Happy New Release Day!

Those of you that haven’t seen the new Close To My Heart products have got to stop whatever you’re doing and go look! So many beautiful new products I can’t even stand it! Here is a sneak peek of some of my favorite new releases from this new idea book/catalog:

This has to be my new favorite alpha stamp set! I love that it is sized to store with my other CTMH sets now too!

CTMH Framework alpha

Check out some of the adorable new sets!

CTMH Happy autumnCTMH CityscapeCTMH all the detailsCheck out one of the new mini stamps CTMH is offering for under $3!

CTMH Heartfelt birthday wish

For all you Cricut lovers out there, here is one of the amazing new cartridge packages!

CTMH artbooking

And a look at CTMH’s take on smash type of journaling/scrapbooking collection “My Crush”

My Crush favorites assortment

Wearable art? Yes, Please!

CTMH wearable art

And you all know how I love my CTMH Organization. Here are the two new small organizer foam inserts! One for daubers and one for the mini ink squares.

ctmh Daubers insertCTMH Ink insert

What would a new release day be without some sort of fun special to get you going! from now until Aug. 15th I am offering 10% off all orders! To receive the discount you must email your order to TaniesaVlasak@gmail.com along with your mailing address and email address you want a PayPal billing to be sent. You can view all the new products HERE or go to http://www.thecraftypickle.ctmh.com.

I hope you enjoy all of the new products as I have!

Happy Crafting!