
Well, Hello there crafty friends!
Hope you all have had a fantastic week. This week I have been playing along with the Red White and Blue week challenge at Honey Bee Stamps. Although I have shared my projects on Instagram, I thought I would round ’em all up for you in one big blog post. I also show a bit on how I achieved some of the looks.
First up was one layer Patriotic Bee Free card.

For this card I used the Sweet As Honey stamp set. I stamped the honeycomb trio in a miscellaneous pattern and used copics in blues, reds, and gray shades. The cute little bee was from the same set and I stamped the sentiment from the Hand Lettered Alphabet. Instead of doing a gray shadow on the letter I used my Sakura Clear Stardust Gel Pen as well as outlined the letters with light Copic blue markers .
Next is a very simple watercolor one layer card.

For this card I took a piece of Distress watercolor paper and layered up some red and blue watercolor. I used the Daniel Smith Watercolor Essential Set
watercolor’s but any kind of watercolors will do just fine. I did 4 different layers letting them air dry fully in between painting each layer. I then stamped the little stars and hearts from the Just Sayin’ stamp set. They didn’t quite show up as bright as I would have liked so after the Hero Arts Unicorn white pigment ink was dry I went over the stars with a Sakura Clear Stardust Gel Pen and went over the hearts with a Sakura Gelly Roll white gel pen
. I stamped the BLESSED sentiment from the Bless your heart stamp set. Once dry, I die cut the panel with Lawn Fawn Large Stitched Rectangle die (Large) and layered with some blue Glitter paper. I placed both on a red card base.
For my next card I decided to do a little rustic americana look.

This card took a bit more time because I did a lot of masking. Here is a few photos of the process…
First I measured out the stripes evenly and then blocked off the blue stars section. I used full adhesive post-its and post-it tape
to help me mask off around each of the stripes as I stamped. I used Red Royal Hero Arts shadow ink
for the red stamping and for the white stripes I used Wet Cement Hero Arts shadow ink
. The HAPPY stamp is from the Happy Everything stamp set. For the red ink blending I used the Candied Apple distress ink.

Below is a photo of the stripes when I lifted off the masking papers.

Below is the finished flag before distressing. For the blue section I applied Blueprint sketch distress ink and then stamped the “4th” with Hero Arts Indigo Bold ink . The 4 is from the brush grunge alpha set and the “th” is from the Hand lettered numeric set. I added stars from various Honey Bee stamp sets stamped in Hero Arts Unicorn white pigment ink
. Some of the stars I went over with my Sakura Gelly Roll white gel pen
.

Time for distressing! First I crumpled up the flag and flattened it, then crumpled smashed and smooshed it again. After I flattened it out again it was ready for some staining. Sometimes it pays to hang on to your older crafty things. I had some Walnut ink from years ago that I mixed with some water. I added a few sprays on a piece of acetate along with some Faber-Castel Gel Medium to give me a glaze that I could paint on top of the flag.

Once it was fully dry (I left it for about an hour or two while I did other things) I ran it though my American Crafts Heidi Swapp MINC machine. I used a heat setting of 5. It came out super flat the first time though.
Finally I wrapped around some May Arts Natural twine and then attached a bow in the center with a glue dot. I adhered the piece to a cream card base. For a finishing touch I stamped some stars from the Country Wreath stamp set on the flap of a kraft envelope. I love adding a matching envelope whenever I can.

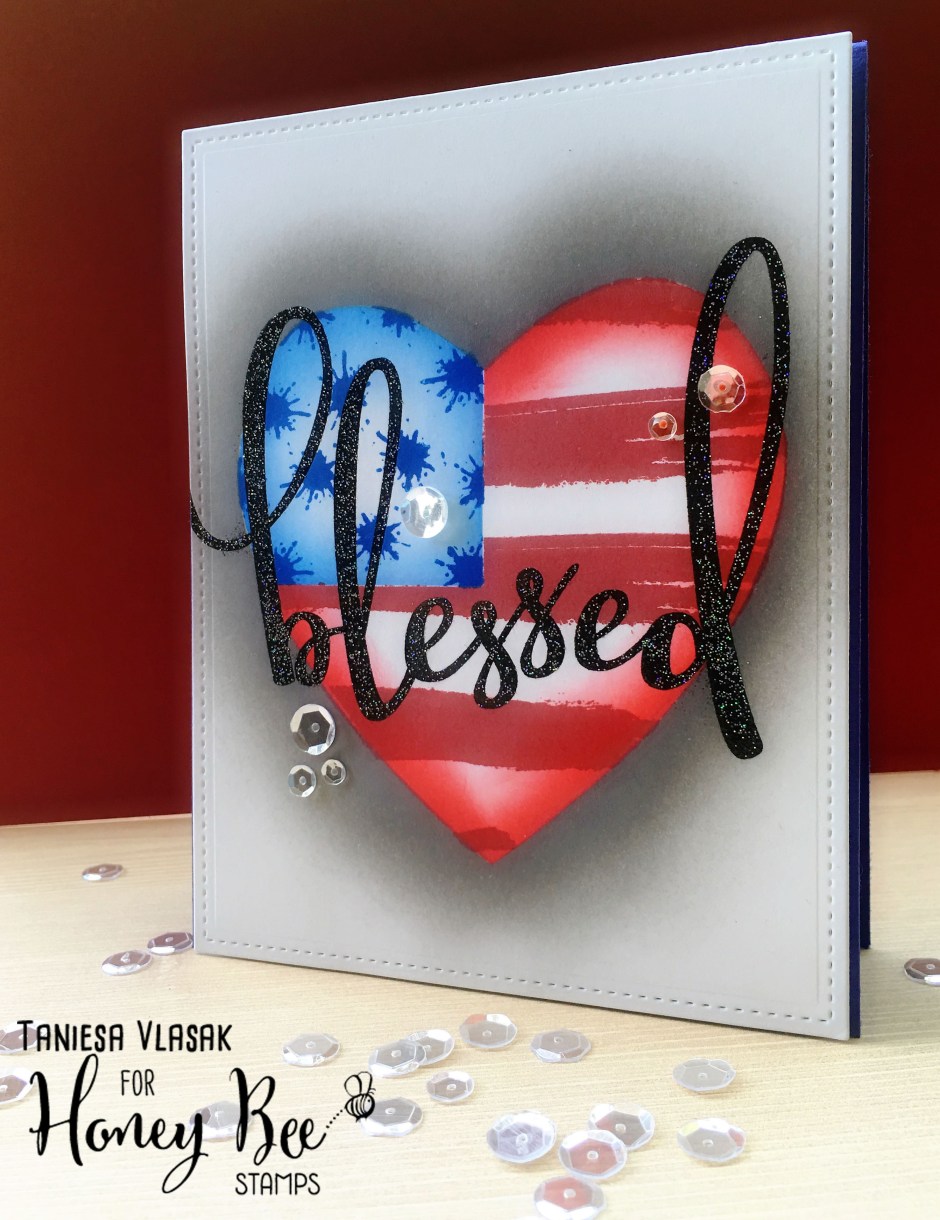
That brings me to today’s card and my final card for this week’s Red White and Blue Challenge. This one I think was my favorite out of all of the cards I completed this week.
 I love a simple one layered card that looks like it has a lot of dimension to it. This card was a lot of fun to create.
First I cut a heart out of a piece of acetate with a metal die (heart)
. and then attached it to a piece of hot press watercolor paper. The brand I like to use for ink blending like this is by Fluid. It’s reasonably priced, very smooth, and takes ink blending really well (the pad I used is linked in the supply section at the bottom of this post).

Below are the red and blue inks that I used for this project Blueprint sketch distress inkand Candied Apple distress ink
. I applied using little Makeup Blender Sponges
. These allowed a smoother application of these colors with the stencil for me. The stamping was done in Hero Arts Indigo Bold ink
and Red Royal Hero Arts shadow ink
.

I used the Paint swash from the Brush grunge Alpha set. It is normally at a curve but I straightened it on my Misti Stamp Tool for the stripes (the very bottom little brush stroke stamp is from Color My World stamp set)

After I stamped the stripes I shaded the outside edge with the Candied Apple distress ink. I went over it with a dry Makeup Blender Sponge after applying to soften the line further and remove excess ink.

I did the same process for the blue section. Masking off the red area I shaded using the Blueprint sketch distress ink.

Then for the “stars” I stamped the paint splotch from the Color My World stamp set.

After all the heart was complete. I placed the die cut heart that I saved from die cutting the stencil over the heart and shaded the outside edges with Hickory Smoke distress ink. I let this dry fully on its own for about a half hour. I then applied powder from my EK success powder embossing tool. I stamped the word Blessed from the Bless your heart stamp set with Versafine Onyx Black ink
and then covered the title with some clear sparkle embossing powder and heat set.

I mounted the base on some thin fun foam and then placed that on a royal blue card base with just enough blue to peek out on the sides of the card. I finished everything off by adding some clear iridescent sequins.
Listed below (and within my blog post) are the links to the products I have used for this project. Affiliate links may be used, this means if you make a purchase I receive a small commission at no additional cost to you. I really appreciate your support toward the costs of running this blog.
Honey Bee Stamp sets used:
Hand lettered Alphabet and Hand Lettered Numeric are also available as a set HERE
Other products used:
Sakura Gelly Roll white gel pen
Sakura Clear Stardust Gel Pen
Distress watercolor paper
Glitter paper
Copic Grey Markers
Copic blue markers
Daniel Smith Watercolor Essential Set
Lawn Fawn Large Stitched Rectangle die
Red Royal Hero Arts shadow ink
Wet Cement Hero Arts shadow ink
Blueprint sketch distress ink
Hero Arts Indigo Bold ink
Hero Arts Unicorn white pigment ink
full adhesive post-its
post-it tape
Candied Apple distress ink
Walnut ink
Bulk Buy: Faber-Castel (2-Pack) Gel Medium Jar 100ml FC770303
American Crafts Heidi Swapp MINC Foil Applicator with Transfer Folder, Foil & Art Prints, 6″
May Arts Natural twine
kraft envelope
acetate
metal die (heart)
Fluid watercolor paper
Sankuwen 4pcs Flawless Makeup Blender Foundation Puff Multi Shape Sponges
Misti Stamp Tool
Hickory Smoke distress ink
EK success powder embossing tool
Versafine Onyx Black ink
clear sparkle embossing powder
fun foam
I hope you like my little collection of Red White and Blue from this week! Thank you so much for stopping by!
Have a wonderful weekend and a happy and safe Independence Day!
Happy Crafting!


Your cards are spectacular. I love all the ideas for the 4th of July. I used several. Thank you so much for sharing your talents. I truly appreciate you. 🙂
WoW! All your cards are just amazing! I love the idea of maing the USA flag with different stamps and close it in a heart. Absolutely fabulous! Thank you for playing over at Simon Says Stamp Monday Challenge. Hugs, Marzena