

Hi Crafty Friends!
Happy 4th of July to all of my American friends out there. Today I am wrapping up red, white, and blue week with my final project for Honey Bee Stamps. Today, rather than do a card, I thought I would share with you an entry I did in my journaling bible. Maybe even give you a few tips that might help you in your bible/art journaling. I also want to mention that there is a sale at Honey Bee Stamps today 7/4/16. 15% off your total purchase by using the code 15FREEDOM (this is on top of the sale prices listed).
Here is a close up view of my finished entry. I kept it pretty simple with just journaling the verse on the right and text along the left margin. (this is before I added the tab to the right hand page)

To begin I prepped the pages with a thin coat of clear gesso. I used the Ranger Dina Wakley Clear Gesso brand but I also love the Clear gesso by prima
and use both interchangeably.
After the gesso was fully dry I masked off sections for the flag using post-it tape. I did some ink blending for the square and the stripes with Blueprint sketch distress ink
and Candied Apple distress ink
. After the ink dried the red wasn’t as vibrant as I would have liked so I added a bit of red acrylic paint. I also took the star stamp from the Brush Grunge Alphabet set and stamped that in the blue section with Hero Arts Unicorn white pigment ink
.
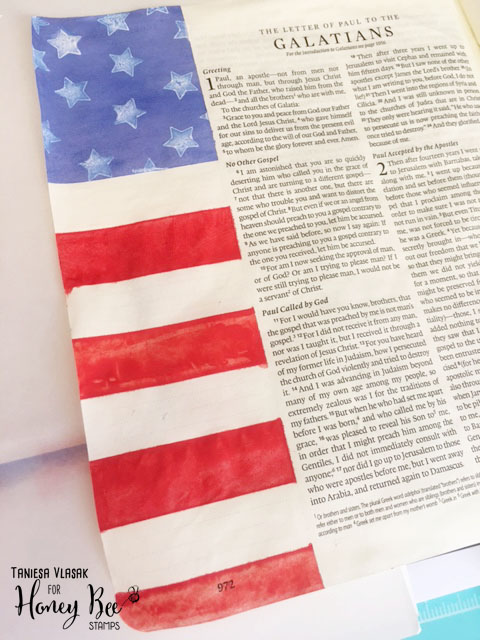
After I let the pigment ink dry I stamped the stars on the other side but this time in blue chalk ink, and stamped “Christ has set me free” in Ranger archival black ink. I used the Brush Grunge Alphabet stamp set. (Can you tell I really love this alpha set?) Because the page was prepped with gesso the ink does not bleed through.

I didn’t think that the text popped out enough so I took a white paint pen (Derwent Graphik Line Painter ) and went around the stamping.

Next it was time to highlight the verse I wanted. Because I had a different plan for the page the actual verse was on I chose to use the first chapter of Galatians. Now I am really bad at hand lettering. I wish I could letter like lots of the beautiful and talented ladies and gentleman I see on Pinterest but I know my strengths and I know my weaknesses. Thankfully, I do know Photoshop! I have a love for different fonts and so I played around with the verse and came up with something I liked. (you could also use Microsoft word for something as simple as this)

After I printed out my verse I coated the back of the copy paper with Derivan liquid pencil . This stuff is AH-MAZE-ING! I saw a review on YouTube for a completely different purpose and thought it would be great for bible journaling. The rewetable version of this watercolor type paint is completely erasable! You can also wet it and blot it off that way if you prefer. I think this is much cleaner than using graphite paper
, but I have used that as well with fairly good results. I do like that this paint makes a light mark when traced over. I chose the lightest grey shade that they make (Grey #3).

I applied the paint to the back side of the paper just where the text was.

You can see the paper I used to print on was cheap thin copy paper. I found this works the best so that you do not over apply the paint.

Now you can use a ballpoint pen to trace your text, but if you press to hard you run the risk of tearing through the paper. I like to use a small ended stylist to go over all of the text. You may have one in your stash if you are a card maker. These were meant to be used for dry embossing. I also love using these tools to add small white dots on my projects with acrylic paint.
Once in place go over all of the text with your tool, you can outline the text or just trace over the center depending on your font. For the bold text I chose to outline and for the thinner text i just went over it once. you can lift up your paper as you go to make sure you are getting the transfer you prefer. If you mess up, just erase and go over again.

Below is what it looks like after I was all done tracing.

Simple right? Now I don’t have to worry about straight lines, mis-spelling (provided I used spellcheck LOL) and style of text.

Now it is time to go over the text in a waterproof bleedproof pen. The pens above are all of my favorites for bible journaling. The Faber Castell Pitt artist pen (I also love the large brush markers in this same line). The Pigma Micron pens
have been my go to pens for YEARS and I love that they come in a wide range of sizes. My new favorite is the Illustrated faith pens
. They now come in three different sizes which I love and used all three for my outlining on this project.

I used the .25 for the thin text, the .35 for outlining the bold text, and the .65 for filling in the text and making the bolder downstroke lines in “Christ”.
I decided to fill in the words Freedom and firm with a Copic Atyou Spica red glitter pen. I thought this tied the red from the other page over to this side well. After I was done with the text, I let dry and then went around the letters carefully with a Tombow Mono Zero eraser (Ultra fine 2.3mm) I just LOVE this eraser any time I am working in my bible.
I did add some black splatter with some diluted black acrylic paint. Unfortunately it smudged just a little but I went with it. I used my WRMK Tab punch and some star dies
to make the tab on the upper right that you see for a final touch. I also added a thin coat of Distress Glaze
as I do on most of my finished journaling entries as this seals the paint and ink. you only need a very little bit and buff lightly with a paper towel. One jar will last you a very very long time.

There you have it, my completed two page entry. All in all I am happy with how it came out. I love our country and the freedom so many have fought for. It also made me reflect on the freedom I have in Christ.
As a little freebie gift and a way for you to practice using the text transfer method I shared (or graphite paper), I created a little printable for you all. You could even use this as a tip in for your bible. Print it out on a laser printer and you can run it through your foiling machine too! Lots of possibilities.

Download your free printable here.
Listed below (and within my blog post) are the links to the products I have used for this project. Affiliate links may be used, this means if you make a purchase I receive a small commission at no additional cost to you. I really appreciate your support toward the costs of running this blog.
Stamps used:
Honey Bee Stamps Brush Grunge Alphabet set (on sale as I type this 7/4/16)
Other products used:
Glitter paper
Blueprint sketch distress ink
Hero Arts Unicorn white pigment ink
post-it tape
Candied Apple distress ink
Ranger Dina Wakley Clear Gesso
Clear gesso by prima
Ranger archival black ink
Derwent Graphik Line Painter
Derivan liquid pencil
small ended stylist
Faber Castell Pitt artist pen
Pigma Micron pens
Illustrated faith pens
Copic Atyou Spica Glitter Pen
Tombow Mono Zero eraser (Ultra fine 2.3mm)
WRMK Tab punch
star dies
graphite paper
Distress Glaze
Thanks so much for stopping by! I hope you have a Fabulous and safe Independence day celebration!
Happy crafting!


Adorable! Great work!!