Create your own Handmade Postcards!

Hi there friends!

I know lots of you out there love to make handmade cards. One thing I don’t see too often is handmade postcards. They are super easy to send, and very inexpensive. I had the idea during TheDailyMarker.com’s 30 day coloring challenge to take my daily coloring and put it on a postcard and just send it to make someone smile. Not all my projects made it on a postcard but I did do a few and I really loved the result. Postcards can be something simple as a Hello friend! or a notification to your friends and family that you have moved.

There are some great products for making your own postcards. First product that I LOVE is the Strathmore watercolor postcards. These are preprinted 140 lb cards on watercolor paper making it so easy to color and send your postcard. I got mine at my local craft store with a coupon making them very inexpensive.

Create your own postcards | TheCraftyPickle.com

Here is a fun stamp from Amy Tangerine. This comes from her Better Together collection.

Create your own postcards | TheCraftyPickle.com

A side note about the stamp above. This stamp is Acrylic and not Photopolymer. I recommend using a stamp positioner tool or a misti to make sure you get a good impression.

There are also other great stamps out there that you can use to build your own postcard backing.

Create your own postcards | TheCraftyPickle.com


Create your own postcards | TheCraftyPickle.comCreate your own postcards | TheCraftyPickle.comCreate your own postcards | TheCraftyPickle.com

First up is a simple hello friend postcard made with Mama Elephant brushstroke florals stamps and Sunday Sentiments stamps. I stamped these florals in various shades of distress ink and softened edges with a waterbrush. I also splattered some black ink afterwards. Sentiment was stamped in Simon Says Stamp intense black ink and then I ran the card though a dotted die. This card is a standard A2 card size and not the traditional 4×6 postcard. Postcards can be a range of sizes and does not have to stick to the 4×6 but double-check if you make it larger, that you do not need extra postage.

Create your own postcards | TheCraftyPickle.com

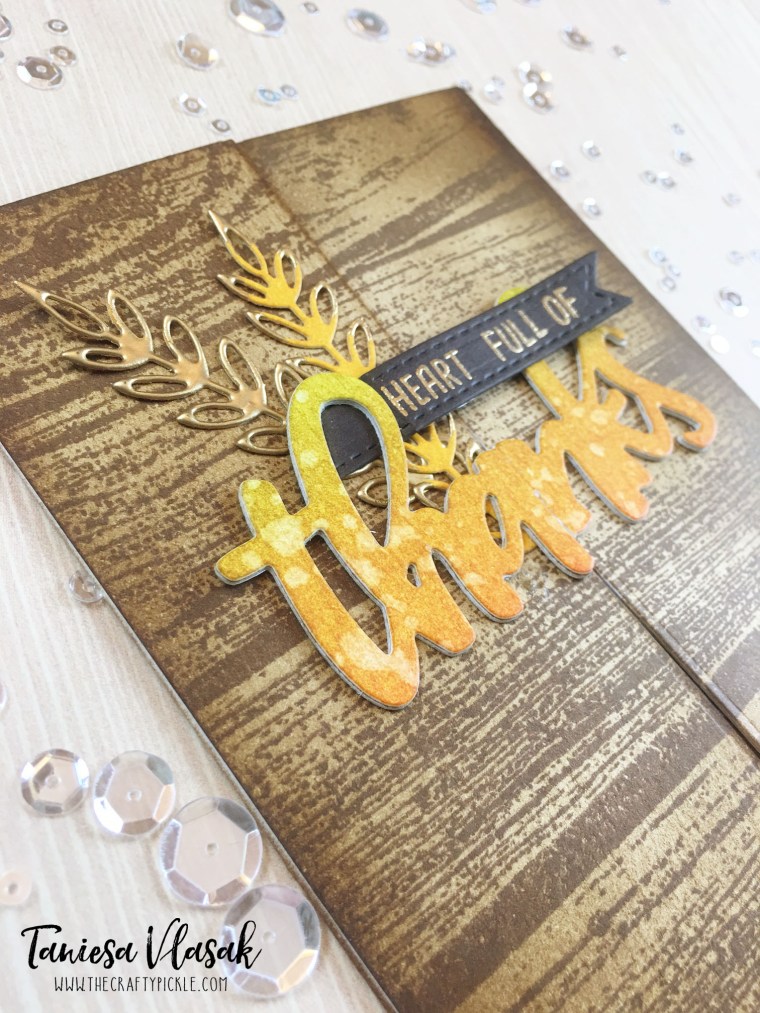
Next we have another Hello postcard, this time with Honey Bee Stamps “Say What” stamp set as well as their “brush stroke alphabet” stamps. I did some spotlight coloring on this one with copic markers. Using grays for the outside and colors for the center circle. After I was done coloring I adhered my postcard back with multi medium matte. If you want the postcard to look seamless make sure to take some ink around the edges.

Create your own postcards | TheCraftyPickle.com

Here we have a thank you postcard that I made for my daughter’s Aunt. Small Talk Stamp set by Mama Elephant with alphabet stamps from Illustrated Faith and Studio Calico. Mostly distress ink blending on this one and zig clean color real brush markers to color in “Aunt”. I also went over the letters with a Spectrum Noir clear sparkle pen once dry.

Create your own postcards | TheCraftyPickle.com

This is a soft thank you postcard using the Not too shabby and kindness stamp sets from Honey Bee Stamps as well as the Kindness die.  I die cut the white panel from Bristol cardstock and sandwiched a piece of Simon Says Stamp Audrey Blue cardstock between that panel and the postcard side. I used my Clarity Stencil Brush to apply Peacock Feathers Distress ink around the postcard. After stamping with Simon Says Stamp intense black ink, I colored the images with Zig Clean Color Real Brush Markers.

Create your own postcards | TheCraftyPickle.com

Finally we have a postcard I made for my friends and family announcing our move which is happening this September. This was made with two fabulous stamp sets, “I heart books” and “Moving Sentiments” by Three Room Studio. They were colored using Zig Clean Color real brush markers on Canson bristol cardstock. I printed off custom postcard backs that I created in Photoshop.

Create your own postcards | TheCraftyPickle.com

Create your own postcards | TheCraftyPickle.com

Another great idea is to take your premade postcards and stamp outlined sentiments like this “Thank you”. This is a great idea for kids to personalize a thank you note to family and friends when needed.

Create your own postcards | TheCraftyPickle.com

Create your own postcards | TheCraftyPickle.com

Because I made a postcard in Photoshop for my projects I thought you might enjoy using it too. Click the link below to download your copy. Print out on your favorite cardstock and cut to 4×6. You can color directly on the back or if you do it separately then adhere together with your favorite adhesive.

Download your FREE postcard printable here!

Free postcard printable | TheCraftyPickle.com


Thank you so much for stopping by. I sure hope you got some postcard creating inspiration today. I would love to see what you create! Please leave me a link to your project via your blog, Instagram, Flickr, or other so I can check it out!

Listed below are the links to the products I have used for these projects as well as postcard projects I have done in the past, and planning on doing. Affiliate links may be used, which means if you make a purchase, I receive a small commission at no additional cost to you. I really appreciate your support toward the costs of running this blog.

https://static.inlinkz.com/ppr.js

Thank you so much for stopping by today! I will be back this Thursday with the Honey Bee Stamps HONEY HOP celebrating the new release! For now, I am back to packing!

Have a wonderful week!
Taniesa Vlasak | TheCraftyPickle.com

Inklipse Blog hop!

Hey Crafty Friends!

If you have never visited TheCraftyPickle before, Welcome! I was so happy to help Simon out in his first Inklipse blog hop! He has a great hop planned with lots of talent (and of course prizes!) I hope you will follow along with us!

If you have started at my blog first you can start at the beginning HERE

You should have arrived from Jess Gerstner’s blog.

Inklipse Blog Hop | August 2016

So I have to tell you, I had this big video planned. I recorded my whole process and when I went to edit my video last night…. nada … nope not any footage. Darn it! So I apologize. I will have some more YouTube videos coming VERY soon! You can find my youtube HERE. Subscribe so you don’t miss out on the content I have coming in September!  ….. On to today’s card!

I recently got some of Concord and 9th’s new release products from a Simon Says Stamp haul and I was super excited to get to play with them. I just loved the Hugs die that they came out with earlier in the year so of course I got the Thanks die too!

Concord and 9th Heart full of thanks | TheCraftyPickle.com

This die is so great for making a card extra special!

Concord and 9th Heart full of thanks | TheCraftyPickle.com

Now I have done the hugs die just how Concord & 9ths YouTube video instructed but this time I thought I would cheat a bit with the thanks die… I cut my paper to 8 1/2 x 5 1/2 and scored at 2 1/8 on either side. This was my base. I set that aside and took two pieces of distress precut cardstock and stamped them both with the Barnwood background stamp from Concord and 9th in Versafine Vintage Sepia ink. I then took an ink blending tool and some gathered twigs Distress ink and blended both card bases.

Concord and 9th Heart full of thanks | TheCraftyPickle.com

I set those panels aside for a bit to dry. Then I blended some distress inks on some scrap watercolor paper ( Ripe Persimmon, Wild Honey, and Crushed Olive) I cut the thanks word out of this scrap of blended cardstock. I then scored each piece of Barnwood stamped Distress paper down the middle. The thanks dies fit right in the grove of my score line and I ran them through my big shot just like that. This left me with two side panels to overlay on the card base side panels. I glued them both down securely using Bee Creative tape.  Once that was finished I glued the extra thanks pieces over the base layer of the thanks die cuts.  I stamped the heart full of…. sentiment from Honey Bee Stamps Sentiment builder stamp set in versamark ink and embossed with Pale Gold embossing powder by WOW. Once cool I cut out using a Simon Says Stamp stitched banner die. Finally I cut out some wheat and a leaf from Concord & 9th’s Layering Leaves dies. I colored the die cuts with some wild honey Distress ink and added some pale gold embossing powder to them as well. I glued all the pieces to the front using Multi Medium Matte from Ranger.

Concord and 9th Heart full of thanks | TheCraftyPickle.com

I wanted the inside to be special too so I turned it into a gift card holder! First I used my clarity stencil brushes and a Dina Wakley stencil to create a layered leaf background ( Crushed olive and Twisted citron distress inks) Then I stamped my sentiment from the Honey Bee Stamps Kindness stamp set in the middle of the card base using the Hero Arts Autumn ombre ink pad.

Concord and 9th Heart full of thanks | TheCraftyPickle.com

Finally I cut out a little gift card envelope from Mama Elephant’s Venice die set. I had the inside flap match the leaf background of the card base inside and the rest I used an ink blending tool and some wild honey Distress ink. For a finishing touch I added one of the layering leaves to the envelope flap. The envelope was glued down to the base using Bee Creative tape.

I hope you enjoyed my card today! Your next stop in the blog hop is Crafty Max!

Listed below are the links to the products I have used for this project. Affiliate links may be used, this means if you make a purchase I receive a small commission at no additional cost to you. I really appreciate your support toward the costs of running this blog.


https://static.inlinkz.com/ppr.js

Thank you again for stopping by. Check back here next week for Honey Bee Stamps Honey Hop on Thursday Aug 25th!

Honey Bee Stamps Honey Hop Aug 25th! Brand new release and of course PRIZES!!!

Have a fabulous weekend!

Taniesa Vlasak | TheCraftyPickle.com