Inklipse Blog hop!

Hey Crafty Friends!

If you have never visited TheCraftyPickle before, Welcome! I was so happy to help Simon out in his first Inklipse blog hop! He has a great hop planned with lots of talent (and of course prizes!) I hope you will follow along with us!

If you have started at my blog first you can start at the beginning HERE

You should have arrived from Jess Gerstner’s blog.

Inklipse Blog Hop | August 2016

So I have to tell you, I had this big video planned. I recorded my whole process and when I went to edit my video last night…. nada … nope not any footage. Darn it! So I apologize. I will have some more YouTube videos coming VERY soon! You can find my youtube HERE. Subscribe so you don’t miss out on the content I have coming in September!  ….. On to today’s card!

I recently got some of Concord and 9th’s new release products from a Simon Says Stamp haul and I was super excited to get to play with them. I just loved the Hugs die that they came out with earlier in the year so of course I got the Thanks die too!

Concord and 9th Heart full of thanks | TheCraftyPickle.com

This die is so great for making a card extra special!

Concord and 9th Heart full of thanks | TheCraftyPickle.com

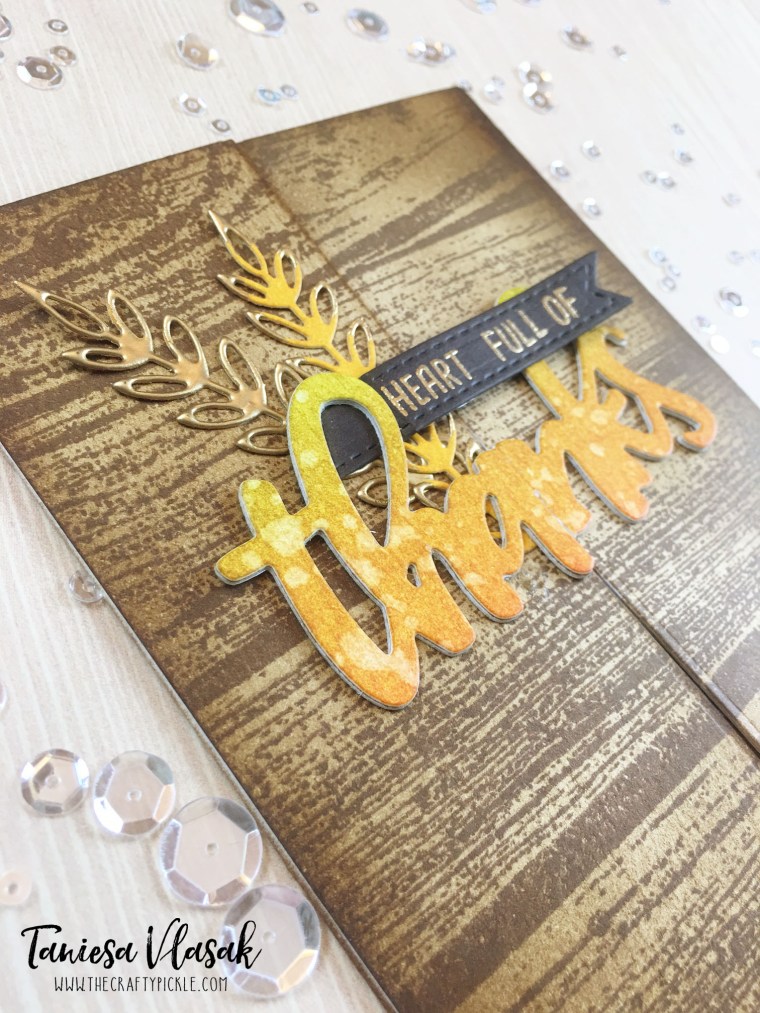
Now I have done the hugs die just how Concord & 9ths YouTube video instructed but this time I thought I would cheat a bit with the thanks die… I cut my paper to 8 1/2 x 5 1/2 and scored at 2 1/8 on either side. This was my base. I set that aside and took two pieces of distress precut cardstock and stamped them both with the Barnwood background stamp from Concord and 9th in Versafine Vintage Sepia ink. I then took an ink blending tool and some gathered twigs Distress ink and blended both card bases.

Concord and 9th Heart full of thanks | TheCraftyPickle.com

I set those panels aside for a bit to dry. Then I blended some distress inks on some scrap watercolor paper ( Ripe Persimmon, Wild Honey, and Crushed Olive) I cut the thanks word out of this scrap of blended cardstock. I then scored each piece of Barnwood stamped Distress paper down the middle. The thanks dies fit right in the grove of my score line and I ran them through my big shot just like that. This left me with two side panels to overlay on the card base side panels. I glued them both down securely using Bee Creative tape.  Once that was finished I glued the extra thanks pieces over the base layer of the thanks die cuts.  I stamped the heart full of…. sentiment from Honey Bee Stamps Sentiment builder stamp set in versamark ink and embossed with Pale Gold embossing powder by WOW. Once cool I cut out using a Simon Says Stamp stitched banner die. Finally I cut out some wheat and a leaf from Concord & 9th’s Layering Leaves dies. I colored the die cuts with some wild honey Distress ink and added some pale gold embossing powder to them as well. I glued all the pieces to the front using Multi Medium Matte from Ranger.

Concord and 9th Heart full of thanks | TheCraftyPickle.com

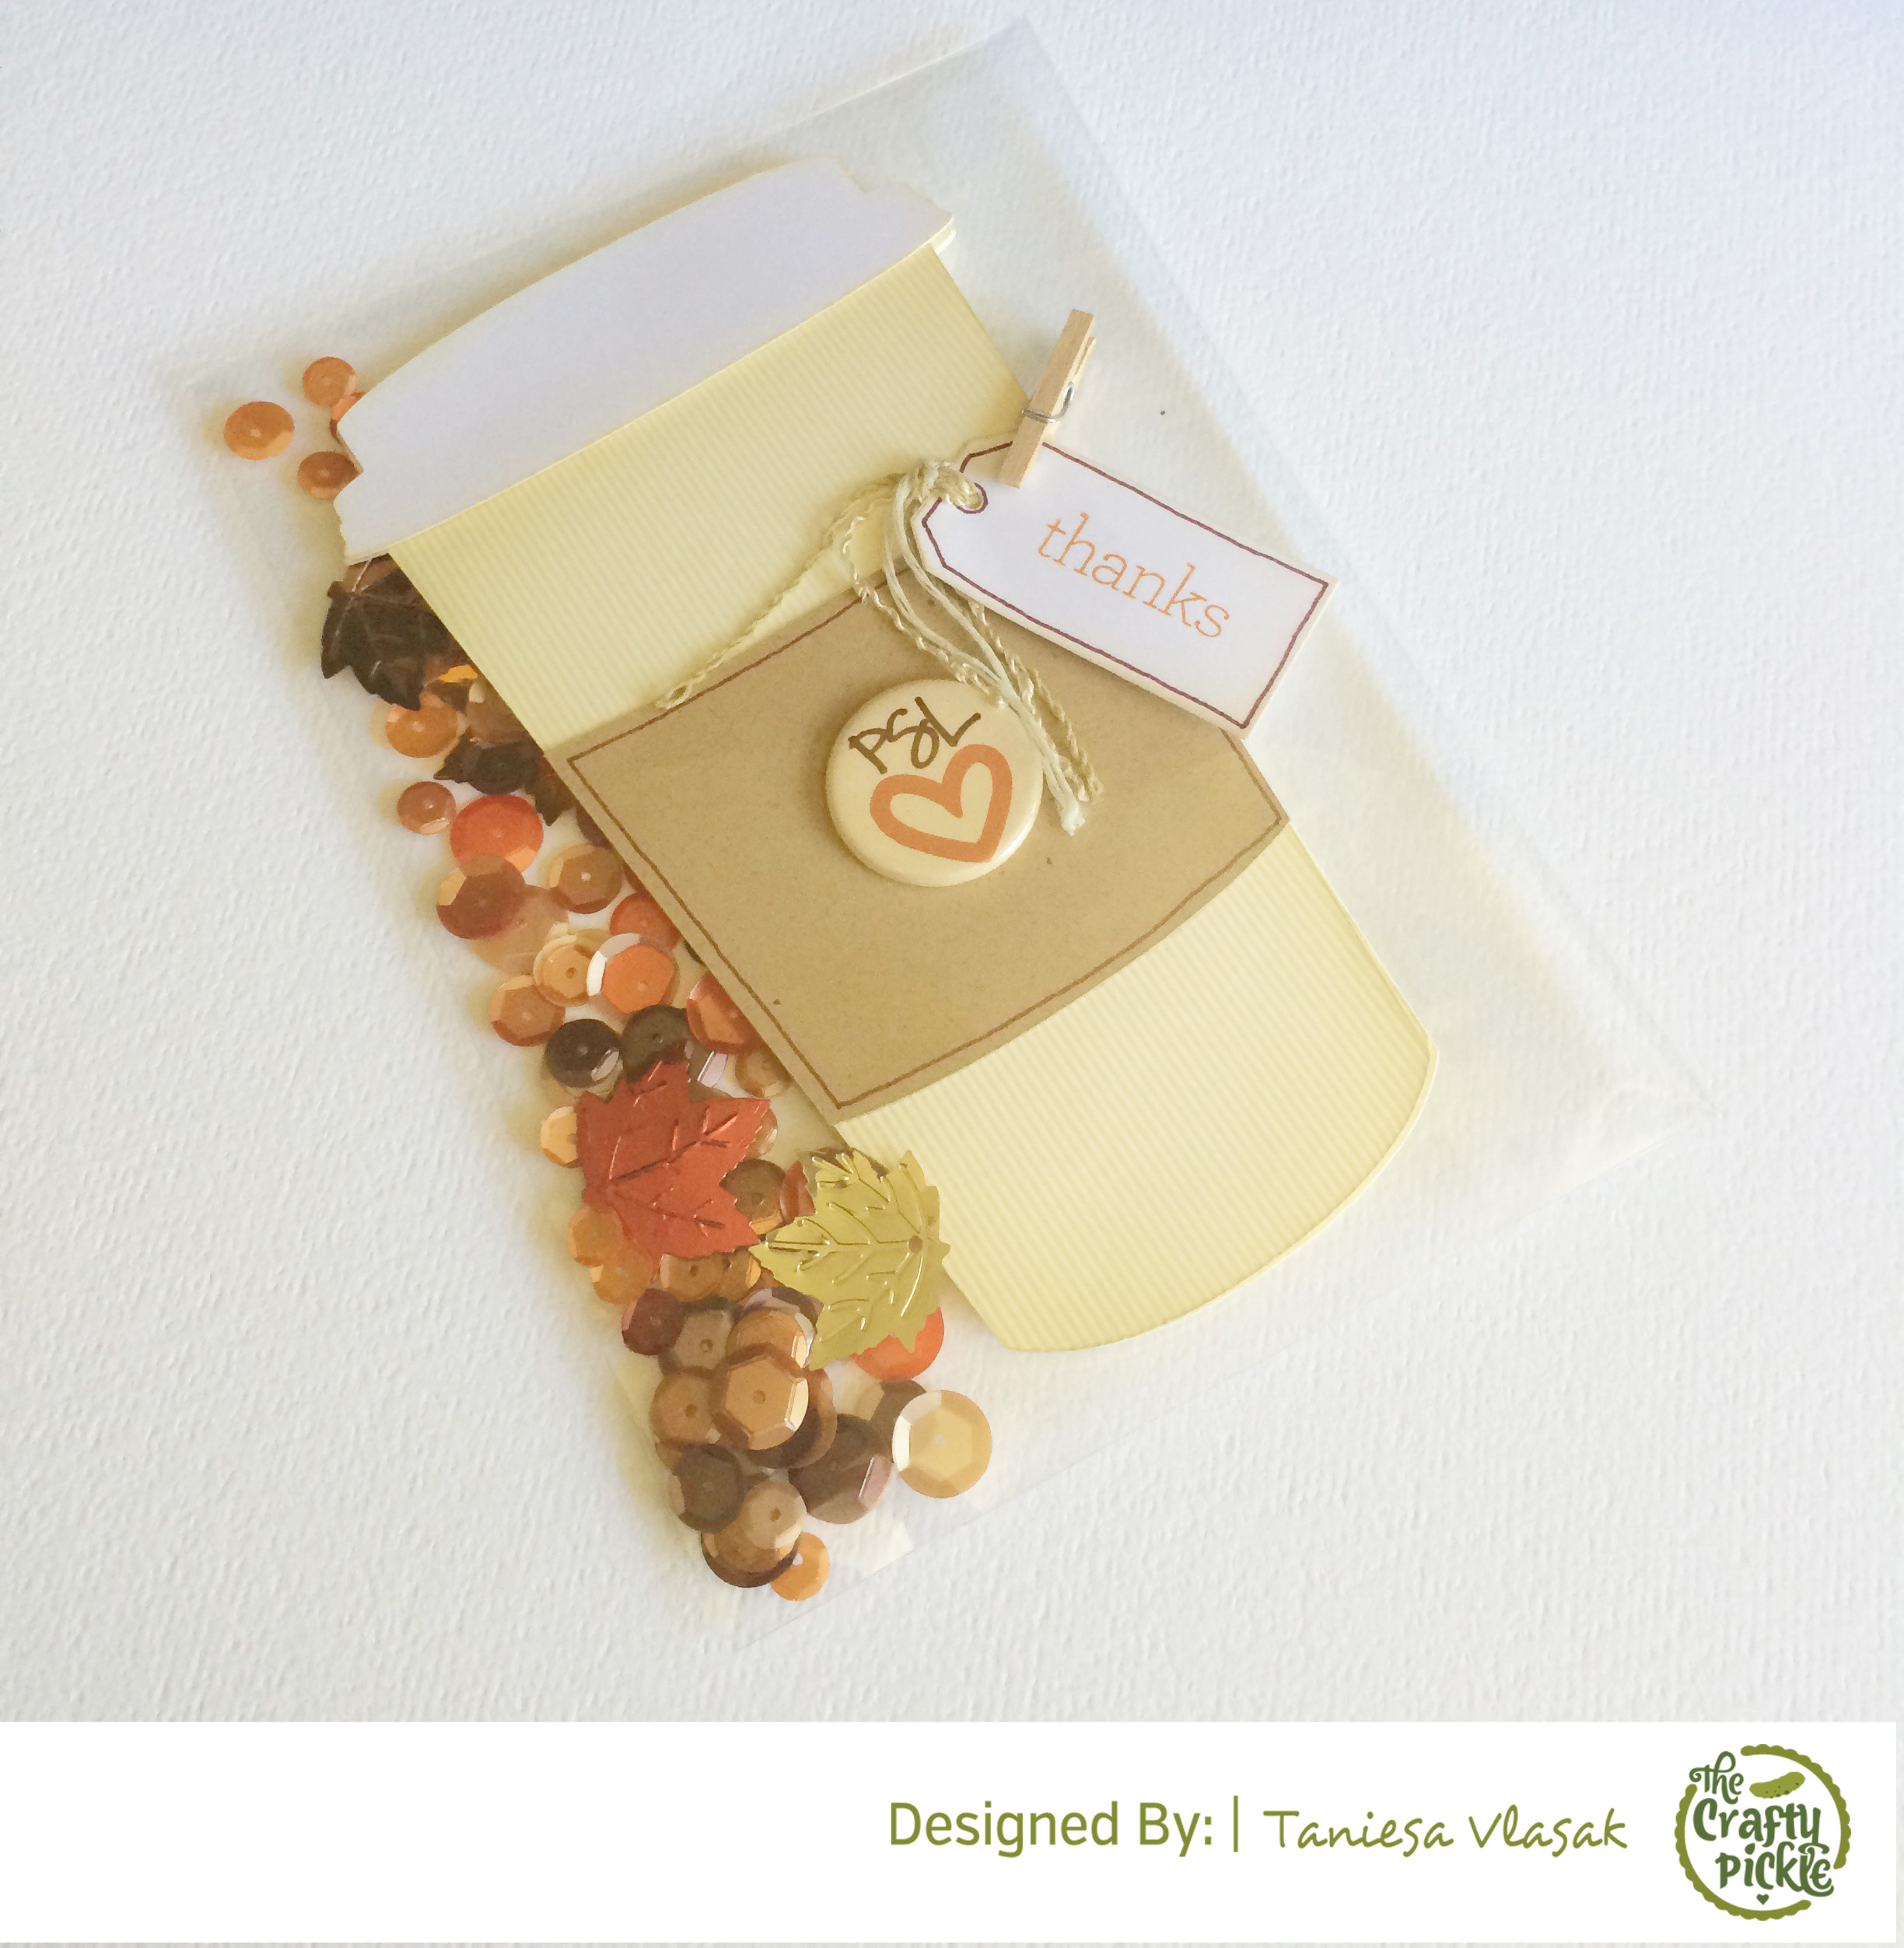
I wanted the inside to be special too so I turned it into a gift card holder! First I used my clarity stencil brushes and a Dina Wakley stencil to create a layered leaf background ( Crushed olive and Twisted citron distress inks) Then I stamped my sentiment from the Honey Bee Stamps Kindness stamp set in the middle of the card base using the Hero Arts Autumn ombre ink pad.

Concord and 9th Heart full of thanks | TheCraftyPickle.com

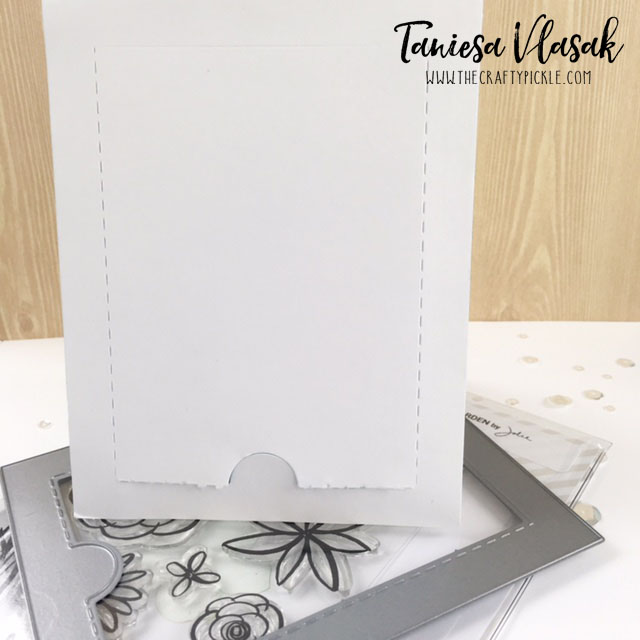
Finally I cut out a little gift card envelope from Mama Elephant’s Venice die set. I had the inside flap match the leaf background of the card base inside and the rest I used an ink blending tool and some wild honey Distress ink. For a finishing touch I added one of the layering leaves to the envelope flap. The envelope was glued down to the base using Bee Creative tape.

I hope you enjoyed my card today! Your next stop in the blog hop is Crafty Max!

Listed below are the links to the products I have used for this project. Affiliate links may be used, this means if you make a purchase I receive a small commission at no additional cost to you. I really appreciate your support toward the costs of running this blog.


https://static.inlinkz.com/ppr.js

Thank you again for stopping by. Check back here next week for Honey Bee Stamps Honey Hop on Thursday Aug 25th!

Honey Bee Stamps Honey Hop Aug 25th! Brand new release and of course PRIZES!!!

Have a fabulous weekend!

Taniesa Vlasak | TheCraftyPickle.com

Ellen Hutson LLC PIN-SIGHTS Challenge | Hidden Gift Shaker Card

Hi there Crafty Friends!

I hope your weekend is off to a fabulous start! I thought I would kick off my weekend by participating in the Pin-Sights challenge over at Ellen Hutson.com.

EllenHutson.com Pin-Sights Challenge

You can find out more by clicking the link HERE (and see some AMAZING project entries!)

The challenge was to take Essentials by Ellen product(s) and pair them with one of your favorite companies products. I have really been enjoying the latest Honey Bee Stamps release and decided to pick something from my Honey Bee stash!

I LOVE the essentials by Ellen stamps, dies, and other papercrafting items so this was a great challenge to hop into and jumpstart my creativity. Today I will be working with the Essentials by Ellen Bohemian Garden stamps and Zipper Panel die.

Essentials-by-Ellen-Clear-Stamps-Bohemian-Garden-by-Julie-EbersoleEssentials-by-Ellen-Designer-Dies-Zipper-Panel-by-Julie-Ebersole

I will also be using the Kindness stamp set by Honey bee stamps.

Honey-Bee-Clear-Stamps-Kindness

Today I wanted to mix things up a bit and I thought… “What if I used the zipper panel in the back of the card rather than the front?” This way the recipient could see the gift when they opened the card but take the gift card out when they were ready.

For the front panel I did all my stamping in Versamark ink and heat embossed with Hero Arts white embossing powder. I did ink blending at the top and at the bottom with distress ink (colors listed at the bottom of the post) and mixed some Daniel Smith watercolors to color my floral images. I did add a vellum flag out of Essentials by Ellen 40 lb vellum and heat embossed the same as the card. For the final touch on the panel I added some Sparkling clear sequins with some Ranger Multi Medium Matte.

Hidden Gift Shaker Card | TheCraftyPickle.com

I set the front panel aside and went to work on the rest of the card. I made the shaker pocket from an Essentials by Ellen small stamp storage pocket and Be Creative tape. (I probably would have used my fuse but we are moving and it is packed up in a box at the moment). I printed my message on the same 40 lb vellum from Essentials by Ellen using my laser printer and cut it to fit inside the stamp storage pocket. I added the die cut “Enjoy” which is also apart of the zipper panel die set. Once that was dry, I added the pretty pink posh sequins, Prima beads, and Distress glitter.

Hidden Gift Shaker Card | TheCraftyPickle.com

I reinforced the center part of the zipper panel as Julie Ebersole has shown in her YouTube video (See bottom of post for video) with a piece of Neenah cardstock that I blended some distress ink on. I added be creative tape all around the back panel edges being careful not to cover the zipper stitched marks. I then added my gift card in the middle and placed the finished shaker pocket down on top of the tape. To hide the rough adhesive edges I made a frame from the large stitched rectangle dies from Lawn fawn and adhered that to the top of the shaker pocket.


Hidden Gift Shaker Card | TheCraftyPickle.com

I love that you can see the gift card through the vellum but the message still stands out. The shaker adds a fun playful confetti party like feel.

Hidden Gift Shaker Card | TheCraftyPickle.com

Here is the view of the back . I started lifting the bottom up……

Hidden Gift Shaker Card | TheCraftyPickle.com

But then I decided I wanted to show you all how cool it looks when it is opened up all the way!

Hidden Gift Shaker Card | TheCraftyPickle.com

What I love about putting the zipper in the back is that the front stays pretty and intact so you can still display as normal if you like.

Hidden Gift Shaker Card | TheCraftyPickle.com

This card was a lot of fun to make. Let me know in the comments below if you would like to see a video tutorial on how to assemble a gift card like the one shown today.

If you have never seen the zipper panel from Ellen Hutson yet. Check out this how-to video that Julie Ebersole (the designer) made. The die is just genius!

Links to the items I have used are listed below.

https://static.inlinkz.com/ppr.js
Thank you for stopping by. I hope you found my card project inspiring. I love giving gifts, but making gift packaging pretty is extra special!

Have an extra fun and crafty weekend!

Taniesa Vlasak | TheCraftyPickle.com

A Thank You card and a Project Life card using Flair

Hi Crafty Friends!

Today I have teamed up with Scrap your Scraps to share some ideas using Flair buttons! I wanted to share two different ideas using some brand new Flair that I just added to The Crafty Pickle Etsy Store.

First up is a thank you gift card holder that I made using my silhouette and a flair from the Cozy Fall Set. I adore Autumn and pumpkin spice latte’s are my favorite!

Coffee Gift Card @TheCraftyPickle.com

I used some cardstock I had on hand and cut out the card design on my Silhouette using design # 29511

Coffee Gift Card @TheCraftyPickle.com


I die cut a tag from some cardstock scraps I had, added a little bit of decorative trim and attached it with a little clothes pin. I attached the PSL (pumpkin spice latte) button with some tombo xtreme adhesive. You could also use a button from the Starbucks flair set too, I just wanted to go for an autumn feel with this card.

Coffee Gift Card @TheCraftyPickle.com


The inside has room for the coffee gift card as well as a little room to write a personal message.

Coffee Gift Card @TheCraftyPickle.com


Once it was all finished I slipped the card into a clear envelope and tossed in some of the exclusive autumn mix sequins from The Crafty Pickle Etsy shop for a little added fun touch.

Next up I have a project life card that I am sure anyone can find use for in their album, Mine is usually inspired by one of my teenage boys dodging the camera. For this card I am using the Photo Not Available flair from the Everyday Photo #2 set

No Photo Available Project life card @TheCraftyPickle.com


To make this card I took a white piece of heavy cardstock that was in my scrap pile and cut out the camera design on my silhouette (Design #41015)  The design called for several shades of gray but I only had two shades on hand so I just cut everything out of the white cardstock and colored the pieces with my copic markers (N8, N6, N4, N2, Y15, and Y19) I also used my wink of stella glitter pen and my Stardust gelly roll pen by Sakura

No Photo Available Project life card @TheCraftyPickle.com


I attached a few sequins (that are always included in my flair packages) and attached the Photo Not Available flair with some Tombo Xtreme adhesive. The base card is a Becky Higgins Project Life grid card.

No Photo Available Project life card @TheCraftyPickle.com

As you can see above my flair has a very low profile making it ideal for page protectors of all types, especially pocket pages. It’s about the same dimension as chipboard or thickers.

If you haven’t visited The Crafty Pickle Etsy shop recently you might be surprised to find over 30 new flair sets including our new color patterned pop collection and some special limited edition sequins mixes.

Make sure you Stop by the Scrap your Scraps blog for even more flair inspiration, Not to mention a fun giveaway from The Crafty Pickle Etsy Store too!!!

Happy Crafting!

The Crafty Pickle