

Good Morning Honey Bees! Welcome to our August release Honey Hop!!!
You should have arrived from Melissa’s blog. If you got lost you can always start at the beginning HERE.
All this week we have been showing you little sneaks of our awesome new stamp sets and dies! TOMORROW our new release goes live and to celebrate we are showing you some beautiful projects, TODAY!!!
What’s a Honey Hop without some sweet prizes, right? This time we not only have one awesome prize pack but TWO!! One winner will win our zen florals pack (Zen florals, Zen Bouquet, and each of their matching die sets) and our second winner will win our Alpha prize pack! (Color me alpha stamp set, sentiment alpha stamp set, and color me alpha die set). All you have to do to win is comment here on the Honey Bee Stamps blog and again at each one of our designer’s blogs by Sunday August 28th. Winner will be announced on Monday August 29th at Noon PST.
So Hop along and get ready to BEE inspired!
During our preview days this week I shared two videos. One for each new Alphabet stamp set that Honey Bee Stamps is releasing this friday. I love them both and I am sure you will too.
Brand new Sentiment Alpha!
And the oh so fun Color-Me-Alpha!
and now I have two cards to share! The first one you may of saw this week on social media….

For this card I used the main floral border in the new Zen Florals stamp set. I also used the Smile stamp set and die as well as the Sweet as honey stamp set.

First I used distress ink to blend a light blue background (Tumbled Glass). Then I water colored the floral images. After the watercolor was dry I went over with a clear Spectrum sparkle pen.

I heat embossed a dot pattern on black cardstock and adhered just below the floral border strip. I also embossed the smile die cut and the sentiment that was made up from the smile stamp set as well as the sweet as honey stamp set. Everything was heat embossed using the WOW rich pale gold embossing powder. I popped the smile die cut up on some black adhesive backed foam.

As an added touch, and something I have been doing a lot lately, is taking a coordinating image from the stamp set that I used for the card and stamping it on top of my custom signature stamp. I love how this just ties the entire card together and makes it just a little more special.

I also really like to stamp the envelope to match too.
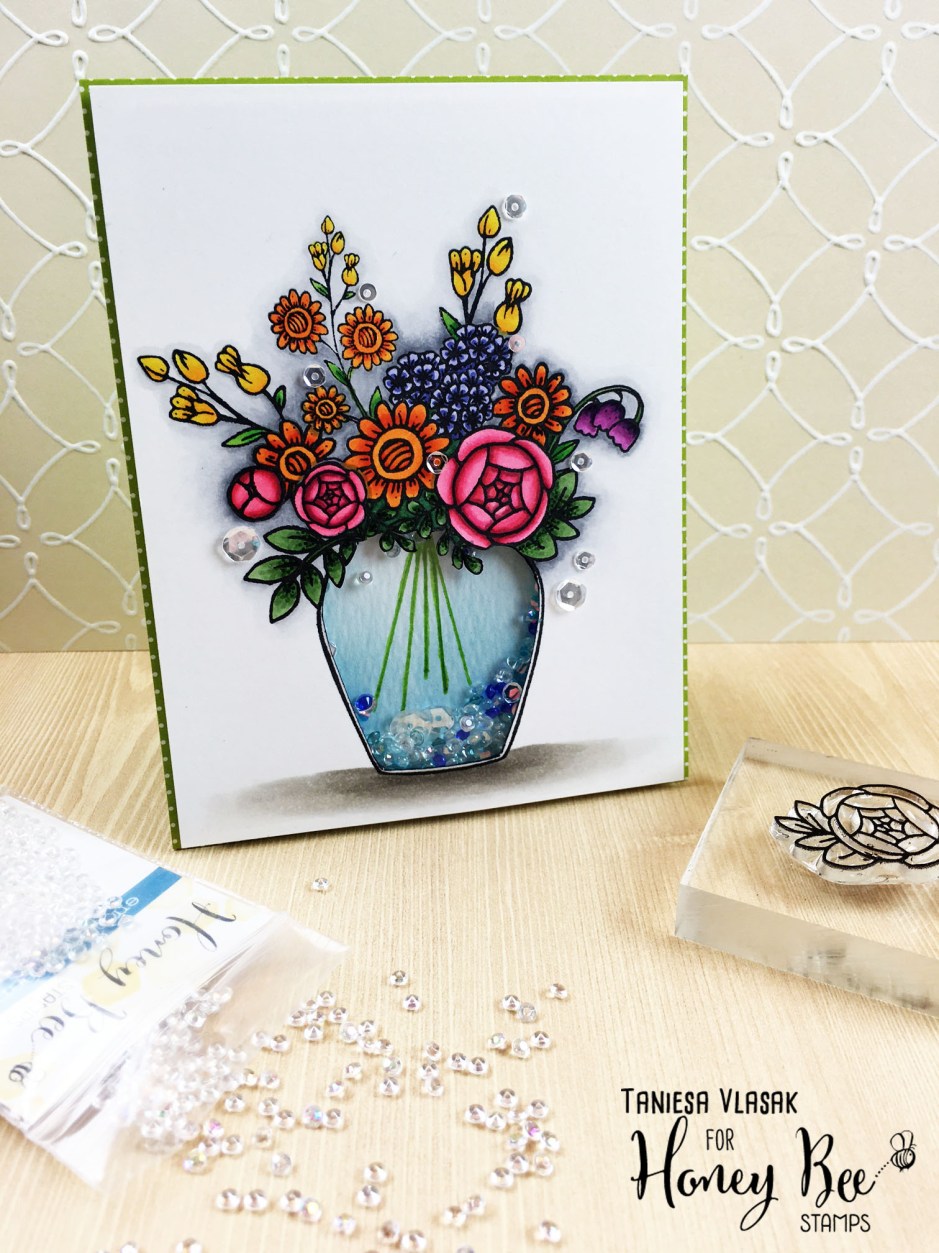
For my next card I decided to shake things up…. well, Literally. I made a fun shaker card with Honey bee stamps new Zen Bouquet set, Zen Florals set, new gems embellishment pack, and I also added in the jar from the sweet as honey stamp and die set.

I stamped out the various flowers from both zen sets into an arrangement on scratch paper first. Once I was happy with the layout I traced around the jar from the sweet as honey die set. I cut some masks for each of the florals using Simon Says Stamp masking paper. Then I stamped my arrangement using Simon Says Stamp intense black ink.

After everything was stamped. I took my Tim Holtz craft knife (best craft knife I have ever owned, I love this thing!) and I cut around the inside of the honey jar and around the overlapping florals and leaves. This leaves the window for my shaker card. I took a piece of craft foam slightly smaller than my card panel and I cut out the Honey jar from the foam in the same place as the card panel. This leaves the opening a bit larger so that my panel covers the foam completely.

Then I began coloring. I used 3 to 4 shades per color family of copics to color in my images. I used warm grays at the bottom of the jar to ground the image. Once I was finished coloring I adhered a piece of acetate to the back of the front panel to act as my window.

Now the fun part …. Wait, it’s all fun, ok ANOTHER fun part…. filling the shaker! If you have seen the sneaks, Honey Bee Stamps came out with these cute little clear gemstones to use in your shakers. I needed shaker bits to look a little bluish like water so I pulled out a tip my dear friend and fellow design team member taught me a year or so ago. You can dye your clear plastic embellishments any color you want with alcohol ink! So I thought why not these cute little gems. I took two shades of Ranger alcohol ink and a couple of plastic baggies and put some gems in each. I then put two drops of the ink in the bag and smooshed it around…. after they were coated well I poured them out on a paper towel and let them dry. here is a closer look at them….

Of course I need to buy more so I can dye these lil babies in every color of the rainbow!! I added some of these to my shaker window along with some clear sequins and some blue confetti. I covered up the opening in the back with a scrap piece of distress cardstock that I used a bit of ink blending on ( Broken china distress ink ) and that I drew in some stems with a green marker. I placed the shaker panel on a piece of Doodlebug green polka dot patterned paper and attached the completed panel to a top fold A-2 cardbase.

And that pretty much does it for my cards today. Thank you so much for hanging in there with my very long post today. I hope you were inspired.
There is lots more fun to be had. Keep on Honey Hoppin to our awesome Guest Designer’s blog, Deepti Stephens!!
Listed below are the links to the products I have used for these projects as well as postcard projects I have done in the past, and planning on doing. Affiliate links may be used, which means if you make a purchase, I receive a small commission at no additional cost to you. I really appreciate your support toward the costs of running this blog.


https://static.inlinkz.com/ppr.js


The shaker card is awesome
Your cards are awesome. The shaker card is great.
Love these wounderful shaker card ,both are so pretty.
both cards are stunning .. colourful treat for eyes 🙂
Both of your cards are incredible but the shaker card is mesmerizingly beautiful! I absolutely love the little gemstones and will be purchasing a ton of them as soon as my SS check arrives! I absolutely love how the vase looks like it really has water in it! Magical and fun!!! I have to say that this is my favorite card from all of the ones on this hop!! Awesome job!! TFS!
Wow!!! Beautiful cards:)
Wow, how beautiful! I love the little gems. They’re going to be great for shaker cards.
Fantastic projects, great details. The shaker in the vase is great, and the way you colored them is so much better than using markers on each one, thanks for the great tip. Also love your name on the back of the card. Really great projects, thank you!
Both of your cards are fantastic, but I have to say the shaker card is incredible!!! I love how those little gems look and the gorgeous vibrant colours that you used for the flowers could not be better.
Gorgeous cards! I love the shaker vase!!!
Wow! Love Love Love the shaker vase! The boldness of the flowers is FABULOUS 😉