Dive in! Under the Sea with Honey Bee *Blog Hop*

Good Morning Crafty Friends!

It’s new release day over at Honey Bee stamps, and that means its Blog Hop SWIM time!!!

If you are already swimming along, then you should have arrived here from the blog of the kind and beautiful, Patricia! If not, don’t worry, you can always go to the Honey Bee Stamps blog<— and see all of the amazingly talented designers that are inspiring you today.

Swim along with our New ReleaseUnder The Sea with Honey Bee!

Limited quantities of the NEW July Under the Sea Stamp bundles are available. click the photo or see the end of the post for links.

Everything is available for purchase today in our shop HERE.
So let’s Shellabrate with some splashingly sweet prizes!!  We will have TWO winners that will each receive a $50 gift certificate to purchase new goodies in the Honey Bee Stamps Store.

Enter to win one of two $50 shopping sprees to HoneyBeeStamps.com for participating in our new release Blog Hop!

All you have to do to win is comment here on the Honey Bee Stamps blog and again at each one of our designer’s blog by Sunday, July 16th. Winners will be announced on Monday, July 17th at Noon PST.

So swim along and get ready to SEA some inspiration!

Affiliate links used where available at NO cost to you, Thank you so very much for your support!

Today I have two simple cards to share with you all highlighting some of the new stamps, dies and embellishments by Honey Bee Stamps, It’s another HUGE and amazing release so I will have lots more to share in the coming weeks!

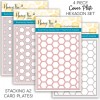
First up is this classy neutral shaker card made with the new Seashell Card die.

I created this shaker card using all three large shell and shell card pieces. First I cut the card itself, then cut the inside of one of the shells using the smaller open shell. I set that aside. I took the detail die and cut that out of some Cricut holographic opal vinyl and then I used that same detail die to cut a seashell in the middle of my card panel as the opening for the shaker.

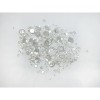
I cut the card in half at the score line and started assembling the two pieces with a double layer of foam tape. Once that was finished I added some of the new Seaside Treasures shaker kit as well as some glitter and sequins from various new embellishment kits. I covered the shaker with a piece of acetate and then again covered that up with the card panel. I took that vinyl detail piece (which already has adhesive on the back) and stuck it in the opening of the panel on top of the acetate. I put more foam tape around the Seashell shaker to cover the top panel and then glued all of that on an off white mat base, and then to a heavy weight beige cardstock card base.

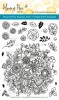
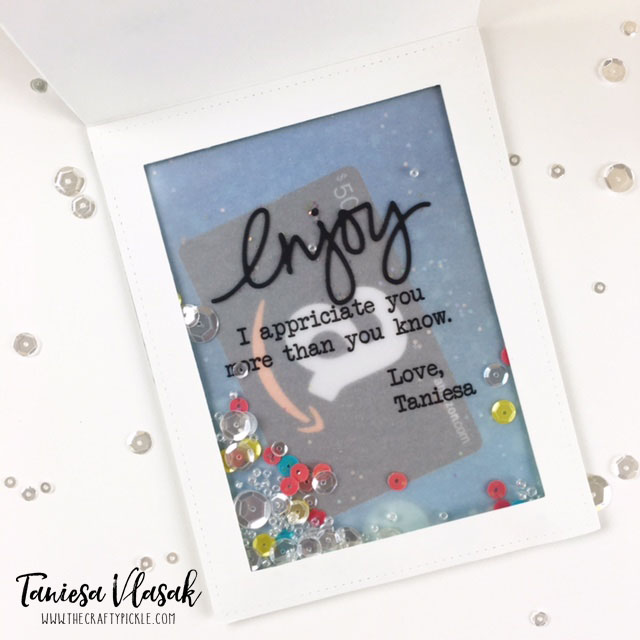
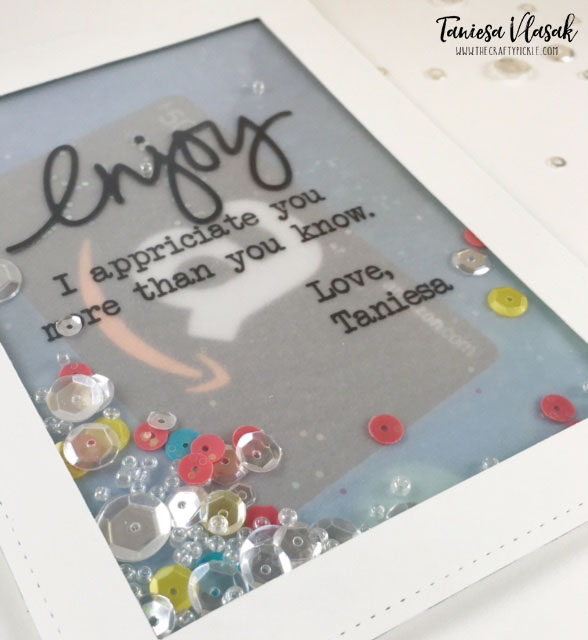
On the inside of the card I stamped Let’s Shellabrate from the Mermaid song stamp set using Versamark ink, and heat embossed using WOW Rich pale gold embossing powder. I also stamped some cute little sand dollars from the Message in a bottle stamp set and heat embossed those with Nuvo White embossing powder. I think this would make a great masculine card or a wedding card for someone celebrating their wedding at the beach.

I am in love with this die and it can do a lot more than just a shaker card. It can be a stand alone card or used within a traditional card like my example. There is a lot of possibilities with this die and I am sure you will be seeing a lot of great ideas using this card die in the near future!

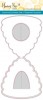
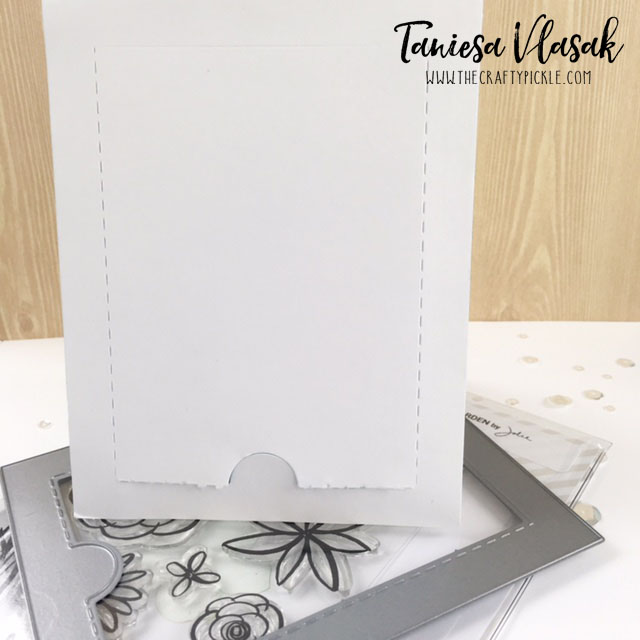
This is the card (closed) with two pieces layered on top . Just one of the options that you can create with this die set!

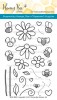
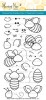
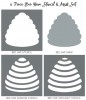
Here are the main die pieces of the Seashell card Die set. There are two small circle dies that are not pictured below that are great for making a pearl to go inside your shell!

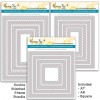
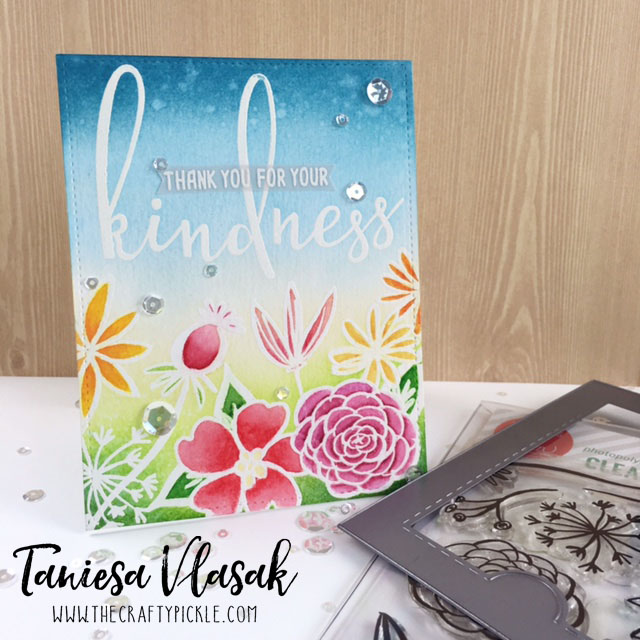
The next card I have for you is one that features the new Sunburst A-2 cover plate die from Honey Bee Stamps. as well as the Ocean Borders stamp and die and the Swimming By die set.

I cut out the cover plate die in two shades of yellow cardstock and glued the pieces of the other color inside the cut panel. This will make two cards, so it’s a great timesaver too! I took the border stamp in the ocean borders and I stamped, heat embossed in clear and then masked the first border stamp at the bottom of some light blue cardstock, I repeated this process of stamping, embossing, then masking about 5 times. Once I had a about a half of a card panel worth of ocean borders I took the Ocean Borders Die that just cuts the top of that wave-like border and I cut the top of that masked border stack. I glued some foam behind that piece and set aside.

I stacked a couple of pieces of cardstock and glued those together, Then I cut that stacked cardstock piece with the Mermaid die from the Swimming by die set. I used the same die and with just using the bottom half of that die I cut some Cricut holographic Opal vinyl. I stuck that to the cardstock piece and cut off everything below the tail, I glued just the bottom portion of that tail to the card base just below the circle part of the sun, I then glued the waves on top of that, which completed the scene. I finished the card off by adding some new Bubbles Sequins and Bokeh lights confetti and a sentiment from the Mermaid song stamp set. I heat embossed that with the Nuvo white power and cut a little flag end to the left. I popped this up on foam tape and glued to my card. I really love how that Vinyl is shiny and iridescent like… perfect for under the sea and beach papercrafting!

I hope these cards inspired you. Make sure to check out all of the new releases in the Honey Bee Stamps shop available NOW!

Also, there is a limited number of new release stamp bundle sets! See that special deal

—> HERE <—  Grab them quick!  I noticed there wasn’t too many at this reduced rate.

Don’t forget to comment below for your chance at two $50 gift certificate giveaways going on during this Blog Swim!

Supplies used are listed below.

Thank you so much for stopping by. Your next stop in this swim-a-long is the fabulous and super-duper talented Tracy! Swim on over and see what amazing things she has to share with you today!

I’ll SEA you soon, with MORE ideas and inspiration using the new release items!


Supplies used:

Honey Bee Stamp Sets:

Honey Bee Dies:

Honey Bee Embellishments:

Toolbox supplies:

Surprise 2nd BEE-day Blog hop (and a swarm of awesome new releases!)

Hap-BEE Friday, Friends!

We have enlisted some very talented designers to help Surprise Melissa (the owner of Honey Bee Stamps) for her 2nd Honey Bee Stamps Birthday. Be sure to hop along for all the fun & prizes!! Each stop on the hop will have a drawing for a FREE stamp set of their choice from the Honey Bee Stamps store. Be sure to comment at each stop to enter all of the drawings. The winners will be announced on the Honey Bee Stamps Blog on May 3rd at Noon PST.

 I have to say this month’s new release is my favorite so far. I sat down to make one card and ended up making a few more. I’m telling ya, my mind was buzzing with ideas for these new products.

My first card is this cute bee hive card which is a shaker card.

I made this card using the new Hive card die and Hive stencil set. I also used two of the bees from Busy Bees and the Bee-You-Tiful sentiment set.

I love that the stencils make shading the hive super easy. I used my distress inks and finger daubers to do the shading. the inside of the shaker has the new layered hexagon die cover plates cut apart, and I used Nuvo Drops to add Honey like accents. I filled the shaker with the special birthday Honey Jar sequins mix and of course that cute little busy bee!

Next card is another hive, but this time I used only the stencils. All 4 of them actually. I used the hive cut out to lay down color, the two shading stencils to give detail, and then when I was all done with that I used the hive cut out piece as a mask and applied the blue distress ink background.

The leaves are from the Busy bees stamp set. I just made a branch with a zig clean color real brush brown marker. The hexagon confetti / sequins is in the spring sequins pack. The cute little bee is from the Build a Bee stamp set.  The bee is actually on a little action wobbler and, with the addition of the google eyes, it makes for a very fun interactive element.

This next card was totally inspired by a pack of acrylic mirrored hexagons I have been hoarding. You could achieve a similar look with mirror cardstock that I used as an accent strip along the side of the card.

I colored my little build a bee with my zig markers and added some hexagons that I cut out using the new stack hexagon dies. I also added those awesome hexagon mirrors. I think the patterned paper along the side added the perfect final touch. I love this sentiment from the Bee You Tiful sentiment set. I think it’s the perfect card to remind someone how bee-you-tiful they are, inside and out.

Okay, now a super quick card that is great for any of our new buzz words

This card was super quick to make! I had a piece of cardstock that was already stamped and embossed using the Zen Bouquet stamp set. I trimmed it down to A-2 size and used the new Hello Buzz word dies to do a fun inlay look. This could work with your favorite patterned paper too.

You can keep it simple and leave it just black and white, Or you could color it in to make the word stand out even more! The main panel was cut using the Honey Bee Stamps Double stitched A-2 dies.

These next cards were so much fun to make. I did one card with Color burst watercolor powers and the other with distress oxide inks.

I couldn’t decide which I liked better so I thought I would show you both!

I used the Stick with me stamp set and the prickly sentiments stamp set for the sentiment. The bee is from the Busy Bee stamp set.  I had one little hexagon outline cut out left over from another project so I stuck it on one of the sentiment strips. I thought it was a fun little touch. Which one do you like better?

Last but not least is my first real attempt at no line coloring. I took the jar from the sweet as honey stamp and die set (which was a part of Honey Bee Stamps very first release, and one of my most used stamp sets!) and I decided to turn it into a mini Terrarium with the help of the new stick with me stamp set.

I colored the cacti, plants, and rocks with my Copic markers and then added a bit more detail with my colored pencils. For the background I used the hexagon stipple plate die. On the little banner, I used a sentiment from the prickly sentiments stamp set.

The jar is layered with 4 pieces of cardstock instead of using foam, (I had scrap paper I needed to use up). The sentiment is popped up with one layer of foam tape. I finished the card off with a bit of twine around the top of the jar. This was probably my most challenging card but I had a lot of fun. I will be practicing those no line coloring skills more often now!

Here is a photo of all the cards created today. Supplies are listed below.

I hope I inspired you with ways to use these awesome new products (and some of your older ones too). Come back soon BEE-cause I will have lots more projects to share!

Don’t forget to leave a comment for your chance to win your choice of stamp set from Honey Bee Stamps!

Next up on the Hop is the kind & talented, Yana Smakula! Buzz on over and see what beautiful creation she has to share with you today.

Here is the lineup for the Hop in case you get lost:

Honey Bee Stamps

Jennifer McGuire

Stephanie Klauck

Amy Rysavy

Lisa Cisneros

Sandy Allnock

Taniesa Vlasak (Thats me!)

Yana Smakula

Nichol Spohr

Supplies used (Affiliate links where available, thank you for your support!)

Honey Hop! Honey Bee Stamps | August NEW release!!!

www.honeybeestamps.com August Honey Hop!

Good Morning Honey Bees! Welcome to our August release Honey Hop!!!

You should have arrived from Melissa’s blog. If you got lost you can always start at the beginning HERE.

All this week we have been showing you little sneaks of our awesome new stamp sets and dies! TOMORROW our new release goes live and to celebrate we are showing you some beautiful projects, TODAY!!!
What’s a Honey Hop without some sweet prizes, right? This time we not only have one awesome prize pack but TWO!! One winner will win our zen florals pack (Zen florals, Zen Bouquet, and each of their matching die sets) and our second winner will win our Alpha prize pack! (Color me alpha stamp set, sentiment alpha stamp set, and color me alpha die set). All you have to do to win is comment here on the Honey Bee Stamps blog and again at each one of our designer’s blogs by Sunday August 28th. Winner will be announced on Monday August 29th at Noon PST.

So Hop along and get ready to BEE inspired!

During our preview days this week I shared two videos. One for each new Alphabet stamp set that Honey Bee Stamps is releasing this friday. I love them both and I am sure you will too.

Brand new Sentiment Alpha!

And the oh so fun Color-Me-Alpha!

and now I have two cards to share! The first one you may of saw this week on social media….

Honey Bee Stamps Aug 2016 release | Taniesa Vlasak

For this card I used the main floral border in the new Zen Florals stamp set. I also used the Smile stamp set and die as well as the Sweet as honey stamp set.

Honey Bee Stamps Aug 2016 release | Taniesa Vlasak

First I used distress ink to blend a light blue background (Tumbled Glass). Then I water colored the floral images. After the watercolor was dry I went over with a clear Spectrum sparkle pen.

Honey Bee Stamps Aug 2016 release | Taniesa Vlasak

I heat embossed a dot pattern on black cardstock and adhered just below the floral border strip. I also embossed the smile die cut and the sentiment that was made up from the smile stamp set as well as the sweet as honey stamp set. Everything was heat embossed using the WOW rich pale gold embossing powder. I popped the smile die cut up on some black adhesive backed foam.

Honey Bee Stamps Aug 2016 release | Taniesa Vlasak | Customize the back of your card with your signature and a stamp from the main stamp set you used on your card!

As an added touch, and something I have been doing a lot lately, is taking a coordinating image from the stamp set that I used for the card and stamping it on top of my custom signature stamp.  I love how this just ties the entire card together and makes it just a little more special.

Honey Bee Stamps Aug 2016 release | Taniesa Vlasak

I also really like to stamp the envelope to match too.

For my next card I decided to shake things up…. well, Literally. I made a fun shaker card with Honey bee stamps new Zen Bouquet set, Zen Florals set, new gems embellishment pack, and I also added in the jar from the sweet as honey stamp and die set.

Honey Bee Stamps Aug 2016 release | Taniesa Vlasak

I stamped out the various flowers from both zen sets into an arrangement on scratch paper first. Once I was happy with the layout I traced around the jar from the sweet as honey die set. I cut some masks for each of the florals using Simon Says Stamp masking paper. Then I stamped my arrangement using Simon Says Stamp intense black ink.

Honey Bee Stamps Aug 2016 release | Taniesa Vlasak

After everything was stamped. I took my Tim Holtz craft knife (best craft knife I have ever owned, I love this thing!) and I cut around the inside of the honey jar and around the overlapping florals and leaves. This leaves the window for my shaker card. I took a piece of craft foam slightly smaller than my card panel and I cut out the Honey jar from the foam in the same place as the card panel. This leaves the opening a bit larger so that my panel covers the foam completely.

Honey Bee Stamps Aug 2016 release | Taniesa Vlasak

Then I began coloring. I used 3 to 4 shades per color family of copics to color in my images. I used warm grays at the bottom of the jar to ground the image. Once I was finished coloring I adhered a piece of acetate to the back of the front panel to act as my window.

Honey Bee Stamps Aug 2016 release | Taniesa Vlasak

Now the fun part …. Wait, it’s all fun, ok ANOTHER fun part…. filling the shaker! If you have seen the sneaks, Honey Bee Stamps came out with these cute little clear gemstones to use in your shakers. I needed shaker bits to look a little bluish like water so I pulled out a tip my dear friend and fellow design team member taught me a year or so ago. You can dye your clear plastic embellishments any color you want with alcohol ink! So I thought why not these cute little gems. I  took two shades of Ranger alcohol ink and a couple of plastic baggies and put some gems in each. I then put two drops of the ink in the bag and smooshed it around…. after they were coated well I poured them out on a paper towel and let them dry. here is a closer look at them….

Honey Bee Stamps Aug 2016 release | Taniesa Vlasak

Of course I need to buy more so I can dye these lil babies in every color of the rainbow!! I added some of these to my shaker window along with some clear sequins and some blue confetti. I covered up the opening in the back with a scrap piece of distress cardstock that I used a bit of ink blending on ( Broken china distress ink ) and that I drew in some stems with a green marker.  I placed the shaker panel on a piece of Doodlebug green polka dot patterned paper and attached the completed panel to a top fold A-2 cardbase.

Create an adorable "shaker vase" using Honey Bee Stamps new Zen florals series and new gems that you can hand dye to match any project! More info at www.thecraftypickle.com

And that pretty much does it for my cards today. Thank you so much for hanging in there with my very long post today. I hope you were inspired.

There is lots more fun to be had. Keep on Honey Hoppin to our awesome Guest Designer’s blog, Deepti Stephens!!
Listed below are the links to the products I have used for these projects as well as postcard projects I have done in the past, and planning on doing. Affiliate links may be used, which means if you make a purchase, I receive a small commission at no additional cost to you. I really appreciate your support toward the costs of running this blog.

https://static.inlinkz.com/ppr.js

Taniesa Vlasak | TheCraftyPickle.com

Ellen Hutson LLC PIN-SIGHTS Challenge | Hidden Gift Shaker Card

Hi there Crafty Friends!

I hope your weekend is off to a fabulous start! I thought I would kick off my weekend by participating in the Pin-Sights challenge over at Ellen Hutson.com.

EllenHutson.com Pin-Sights Challenge

You can find out more by clicking the link HERE (and see some AMAZING project entries!)

The challenge was to take Essentials by Ellen product(s) and pair them with one of your favorite companies products. I have really been enjoying the latest Honey Bee Stamps release and decided to pick something from my Honey Bee stash!

I LOVE the essentials by Ellen stamps, dies, and other papercrafting items so this was a great challenge to hop into and jumpstart my creativity. Today I will be working with the Essentials by Ellen Bohemian Garden stamps and Zipper Panel die.

Essentials-by-Ellen-Clear-Stamps-Bohemian-Garden-by-Julie-EbersoleEssentials-by-Ellen-Designer-Dies-Zipper-Panel-by-Julie-Ebersole

I will also be using the Kindness stamp set by Honey bee stamps.

Honey-Bee-Clear-Stamps-Kindness

Today I wanted to mix things up a bit and I thought… “What if I used the zipper panel in the back of the card rather than the front?” This way the recipient could see the gift when they opened the card but take the gift card out when they were ready.

For the front panel I did all my stamping in Versamark ink and heat embossed with Hero Arts white embossing powder. I did ink blending at the top and at the bottom with distress ink (colors listed at the bottom of the post) and mixed some Daniel Smith watercolors to color my floral images. I did add a vellum flag out of Essentials by Ellen 40 lb vellum and heat embossed the same as the card. For the final touch on the panel I added some Sparkling clear sequins with some Ranger Multi Medium Matte.

Hidden Gift Shaker Card | TheCraftyPickle.com

I set the front panel aside and went to work on the rest of the card. I made the shaker pocket from an Essentials by Ellen small stamp storage pocket and Be Creative tape. (I probably would have used my fuse but we are moving and it is packed up in a box at the moment). I printed my message on the same 40 lb vellum from Essentials by Ellen using my laser printer and cut it to fit inside the stamp storage pocket. I added the die cut “Enjoy” which is also apart of the zipper panel die set. Once that was dry, I added the pretty pink posh sequins, Prima beads, and Distress glitter.

Hidden Gift Shaker Card | TheCraftyPickle.com

I reinforced the center part of the zipper panel as Julie Ebersole has shown in her YouTube video (See bottom of post for video) with a piece of Neenah cardstock that I blended some distress ink on. I added be creative tape all around the back panel edges being careful not to cover the zipper stitched marks. I then added my gift card in the middle and placed the finished shaker pocket down on top of the tape. To hide the rough adhesive edges I made a frame from the large stitched rectangle dies from Lawn fawn and adhered that to the top of the shaker pocket.


Hidden Gift Shaker Card | TheCraftyPickle.com

I love that you can see the gift card through the vellum but the message still stands out. The shaker adds a fun playful confetti party like feel.

Hidden Gift Shaker Card | TheCraftyPickle.com

Here is the view of the back . I started lifting the bottom up……

Hidden Gift Shaker Card | TheCraftyPickle.com

But then I decided I wanted to show you all how cool it looks when it is opened up all the way!

Hidden Gift Shaker Card | TheCraftyPickle.com

What I love about putting the zipper in the back is that the front stays pretty and intact so you can still display as normal if you like.

Hidden Gift Shaker Card | TheCraftyPickle.com

This card was a lot of fun to make. Let me know in the comments below if you would like to see a video tutorial on how to assemble a gift card like the one shown today.

If you have never seen the zipper panel from Ellen Hutson yet. Check out this how-to video that Julie Ebersole (the designer) made. The die is just genius!

Links to the items I have used are listed below.

https://static.inlinkz.com/ppr.js
Thank you for stopping by. I hope you found my card project inspiring. I love giving gifts, but making gift packaging pretty is extra special!

Have an extra fun and crafty weekend!

Taniesa Vlasak | TheCraftyPickle.com

Happy Birthday Honey Bee Stamps!!!

Hi and welcome to Honey Bee Stamps 1st birthday blog hop!!!

12994413_10100195422994386_9040328030175265407_n

Thanks for joining us on our week-long birthday celebration! Today the designers are featuring the brand new stamp set “Happy Everything” with a sweet little kit put together by designer Lisa Cisneros. We have lots planned for you this week and of course lots of prizes! Just leave a comment on our designer’s blogs along your hop for your chance to win!
You should have arrived here from Holly’s Blog, but if not click HERE to start at the beginning!

Here is a photo of the kit we got to work with along with the Happy Everything stamp set:

13035410_10100195286947026_1188573436_o

For my project I wanted to do a little something different with the stamping. Did you know that if you own a foiling machine or laminator, you can actually foil your stamping work?

All you need to do is do your stamping with a very good black ink. Using a stamp positioner like the MISTI tool can really help. If you miss any spots in your stamping be sure to go over it with a marker or a fine tip pen.

Then take your stamped paper and photocopy onto cardstock using a toner based printer or photocopier. Your image is ready for foiling! Note: This should ONLY be for personal use due to copyright, do not share your photocopy images with others.

That is exactly what I did in my project below. You can see the aqua colored foil in the close up photo. I love how it shimmers right along with all the sequins in the shaker card.

TheCraftyPickle.com for Honey Bee Stamps

TheCraftyPickle.com for Honey Bee Stamps

I hope my little tip got your creative wheels-a-turnin’! I know that I want to foil ALL THE THINGS now! LOL.

I sure hope you had fun hopping along with us today for Honey Bee Stamps very first birthday blog hop. Make sure you have left a comment below as well as one on every designer’s page and of course the honey bee blog as well. Keep checking back  on the Honey Bee Blog all week long for more inspiration and new products…. better yet join the Facebook party HERE for your chance to win lots of awesome prizes.

Happy Hopping!

Taniesa for ThecraftyPickle.com

Thinking about Valentine’s yet?

Hi Crafty friends!

  Designer, Elodie is already in the Valentines Day spirit and has made a lovely Valentine’s shaker card along with an adorable everyday card too! Check it out!

Hi Crafty Friends! Elodie here. Today I would like to  show you 2 Valentine’s day card that I made with TCP button’s flairs.

For the first I made a shaker card.

DSCN1364

DSCN1366

Supplies used:

– Pink Patterned Color Pop Flair set

– Winter Sequins Mix

– Christmas Holiday Sequins

I changed the style for the second card for having a fun card.

DSCN1367

DSCN1368

Supplies used:

– Everyday Photo button #2 flair

– Colorful Star button flair set 

Thanks for looking and have a great day!

Elodie

Thanks, Elodie. I just love how you took your Christmas and winter sequin mixes and made a valentine mix that works for your shaker card. Absolutely beautiful!

Speaking of Valentine’s sequins. We have a new mix coming to the shop soon (also some new fun sprinkles in your flair packages too!)

Have a wonderfully crafty day!

The Crafty Pickle