I am So excited to tell you that Trinity Stamps has finally released another fabulous line of Stamps, Dies, and LOTS of embellishments. There are also lots of new shop items added (plus more coming this week!).
If you don’t already know, we started the new release off with a blog hop on Friday and the fun is still happening! If you are coming to my blog for the first time be sure to click the links at the bottom of my post to go through both days of blog hop inspiration. Don’t forget to comment along the way because, friends…. there is prizes, FIVE of them. All of them are worth at least $25 (and some a lot more) Winner will be announced HERE on November 10th!
So I started coloring the wizard’s head from Magical Wizards, and then one of the robes from wizard friends. I did some simple copic coloring and because I didn’t want white showing around my image, I opted to fussy cut instead of die cut. I cut the body off except for a piece that will glue behind the robe. I attached the two pieces with my Nuvo Smooth Precision glue and voila! Wizard is (almost) card ready!
I had made a green background by blending some various shades of Distress Oxide ink and then to make a floor to ground our character, I blended some ink into cardstock then ran it through a WRMK woodgrain embossing folder. I tried doing this with markers and drawing the floor in but it was taking away from my wizard scene too much so this was a much more subtle option.
I put some foam tape on the back of the wizard and set him and the floor piece aside.
Then came the embossing. I took several colors of WOW embossing and embossed all of the star, sparkle, and shine images from all three sets (Magical Wizards, Wizard Friends, and Magical Sentiments). As I was making my way through the swirl of stars and swooshes, I die cut different sizes of hearts from the Castle Builder die set.
once all the stamping and embossing was done, I took a damp rag and went along the stary magic trail and gave it even more texture. There were a few spots that still needed something so I took my embossing pen and added some dots here and there.
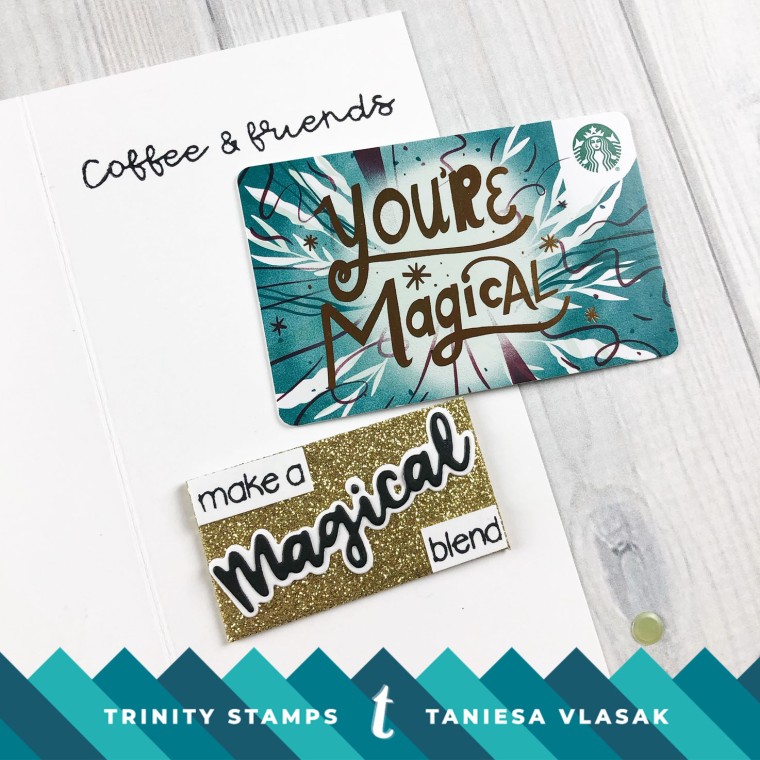
I added a sentiment from Caffeinated Sentiments, one of my personal fave… it was so appropriate given the fact a gift card was going inside.
I added a little Midas Touch Aqua Shimmer pen by Nuvo to the red part of the robe the wizard is wearing and I even embossed his wand gold.
Such a fun card right. I made the card 3×6 to fit these gold envelops I picked up at my local stamping store. I like the fun size, a nice change from the A-2 cards I usually make… But wait, there’s MORE!
Remember about that gift card I was telling you about? Bam! you’re magical! how perfect is THAT! I did a little stamp surgery so that I could make the sentiment ” Coffee and friends make a magical blend) In the Caffeinated sentiments, there is one that says Coffee & Friends make the perfect blend. All I had to do was snip off the make and the blend.
I stamped the first part directly to the card and the make a & Blend was stamped on a strip of white cardstock and then cut. I die cut the two layers of the magical sentiment die set (you can also use the stamp set to stamp in that shadow layer die) I glued those pieces to a very simple gold glitter pocket I made to hold the card.
Starbucks usually has fun seasonal and celebratory gift cards and so does a lot of other places, especially this year. How much fun is it to receive a gift inside a handmade card (which is a gift also!) Now is a great time to make a few of these types of cards to have on hand when you need to gift a card to someone.
I hope you enjoyed my little card today AND this awesome blog hop! These girls blow me away with their talent and I couldn’t be more excited to work with them all!
I am the last stop on the hop today BUT if you haven’t stopped by every blog on the hop today I have included a list below. Don’t forget those Monday Blog Hop stops either, more chances to win, more inspiration to be had!
Trinity Stamps blog post can be found HERE and the winner announcement will be posted HERE on November 10th!
Thank you for stopping by today! When you comment below I would love to know what you thought of our blog hop AND as an added bonus for making it this far, I have a $15 Trinity Stamps Gift certificate especially for one of YOU! YAY, MORE PRIZES! So come on and say HI, I know I haven’t blogged in FOR EVER, but now that you see all our great stamps you know why 🙂
Make sure you read all the way through for details on how you could win one of two $30 gift certificates to Ellen Hutson!
I have absolutely fallen in love with the Sending Sunshine stamp and die set designed by Honey Bee Stamps for Ellen Hutson, as well as some coordinating items from Honey Bee stamps! I created quite a few cards using this new release in no time at all. Let me show you a few.
First is a fun ” You are my sunshine” this card features a shaker sun center using the Honey Bee Stamps Partly Cloudy die set and the new Sunny Day sequins mix. The small frame around the sun circle made this shaker come together quickly. (Affiliate links used where available at no cost to you, thank you for supporting this blog)
The fun thing about this card is that the sun rays actually spin!
I assembled the layers using a paper fastener (aka brad) which allows the top two layers to spin around. My daughter who loves her fidget spinner, loved playing with this card and I think it would be great for any tween or teen!
Next card is a simple ink blended rainbow for an inspirational ray of sunshine!
First, I created a shaker card using foam and the a-2 sunburst cover plate die. I added my Sunny day sequins to the center and then covered with acetate. I cut the A-2 cover plate from glitter and white cardstock. For the white piece I taped off sections and used my distress inks to build a rainbow from the center of the sun. once that was done I layered that over the shaker foam layer and then pieced in the glitter rays. I stamped and embossed the sentiment from the Ray of sunshine stamp set. I did some simple die cut inlay for the “sunshine” word. both from glitter cardstock. To finish it off I added some Bokeh lights confetti with my Silver Moondust Nuvo glitter drops. I love how you can see a bit of sparkle though the confetti.
The last card I have for you is one that takes a bit of time but can be well worth the time spent. This is a pop up box card with a little handmade gift included too!
To make the box I followed THIS tutorial which was super easy! I covered the front flap with strips of colored cardstock and then trimmed away any excess. I took some Nuvo Moonstone glimmer paste and spread a thin layer over all the cardstock strips and let try. Once the glitter was dry I cut a cloud border using the Honey Bee Stamps cloud border dies and glued to the bottom of the rainbow. I cut this from white glitter cardstock and I also cut pieces to go around the outside of the box. the inside of the box has 4 layers and in between the front flap and the first layer I attached a bit of cotton to give a fluffy cloud look.
The back panel of the box card is the sunburst cover plate die cut pieces together and glued on that back piece. This gave the box extra stability too. I set the almost finished box aside and went to work on some cute planner clips for a friend who loves to decorate in her planner.
I cut felt pieces from the partly cloudy die set… the sun as well as the largest cloud in the set. I cut three pieces of each. I glued the ribbon on one layer and then once dry I sandwiched the other two pieces around the ribbon covered pieces and hand stitched them together. I am not the best when it comes to stitching and sewing but it was a lot of fun to make. I did sew the large paper clip to the middle layers before stitching all the way closed.
I added a row of sequins along the bottom of the cloud, each by hand, from the Honey Bee Stamps cloudy day sequins mix.
once finished I clipped these both into the layers of the box card.
Because this can be quite bulky I thought about making a band of sorts to go around the closed box for mailing. I took a piece of 12×12 cardstock and wrapped it around the box to make sure it fit ok and then using a heavy-duty tape I glued the two ends together.
It was a really fun gift to put together. I am already thinking of more things I can do with the box card idea not to mention more fun felt paper clips!
That is all for today. Thank you so much for stopping by to view my projects. I hope you found them inspiring. To win one of two $30 gift certificates to Ellen Hutson, simply just comment below on this post and the other designers in the blog hop as well. I am the last stop in the blog hop but if you missed anyone don’t worry, you can head HERE to the honey bee stamps blog and get the entire line up.
If you missed my video highlighting all of the great new Sending Sunshine products you can check out that post HERE and watch my video showing all the products mentioned today and more.
Supplies used are listed below(affiliate links where available at no cost to you)
Affiliate Links used in this post where available at NO cost to you! Thanks for your support!
I love what Illustrated Faith has brought to Christian Creatives, and I have grown deeper in knowledge and in my faith since beginning to create in and outside of my bible. I believe that Faith based art and papercraft is more than just for the pages of my bible , so when I saw that Shanna Noel (that incredibly inspiring and kind-hearted woman) was kicking off a 30 day happy mail challenge, I got very excited and knew I had to participate. I also think this challenge can be different for everyone….. you can customize it to fit YOU. That being said I will share what I have in mind for the challenge (as I see it) and how I will be approaching it!The basic idea is that you send some old-fashioned snail mail to a different person every day for 30 days. That’s it in a nutshell. This doesn’t have to be super time-consuming or cost more than a postage stamp and paper. Email is quick and convenient and pretty much the norm when communicating with our family and friends. So when you actually receive a letter or card in the mail, it just FEELS special. Can you remember the last time you received a letter or card or gift in the mail? Did it bring you joy? I am betting it did. Who wouldn’t want to be apart of something fulfilling and FUN like that! We definitely need more Joy, more Kindness, and more encouraging and lifting each other up.
To make things easy on yourself, you might want to gather a few things and keep them organized by your desk or a designated spot. The supplies you will want to pull together will really depend on how elaborate or simple you want your happy mail to be (BOTH are good!). I am going to list a few basic things and optional things that I am setting aside for myself, maybe that will help you figure out what you want to pull together.
I encourage you to use whatever you have on hand and try to think of new ways to use the supplies you already own. I am linking my favorite things that are tried and true and that I really do love, but again, you do not need to spend anything to make this challenge work for you! Another option is to get together with friends and share supplies! Any excuse for crafting and fellowship sounds great to me!
Paper Trimmer: THIS one is my favorite and is by Tonic. I also really love THIS one by Fiskars.
Scoreboard: (only if you already have one, a trimmer can do the job just fine if you don’t) I am using THIS mini one which is by Martha Stewart. There is a number of them on the market though.
Bone Folder: I recommend THIS teflon bone folder, It’s a little pricey but it will last you forever and it will be the only one you ever use! The reason for the teflon is that when you use it to crease your paper you will not get that shiny streak on your cardstock that other bone folders leave behind.
Cards and envelopes: (unless you are making your own of both) You can pick these up anywhere but THESE envelopes are my current favorite , and some of them have a slight shimmer. I also like THESE that are made of vellum. As far as card bases, I prefer to use this heavy weight cardstock HERE and cut and fold my own. This pack of 25 will make 50 A-2 size card bases. They also sell it in 250 count reams HERE. I find they are more sturdy and I like top fold cards better.
Envelope template or tool: (if you are making your own envelopes) HERE is the one that I use and love!
Adhesive: (wet, dry, or both, whatever your preference is) My prefered Wet Adhesive Currently is THIS ONE by Nuvo and for dry adhesives I am liking THIS one by Tombow since my old favorite has been discontinued. For a very strong dry adhesive I love THIS tape, and it comes in lots of different widths. It is great for applying glitter and foil to as well.
Black ink pad: (and other colors if you wish) My favorite is THIS black ink pad for crisp lines which is also waterproof when dry. For copic coloring or any alcohol based ink I like using THIS particular Hero Arts ink pad. For colored ink I really love the distress inks and especially the Distress Oxide ink pads. There is a great deal HERE If you are looking for them.
Die cuts: (Ephemera, Die cut packs, Digital cut apart, Die cuts you cut from your Cricut or Silhouette) I love the die cut packs from Illustrated Faith and Bella Blvd., Doodlebug is another company I buy ephemera or die cuts from often.
Some people are choosing to swap addresses with their online friends and do the 30 day challenge that way, some are randomly sending out happy mail to various people they know, Some are sending cards to friends and family. You don’t have to know who you are sending to for the whole challenge, Like Shanna said, you could decide that day who you’re sending to or you can make a list one week at a time if that works better for you. The HOW you approach thischallenge is whatever works for YOU, and the great thing is, you can figure that out as you go along the 30 days, or you can plan it all out now. That being said I will go ahead and share my ideas and plans for my 30 Days of sending HAPPY MAIL!
Every day I will be sending out some kind of Happy mail to someone. (basic idea, right? right! but read on!)
Some days it will be a handmade card that I have already made, or will make that will be going to friends, family, or even people like my mailman, or the grocery store clerk that always seems to remember my name, Maybe even my favorite barista at Starbucks (who does not get enough credit for making my coffee PERFECT every time!) I really like the idea of surprising people who go about doing their jobs but don’t just do their job, they do it with a smile, detail, pride, and kindness… that should be acknowledged more I think, Even if it’s just a card saying, Hey! I think you are AWESOME!
I might also sent some postcards. Like THESE postcards from the Illustrated Faith Collection. You can even embellish those premade postcards or you can make your own postcards! See my post HERE where I show ideas for making your own postcards. How nice to make the people who handle your card along its journey, smile as it travels to its destination. If you’re sending a traditional card, you can decorate your envelope as well. It may even encourage some one that sees your happy mail to send some happy mail of their own!
I love giving little unexpected gifts so some of my happy mail will include some DIY gifts that are fun to make and fun to send to some unsuspecting friends or family! Care packages are always a great surprise and can really make someone’s day.
A few cards of mine will make their way to some people I do not know personally, but who I am aware are struggling with something, They need to know they are loved and are being prayed for.
And maybe along the way there will be mini cards left on a windshield, in with a bill that has to be paid, or handed to a mom who looks like she’s had a rough day, a simple card with a note of encouragement. I definitely think little acts of Card Kindness can be apart of this challenge, Not everything has to have a stamp on it. You may also consider writing your message on a removable paper inside the card with another note that encourages the recipient to write their own message inside and send to someone they want to encourage! Simon Says Stamp actually sells THIS post-it style pad just for that reason! Look for a post coming soon that has directions on how to create your own!
At the end of the month I want to know that I made 30+ people smile, feel special, be encouraged, and know THEY MATTER enough that I will take the time to create and send them (or hand deliver) a paper hug!
I do plan on documenting my Happy Mail Month on my blog as well as social media. Sometime during the month I might just do a video as well. Make sure to subscribe to my blog for updates or follow me on Instagram ( @taniesa ) where I will update as well!
SO How about you? Want to jump into the challenge with me? You don’t need anything fancy, Just use what you got, grab some stamps if you need to, and send some love for 30 days (and if you can only commit to a week, then that is ok, make it your 7 days of happy mail challenge!) I think that in the end, the person it will benefit the most, is really those of us doing the sending!
The fun starts Tomorrow , July 1st and wraps up on the 30th (but if you want to be the overachiever and go to the 31st, then you go, girl! I will cheer you on and may even do that extra day with you!)
As a special bonus I am going to do a random giveaway to one of my readers that participates in the Illustrated Faith 30 day Happy Mail Challenge too! A bundle of new paper crafting items that will be useful no matter what type of papercrafter you are….a Scrapbooker, Bible / Art Journaler, Cardmaker, Planner girl, or any other artistic papercrafter, There will be things in this bundle anyone would be able to use and enjoy! There was no way to photograph EVERYTHING but there will be stamps and dies, washi tape, stickers, ink, embossing powder, embossing folder, roller stamp, sequins, and so much more stuffed into a large padded envelope! This giveaway is open to anyone (Yes even international!)
If you are participating in the challenge and you want to be entered to win my giveaway, Link up one of your cards between July 1 and July 31st using the blue Link up button below and on August 1 I will randomly draw someone to win! *Edited to note that you may link up as many times/projects as you would like during the challenge duration! I hope that it will add even more inspiration to others participating in the project.*
Stay tuned for more ideas for this happy mail challenge as well as what I am doing for my 30 days of Happy Mail!
Until then! Have a fantastic weekend!!!
*All supplies mentioned are linked within the blog post are in BOLD font. To enter TheCraftyPickle Happy Mail giveaway click the blue button below and link up one of your cards that is for the 30 Day Happy Mail Challenge hosted by Illustrated Faith.
How to add your project to the link-up : Click the blue button with the frog below. Add the URL link to where your project is located (blog, Instagram, Flickr, other) add the required info and enter! You should see the photo of your project below. I created a Flickr group for those of you that don’t have a blog or don’t want to blog but you do want to upload your projects and share. You can find that group HERE! If you have any problems or questions please leave a comment in this post or email me at Taniesa@thecraftypickle.com.