Take a closer look at December Recorded!

Hi Again Pickle Pals!

Today I am showing you a closer peek at the December Recorded kit in the Whimsical Twist shop. It’s a lovely kit designed by the talented Charissa Miller.

December Recorded at Whimsical Twist.com

Charissa really captured all that is classic and trendy at the same time. This kit has a little bit of it all, Glitter, Traditional Red and Greens, wood veneer, star clips, some light blue accents to change it up a bit and the very trendy chalkboard look that I absolutely love! She pulled together product from Websters Pages, Pink Paislee, American Crafts, Theresa Collins, Elle’s studio and more There is also a few little whimsical exclusives to give the kit its unique touch.

December Recorded at Whimsical Twist.com

I just love looking at her kit all spread out pretty in the photo. I can’t wait to see how she puts it all together for her December album.

To see more of Charissa’s amazing Kit or purchase the kit, take a look HERE.

To purchase this kit with the awesome December Days class for only $5 more click HERE.

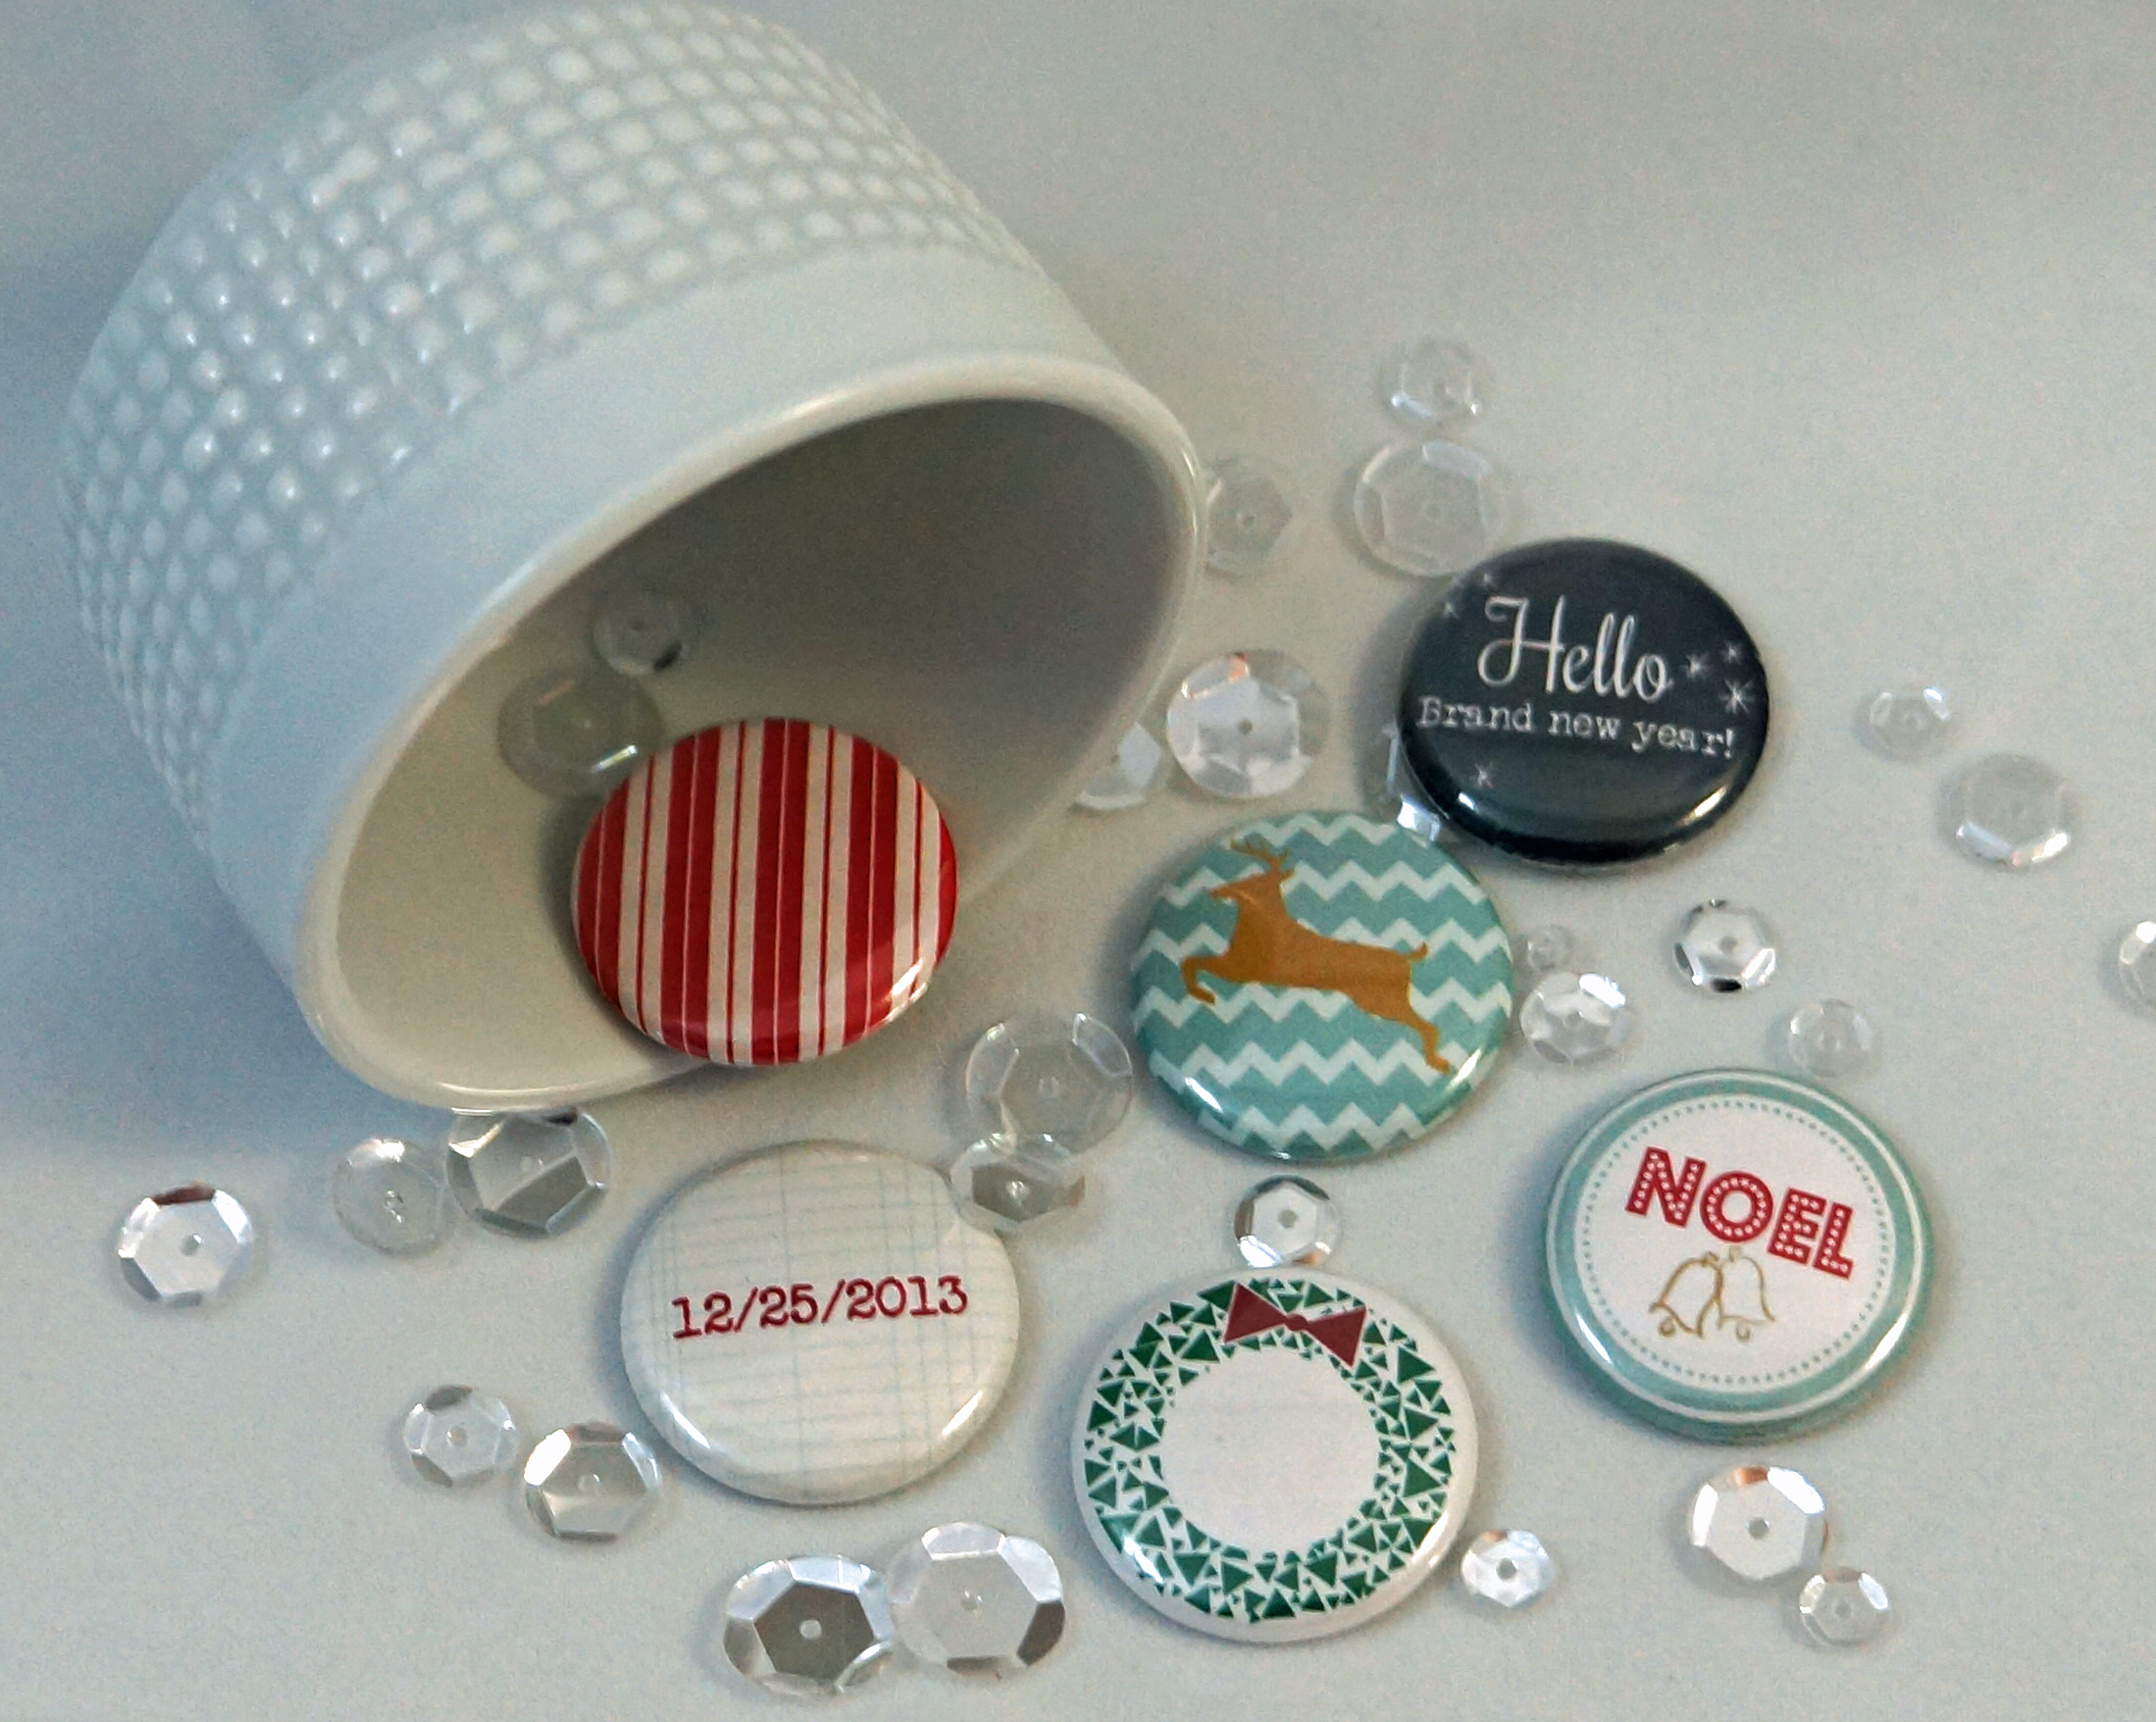
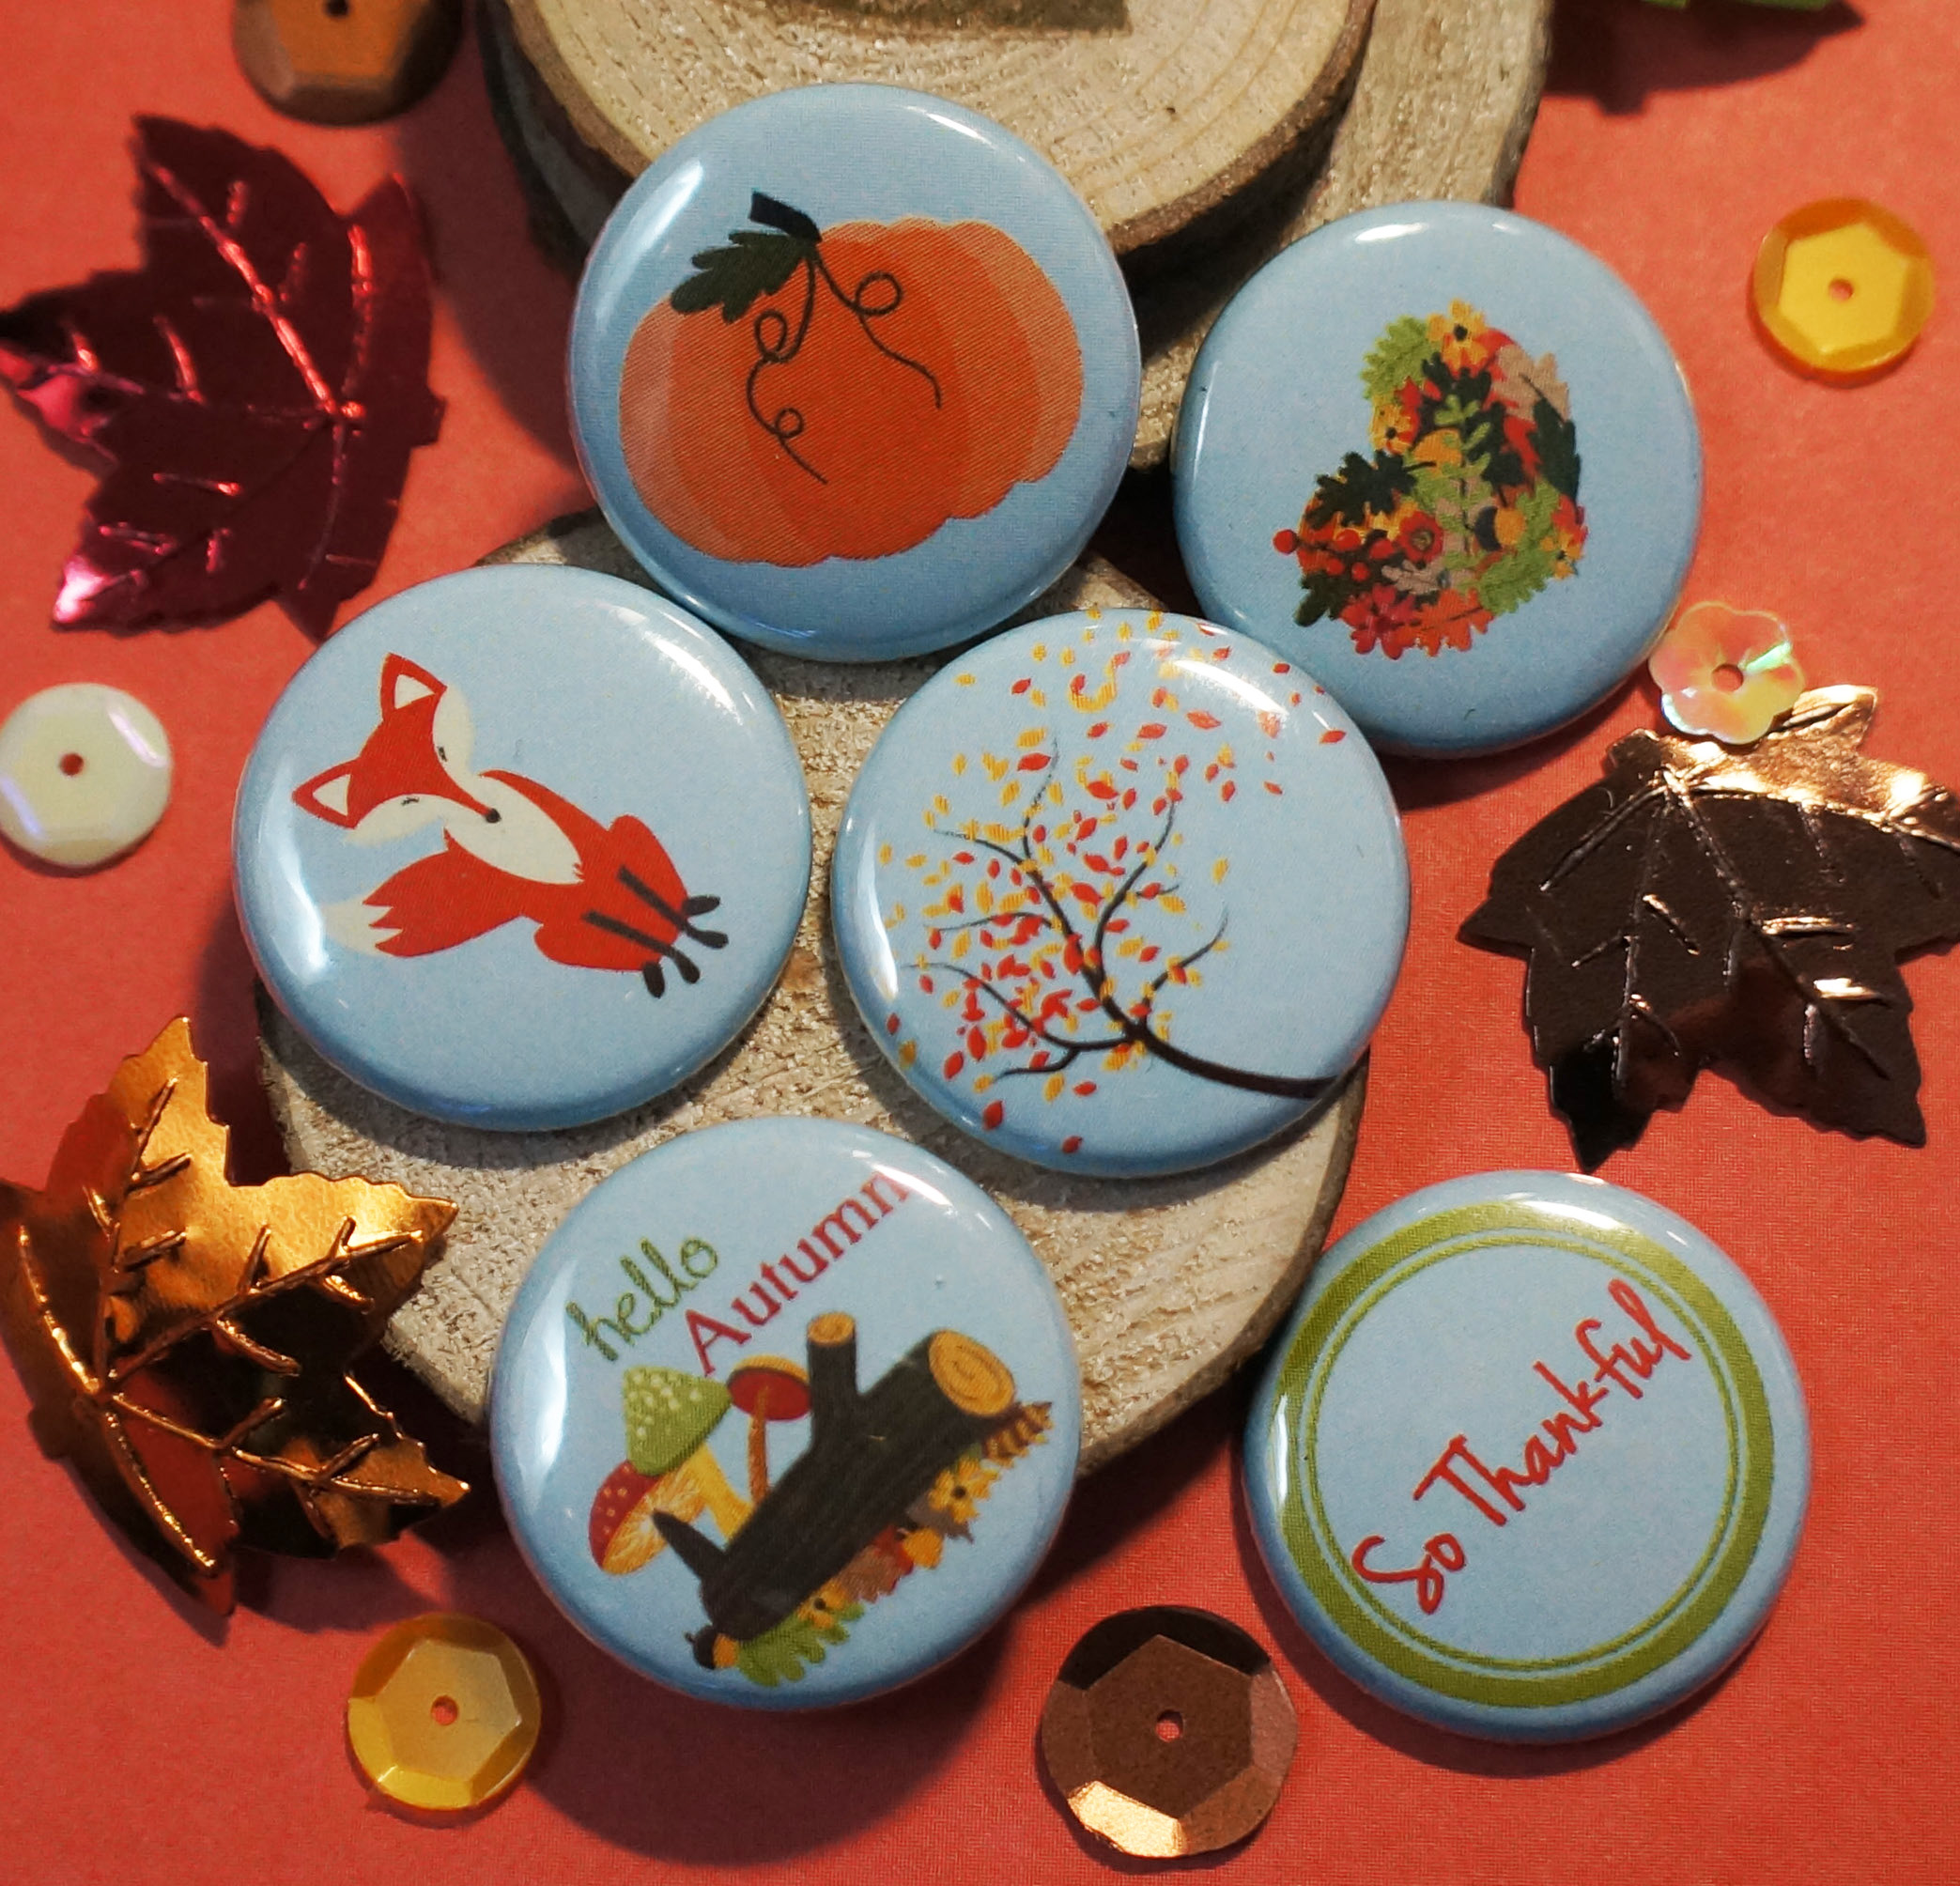
and of course I have to share the EXCLUSIVE December Recorded flair that is now in the Whimsical Twist shop!

December Recorded Exclusive Flair

How about another giveaway! Leave your name and location in the comment section and be entered to win a set of this exclusive flair! If you have purchased Charissa’s kit then Leave another comment for a bonus entry!

Giveaway ends Thursday night at midnight and winner will be announced on Friday!

Dont forget to check out Studio Calico’s PRINTSHOP which is now shipping at Whimsical Twist! There is also an amazing 30% off sale going on until 11/3 on all Basic Gray and My Minds Eye product! Enter MME30BG at checkout!

Stop by tomorrow for another fun giveaway-day!

Till then, Happy Crafting!

The Crafty Pickle

Check out the Krafty Kringle Kit!!!

Hi Pickle Pals

This week I am featuring all three of the Whimsical Twist December Days kits! It’s going to be a fun week of announcements and giveaways! I Hope that you stick with me this week for all of it!

Now Shipping! December Days kits at Whimsical Twist!

The first kit that I am sharing today is the Krafty Kringle Kit designed by Diana Fisher. Diana created a homespun feel with this kit with a fabulous Kraft base (Including a great 7×10 album) and accents with traditional red, a light blue and some soft greens. She brought in product from Pink Paislee, websters pages, elle’s studio and more! I just love what she has put together and I am sure you will too. This kit is unlike the traditional daily kit in where it is meant to mark the events and celebrations for the entire holiday season. I just love all of the little pockets to keep mementos from the season. Fantastic job Diana, your kit is amazing and I can’t wait to see what Magic you create!

Krafty Kringle @ WhimsicalTwist.com

Krafty Kringle @ WhimsicalTwist.com

To see more photos of Diana’s kit check our her blog HERE

You can purchase this amazing kit HERE.

and for $5 more you can get the kit and the December Days Class HERE (Save $10!)

Krafty Kringle Flair @ WhimsicalTwist.com

How about some pretty, EXCLUSIVE flair designed just with the Krafty Kringle kit in mind? This exclusive set of 6 flat backed button flair will be on sale this week in the Whimsical Twist Shop but you can win a set NOW! Giveaway ends Thursday at midnight so be sure to comment with your name and location. All winners from this weeks giveaways will be announced on Friday!

a Rafflecopter giveaway <———- Click here to enter (lots of chances to win!)

Dont forget about class sign ups too!

Whimsical Twist December Days Class

Hope you all have a fabulous Monday!

The Crafty Pickle

Fall Bucket list and Gratitude.Documented.

Happy Autumn Friends!

Taniesa's Bucket List @ WhimsicalTwist.com

I am so excited to share with you today the beginning of my Autumn album! I was first going to do a 6×6 mini bucket list album but I have “Fall”en in love with so many gratitude albums I have seen and the Gratitude.documented concept that Shanna Noel has started that I decided to expand to a 6×8 album. This is my first year doing a mini album for Fall and so far I love it! I am thinking about adding to the same album next year but it will depend on how full this one gets. I decided to use the Simple Stories Faux leather 6×8 album which matches my 12×12 black We R Memory Keepers albums for my project life this year. I wanted to dress it up a bit though so I decided to add a few charms that reminded me of Autumn and family.

Here is a look at the album cover/spine.

Taniesa's Gratitude album @ WhimsicalTwist.com


Taniesa's Gratitude album @ WhimsicalTwist.com


Taniesa's Gratitude album @ WhimsicalTwist.com


Taniesa's Gratitude album @ WhimsicalTwist.com

It was really simple. I just wrapped around some bakers twine and hemp twine where the front cover met the spine of the album and tied on some pretty charms I found while collecting some autumn supplies.  The label for the album is a ticket in Kraft that I cut down to fit. I took white sticker letters and colored them with a copic marker to get the watercolor like effect.

For the first page I took brown woodgrain cardstock and cut out the framed “gratitude” from a cut file I created with my Silhouette software. The second page is shimmery cream cardstock with the adorable Logo from Shanna Noel’s Gratitude.Documented.

Taniesa's Gratitude album @ WhimsicalTwist.com


Taniesa's Gratitude album @ WhimsicalTwist.com

Next page shows off my family’s Bucket list for this Fall. I cut the apple basket , apples and title from my Silhouette all out of cream colored cardstock and then colored them all in using my Copic markers. I wrote out the list using a typewriter font and cut them in strips. I sewed those along the left lower side and to finish off the page added a little Whimsical Sequins for a bit of shimmer. (Silhouette Design ID #47269 used for the apple basket and the font for the title is Jenna Sue)

Taniesa's Gratitude album @ WhimsicalTwist.com

Taniesa's Gratitude album @ WhimsicalTwist.com

Taniesa's Gratitude album @ WhimsicalTwist.com

Taniesa's Gratitude album @ WhimsicalTwist.com

I did want to prep a few pages for the busy days I won’t have a lot of time to scrapbook. I am sure I will move things around as I develop my photos. The papers and embellishments I am using throughout my album is the Basic Gray Persimmon collectionthe Family Traditions line from Websters pages, and some embellishments from My Minds Eye. I really love the combination of the oranges and browns mixed in with the navy and baby blues. I am also adding in some Project Life cards, Pre-cut cardstock, Prima wood accentsHey Kid sticker labels from Pink PaisleyWhimsical Twist sequins, and some other items from my stash to add texture and color.

Here are a few of the “put together ahead of time” pages I have done so far.

Taniesa's Gratitude album @ WhimsicalTwist.com

Taniesa's Gratitude album @ WhimsicalTwist.com

Taniesa's Gratitude album @ WhimsicalTwist.com

For this next page I decided to make a partial transparent divider type of page using some sequins and Prima wood disks. I just sewed the two pockets closed. I will add a filler card or photo in the other two spots.

Taniesa's Gratitude album @ WhimsicalTwist.com

Taniesa's Gratitude album @ WhimsicalTwist.com

One of our bucket items is to make our own Halloween costumes this year. My little girl decided to be a traditional witch this year so I set these two pages aside to show off her costume and a photo of her trick-or-treating. I love the little whimsical sacks to hold tags for journaling!

Taniesa's Gratitude album @ WhimsicalTwist.com

Taniesa's Gratitude album @ WhimsicalTwist.com


Taniesa's Gratitude album @ WhimsicalTwist.com

Taniesa's Gratitude album @ WhimsicalTwist.com

One of the key things with this project as well as any seasonal Mini album project is to simplify and organize. Some items in my craft space I keep where I always keep them but sometimes it helps me if I pull together the collection of items I might want to use for the project. Looking at all the Autumn product together is very inspiring for me. Some things that I have done to help myself along is pre-cut my cardstock in 4×6 and 3×4 pieces, take my 6×6 papers and put them in a 6×6 clear iris plastic box to flip through quickly, Take a binder clip and clip together like items (sticker letters, enamel dots and gems, labels, sticker embellishments, stamps, etc), and put little items like sequins in the color combo that I will be using and wood veneer in small containers for easy access (bead containers from your local craft store work great for this).

I hope you enjoyed my little preview into my Autumn album. I will be back for this series next month to show you my near completed album!

One little bit of exciting news today is that all Basic Gray and My Minds Eye product is now on sale at 20% off in the Whimsical Twist shop!!! The sale lasts from now until November 3rd . So, if you were wanting to get your hands on some great supplies for your autumn and holiday scrapbooking now is a fantastic time! Enter Code MME20BG at checkout!

All Basic Gray and My Minds Eye now on sale at Whimsical Twist!!!!!


Happy Autumn!

The Crafty Pickle


The BIG December Days Kit “Merry and Bright” Video!

Hi Pickle Pals!!!

I have been so excited to post about my Merry and Bright kit that I created for the Whimsical Twist shop and today is finally the day I get to share it all in detail with you! I really thought that photos would not do the kit justice so I made you all a little (ok, it’s a little over 15 minutes but its worth it) video!

Before we get to the video I wanted to talk a little bit about what I tried to achieve when I put the contents together. Last year was my first year doing December Daily and I loved the project so much that it lead into my commitment to do Project life for the entire year. well this year I am doing both and I wanted a kit that could not only fill my December Daily album but one that I could pull from for my PL album for the month of December. There is a lot packed in this little kit and for the price you really can’t go wrong. The Price of the kit is $50 but for TODAY ONLY they are in the shop for 15% off (the sale ends 10/18 at midnight so make sure you run over to Whimsical Twist and nab yours as there is very limited quantity!) You can also get a discount on the December Days class when you purchase a kit (50% off) for only $10! It’s a super fun class that offers free digital files, inspiration, challenges, and lots more. Going on now, and lasts all the way into January! Even if you are using your own homemade kit you will get so much out of the class.

Now on to the video!

http://www.youtube.com/watch?v=4YT1naleX8Y

So to recap, the Merry & Bright December Days Kit includes the following contents:

  • Tis the Season 6 x 6 paper pad (Echo Park)
  • Christmas 3 x 4 Sn@p Cards (Simple Stories)
  • Christmas 4 x 6 Sn@p Cards (Simple Stories)
  • 12 x 12 Chalkstalk (Canvas Corp)
  • Hello Santa Banners stamp set (Ali Edwards for Technique Tuesday)
  • White Chalk Ink Edger (Prima Marketing)
  • December Documented Expressions Cardstock Stickers (Simple Stories)
  • December Documented Fundamental Cardstock Stickers (Simple Stories)
  • Magical Banners (Studio Calico)
  • Micro Mono alphabet stickers – white (Basic Grey)
  • Christmas Sprinkles (Doodlebug)
  • Star washi tape (Freckled Fawn)
  • 2 Bow clips (Webster’s Pages)
  • Assortment of sequins (Whimsical Twist)
  • *Bonus Package from Taniesa* while supplies last.

I really hope you love the kit as much as I do. I am excited to share with you what I do with the kit as well as see what YOU do with the kit.

To purchase the kit alone click HERE.

To purchase the kit with the discounted class admission click HERE

What would a reveal this big be without a fun GIVEAWAY to go with it?  Instead of giving away the kit (because its such a deal I know you are all going to rush over to get yours) we thought it would be more fitting to give away the perfect add-on kit to go with your Merry and Bright kit!!! Here is what you will receive if you are the lucky winner;

  • A red faux leather 6×8 album from Simple Stories.
  • A 6×6 December Documented paper pad from Simple Stories.
  • A Technique Tuesday/Ali Edwards 25 moments stamp set.
  • A Whimsical Twist exclusive matching Pickle Flair set (set of 6 that match the Merry and Bright kit)
  • A set of 31 numbered chalkboard Pickle Flair. Perfect for numbering each day in your album. *not shown*
  • a bag of mixed embellishments (Sequins, Wood Veneer, Confetti stars, ribbon, twine, and more) *not shown*
  • A set of three personalized Just-for-you flair. *not shown*
  • And if that wasn’t enough we are giving you free admission to our December Days Class that is going on now until mid January. We will stick by you from start to finish!

Win ME! www.thecraftypickle.com

To enter all you have to do is leave me a comment with your name and location. Want MORE chances to win? When you purchase a Whimsical Twist Merry and Bright Kit come back and leave a separate comment letting me know and you will have an additional entry! Follow Whimsical Twist on Facebook, Instagram, Twitter, and Pinterest? Leave a separate comment with I follow WT on ____ for each one and you can have more chances to win! Share the reveal video on your Facebook or other social media? Leave another comment with the link and get another chance! Follow @Taniesa on Instagram, Yep, another chance to win!!! You can get a total of 10 chances if you complete all of the above, how easy is that!

The giveaway entries will close Friday 10/25/13 at midnight PST and a winner will be announced Monday 10/28/13!

Best of Luck to you all and Happy (Holiday) Crafting!!!

TheCraftyPickle.com

A Little Relish from The Crafty Pickle!

Hi Pickle Pals!

I have a bit of exciting news to share. I recently started adding more to my Etsy store and in that I have my very own handmade button flair! Here is a little peek at a couple of the sets I have been working on. I also have some exclusives that will be in the Whimsical Twist Merry and Bright Kit that I will be sharing with you very soon!

This is one of my favorite sets, I made this set to match with the Persimmon collection from Basic Gray. I love Autumn and I tried to capture that with this set.

Handmade Autumn Flair from TheCraftyPickle.com

Here is another set that I absolutely adore because we so adore our Elf on the Shelf. My seven year old is so excited to have our Elf, Cupcake, come back after thanksgiving!

Elfontheshelf flair

Both of these sets and more are featured in my Etsy shop. Some exclusive sets will also be sold at the Whimsical Twist shop soon!

How do you use Button flair in your papercrafting projects? I would LOVE to see, Link me up!

Happy Crafting!
TheCraftyPickle.com

Fun October contests & Challenges going on now!

Hi there Pickle-Pals!

I thought I would drop a quick little post telling you about two awesome challenges that are going on for the month of October!

First up is the Whimsical Twist Fall Texture challenge ***Runs 9/30 through 10/11*** You could win a gift certificate to the Whimsical Twist shop! Check out the inspirational layouts posted by some of our design team on the blog post HERE.

fall texture challenge at Whimsical Twist

Also, Die-Namites is sponsoring Creative Scrappers Sketch challenges for the month of October! you could win some awesome Die-namites dies of your own! Make sure to check out their site HERE!

Creative scrappers challenges

Lots of fun for the month of October (and there is more to come too!)

Dont forget that the Whimsical Twist December Days class starts TODAY! 3 months of festive fun that you will definitely not want to miss! If you purchase one of the 4 december days kits offered in the shop you can get your class fee reduced to only $10! I am super excited to share the kit I have designed (Merry & Bright) very soon! Stay tuned to my blog, Instagram, and facebook for some sneak peeks! I have some really fab ideas for all you christmas crafters out there!!

December Days class at www.whimsicaltwist.com

Happy October everyone! I am so excited for this Fall season! I hope you are too

Happy Crafting!

The Crafty Pickle

Project life Re-Organization.

Hi Friends!

I know a number of you have had a lot of questions regarding how I am storing my project life cards. Instead of writing out a long post I made a little video that hopefully will answer some questions and let you see what’s working for me right now.

Here is a little video on how I am organizing my project life and pocket style journaling and filler cards. I am using the medium Close To My Heart organizers which you can see by going to my website HERE <—- that will take you right to the organizers.

The dividers that I had made for my organization were
Pink
Red
Orange
Yellow
Green/Teal
Blue / Aqua
Purple
Gray
Black and white
Brown and Kraft
Multi Color brights
Multi Color muted

Month/Day
Ledger
Numbers
Journaling prompt
Quote filler
Symbols and shapes
Seasons: winter spring summer fall (holidays are in with the season)
Birthday/celebration
Travel
School & Kids life
wedding
Love/hearts

If you have any questions please post a comment, I am happy to answer anything that I can.

Thanks for watching and I hope this has helped you with a few organization ideas of your own!

If you are wanting to puchase the CTMH cases you can visit my CTMH website at www.thecraftypickle.ctmh.com
******Edited to include a link to the divider cut file I made and used in this organizing video and posted on my blog awhile back: Click here for the dividers. The folders that I used were directly from the silhouette store (Design ID #43761)******

The Crafty Pickle


Happy Friday! Let’s get ORGANIZED!

Hi Everyone!
I am on to my next organizing endeavor! this time tackling labels, tags, stickers and other project life supply goodness as well as my Die-namite dies!

Here are some before photos. First is my labels, tags, stickers, etc… that I use primarily for Project Life.

Get organized with help from TheCraftyPickle.com

And here is the drawer I had all of my Dies shoved into.

Get organized with help from TheCraftyPickle.com

What a mess! So I headed to Target (I love Target!) and in the office supply section I found these little gems!

Get organized with help from TheCraftyPickle.com

Now I am focusing on these small ones but there are lots of different size accordion files… you could use different sizes to organize different supplies. These coupon size files came with a little notepad. I took that out to lessen the bulk.

Get organized with help from TheCraftyPickle.com

I created some mini file folders. The first i created using my silhouette…. but I needed to make quite a few, and maybe I was a little lazy, so I just cut the cardstock to size, scored it, folded it, and put a tab on it.

Get organized with help from TheCraftyPickle.com

Then I separated everything into like item piles. A couple of tips to mention. You want to remove any unnecessary excess packaging, this adds extra bulk and sometimes will prevent the item from fitting.

Get organized with help from TheCraftyPickle.com

You also might want to cut down strips of labels to just the label and not the product name or bar code. If you want to retain the info just write on the back with a slick writer.

Get organized with help from TheCraftyPickle.com

For the folders in the sticker, tag, and label files I created one in each to put the items that were loose in, I didn’t want them falling in between the divided sections

Get organized with help from TheCraftyPickle.com

Get organized with help from TheCraftyPickle.com

For the die cut file, I made an individual file folder for each die, also when I use the die I cut a couple of extra shapes and put it in with the die, that way if I just want to grab a cut and not pull out my machine i have it right on hand.

Get organized with help from TheCraftyPickle.com

Get organized with help from TheCraftyPickle.com

And here is some end result photos. I really am enjoying this system, I love that everything is right at my fingertips. For now I am storing the files in the black box I picked up at target seen in the photo, but as I reorganize my IKEA Raskog, I might transfer them over.

Get organized with help from TheCraftyPickle.com

Get organized with help from TheCraftyPickle.com

Get organized with help from TheCraftyPickle.com

Get organized with help from TheCraftyPickle.com

Get organized with help from TheCraftyPickle.com

I hope this provided you with some organization inspiration. I have a pretty big project I am working on next and I can’t wait to share with you all SOON!

Have a fabulous weekend!

The Crafty Pickle

Die-Namites September Sketch and Dare using the Love Heart die & the Wild and Free collection by Glitz Designs.

Welcome to this months Sketch Challenge and Die~Namites Dare!
Every month a new sketch will be introduced….
the sketch can be interpreted as a card, layout or altered piece!
 
You need to use at least one
Die~Namites Die in your creation.
 You have until the last day of the month to post your creation on your blog,
with mention of the
Die~Namites Die used and a link back to the Die~Namites Dies blog.
Link your blog post, using Inlinkz, to the Die~Namites Die blog.
                                    
A random winner will be chosen from eligible participant
for a $25 Gift Certificate to 
 
Here is this month’s sketch…..


   Today I’m showing my take on this month’s sketch challenge and dare! Mine is just a little bit different from the sketch but I am sure you will see how it worked for me. I thought out of the box with this one and decided to incorporate the sketch into a project life title card.
 
  The die I decided to use was an obvious choice given the sketch. I went with the Love Heart die.
 

For this particular project I didn’t want the word to show in the project so I overlapped it with the week title by tucking the strip of Glitz patterned paper in the loop of the L. I replaced the flower embellishment with a Glitz designs rhinestone and some enamel dots by My Minds Eye. For the ribbon dare portion I took some black ribbon and silver embroidery floss. I stitched a little arrow onto the ribbon and stapled it to my card using the Tim Holtz Mini Attacher. All of the printed paper used is from the Glitz Designs Wild and Free 6×6 paper pad. 

And here it is incorporated into my project life layout.

Here is the right side.

The bottom right card in the photo above was from the digital glitz collection. I used a Ali Edwards 4×6 outline brush on top and the journaling. It’s hard to see from the photo but the upper right card says Movie Date on top of the Glitz designs heart washi tape.

I think everything came together quite nicely. I was a little stuck with this particular week for a while so using the sketch really helped inspire me to get this layout completed!

I am LOVING the new Glitz Designs Wild and Free collection! It’s so bright and colorful with some fun basic patterns that go with everything. Right now you can get this collection and all sorts of fun papercrafting candy at Whimsical Twist for 25% off through September 30th! Use Code AUTUMN25.

Happy Crafting (and Shopping)!

TheCraftyPickle.com

Creating a Sequin Station for your craft space.

Happy Friday everyone!

Today I am revisiting a previously posted idea a few months ago that I used for small embellishment storage. Ever since I purchased the sequins in the whimsical Twist shop I have been HOOKED on sequins and use them on a lot of my projects. Getting in and out of the little baggies was getting to be a little bit of a pain so I thought back to that organization blog post I had done, You can see that original post HERE. I thought that it would be nice to have one set up just for sequins so that’s just what I did.

Here is what I used. First a K-Cup storage spinner (I got mine at walmart for about $24 but I have also found the same size on Amazon HERE) and a package of Diamond brand mini condiment cups and lids (I got mine at a grocery store in my area, safeway, for about $3)

Little Bits and Sequin Storage @TheCraftyPickle.com

Cups for storage @ thecraftypickle.com

I emptied all of my sequins in each cup keeping the colors separated, depending on your collection you might want to combine certain colors or shades of the same color.

Sequins-Station @ thecraftypickle.com

sequins-station-close-up @ thecraftypickle.com

Super simple and inexpensive. It takes up very little space and makes using them and clean up a breeze because you’re not dumping the sequins out on your table. The added bonus it looks really pretty out and makes me happy when I look at all the fun color!

Suggestion for those that are going out shopping for your kcup holder, I took one of the mini cups with me to make sure it fit well. There are holders out there that are just a bit too small to hold the cup so to be sure, test it out before you buy it.

Don’t forget to stock up on all the great color sequins that is currently in the Whimsical Twist shop and check back for more fun sequins that will be in the shop soon! While your there don’t forget we have an awesome sale on all your Basic Gray favorites too!!

BasicGray sale @ Whimsical Twist!

I hope you enjoyed this organization inspiration!

Have a Whimsical Weekend!

The Crafty Pickle