Last minute gift ideas with Die-namites dies!

Thank you for joining us for our

Dienamites bloghop

If you have arrived here from Lynne Forsythe’s blog,

you are in the right place. If not head on over to Die~Namites Dies Blog, to begin the hop!

I know it’s a very hectic time of year….. the parties, the shopping, the decorating…. and the last minute gift for Aunt Betty.

We at Die~Namites Dies wanted to share with you a few Last Minute Ideas.

It is always so hard for me to think of what to give teenagers for Christmas. This year filling up their stockings was a little challenging and I was still shopping up until today to finish up everything.

While shopping for stocking gifts I saw so many gift sets that were way overpriced. I thought, “I could put something together for half the cost of those packaged sets”. So I grabbed some nail polish and other nail care items for my daughter and bundled them up in a clear cellophane bag. I attached a pretty tag that I made with two of the new release dies from Die-namites!

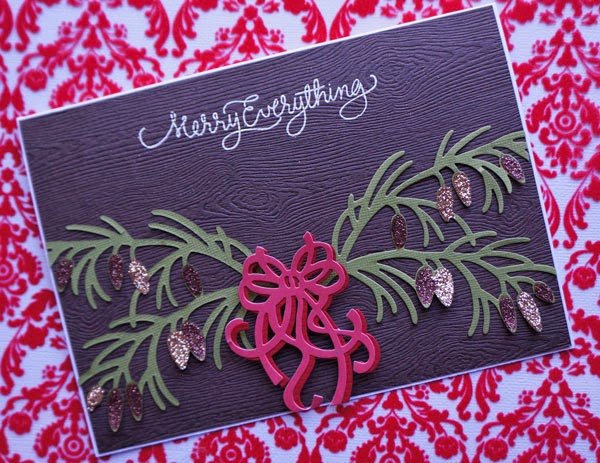
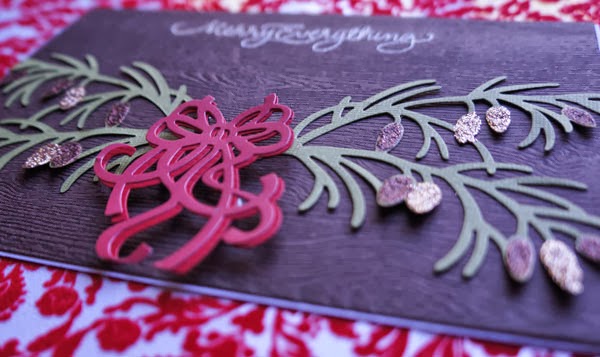
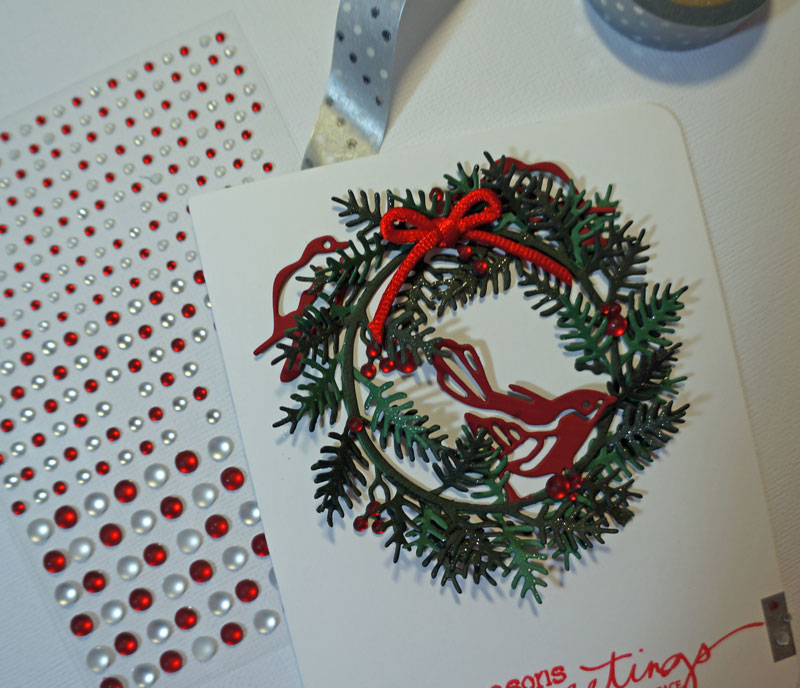
The dies I used were the Curly Poinsettias die and the Winter Branch die.

Winter Branch Curly Pointsettas

I layered the winter branch die with some cuts from additional branch dies along the bottom right corner.Then added the Curly Poinsettias on top. I took a clear wink of stella glitter marker and added some glitter accent on the flowers. I finished everything off by adding in some enamel dots and gems. Once everything was finished and dry I added my daughters name using gold glitter foam thickers.

Last minute gift idea @ thecraftypickle.com

last minute gift idea : Nail care set @ Thecraftypickle.com

Last minute gift idea @ thecraftypickle.com

Last minute gift idea @ thecraftypickle.com

It’s a good idea to have a few ready made tags like this one on hand. Adding a name is easy and fast and it really makes a quickly put together gift that much more special!

Thank you for joining us for our

Die~Namites Dies, Last Minute Christmas Ideas.

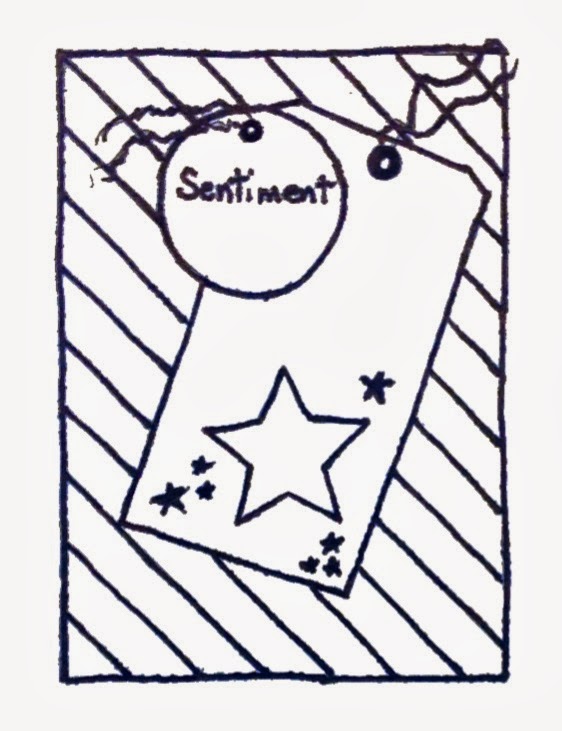
Don’t forget to check out our December Die~Namites Dies Sketch Challenge and Dare sketch challenge

you could be our next randomly chosen WINNER!!!

Now head on over to the Die-namites blog to wrap this blog hop up!!

Happy Holiday Crafting!

The Crafty Pickle

December Daily: Days 1 to 6

Happy Holidays!

I hope all of you are enjoying the season so far and have been keeping up with your December Daily albums or Journals. I wanted to share a little bit of my album today. I have up to day# 5 complete. (warning this post is kind of photo-heavy). For my 2013 December Daily I am using the Merry and Bright Kit from Whimsical Twist. I am also using items I have collected from this year and previous years as well as die cuts from my Silhouette. If you have any questions on products used please let me know.

December Daily 2013 Title page TheCraftyPickle.com

For my title page I did it in three separate page protector layers.  For the First layer I printed a title using Ali Edwards digital brushes on a transparency and placed that in the page protector

DD Title page 1st Layer | TheCraftyPickle.com

For the second layer I took a transparency and two silhouette die cuts (out of the silhouette printable gold foil) and adhered them on the transparency back to back. After sliding that into the page protector I sprinkled sequins on either side and sewed the protector closed.

Title page layer #2  | TheCraftyPickle.com

Title page layer 2  | TheCraftyPickle.com

For the Third and final layer of the Title page(s) I cut a piece of American Crafts POW glitter paper and slid that in the protector, On top of that was another transparency that I printed on the bottom.

December Daily title page layer 3  | TheCraftyPickle.com

The next page I kept really simple.

December Daily calender page.  | TheCraftyPickle.com

Day one:

December Daily Day one  | TheCraftyPickle.com

December Daily Day One  | TheCraftyPickle.com

For the card on the bottom left, I stamped in white ink and then I went over the stamped areas with a white chalk pencil to give it a better chalkboard effect.

December Daily Day one  | TheCraftyPickle.com

Day Two:

December Daily Day 2  | TheCraftyPickle.com

December Daily Day Two  | TheCraftyPickle.com

For the middle layer  I used a 6×8 page protector  and sewed the bottom portion shut with sequins, glitter, and heat embossed wood veneer stars (Studio Calico Printshop stars) Then I slipped the two photos back to back on the top.

Advent Pocket in December Daily Album  | TheCraftyPickle.com

This year I decided to incorporate our advent Calender within our December Daily album. You will see these pockets throughout my album. The little circles are special chalkboard paper. I stamped the number in white prima Chalk ink. (the Advent Kit that I used can be found HERE)

December Daily Advent pocket + Tag  | TheCraftyPickle.com

I printed our advent activities on a piece of shimmer cardstock and then sewed them to the tag that I had cut down to fit the bag. I also did some heat embossing on the tags as well.

Day Three & Four:

December Daily Day 3 and 4  | TheCraftyPickle.com

Day Three:

December Daily day 3  | TheCraftyPickle.com

Day Four:

December Daily day 4  | TheCraftyPickle.com

Day Five:

December Daily Day 5  | TheCraftyPickle.com

I had a lot of fun working on Day 5. Lots of digital stamping on the photos using files from Ali Edwards @ Designer Digitals, Ali Edwards/Technique Tuesday Stamps, and the Pine Wreath Die from Die-Namites Dies.

December Daily Day 5  | TheCraftyPickle.com

For the Tree embellishment I used the Pine Wreath die from Die-Namites dies which you can find HERE. I made 12 cuts of the die and one tree base out of the same card stock. I cut off all of the pine branches from the die cut shapes and made a pile. Then I took some clear liquid adhesive and squeezed a bit out on a scrap piece of card stock. I dipped the bottom part of the pine branch in the glue and started layering from the outside of the tree base inward. After everything was completely dry I added some clear and white gems (Michael’s brand and Studio Calico) To see more photos of this embellishment visit the Die-Namites blog HERE.

December Daily day 5  | TheCraftyPickle.com

December Daily day 5  | TheCraftyPickle.com

Day Six:

For day 6 I kept things super simple. I took cards that were included in the Merry & Bright Kit and embellished the tree card with some sequins and glitter pen accents. Sticker letters are also from the kit. There are a handful of kits still available and you can find them HERE on sale for $35!

December Daily Day 6  | TheCraftyPickle.com

December Daily Day 6  | TheCraftyPickle.com

That wraps up this round of December Daily Pages. I should be back next week to share another handful of pages.

Happy Holiday Crafting!
The Crafty Pickle

A BeWITCHing Halloween!

Hi Everyone!

Today I am sharing a quick 6×8 layout that I did of my daughter’s Halloween costume for this year and I wanted to give you an idea for making the most of your space when working on a small layout like this.

Here is the full layout;

BeWITCHingLayout A 6x8 BeWITCHing layout!

I used my Silhouette to cut out the circle title accent and cut it out of American Crafts POW glitter paper in silver. I backed that with black cardstock and added some white sticker letters that I colored orange and then put a coat of clear glitter on top with my Wink Of Stella Glitter marker.  I also cut out the spider and the Jack-O-Lantern face out of black POW glitter paper.

BeWITCHing A 6x8 BeWITCHing layout!

Because my photo took up so much space in the small layout I wanted to conceal my journaling tag in a design type element. I took one of the Whimsical Sacks sold in the Whimsical Twist shop and put the Jack-O-Lantern face on the top. These little bags are perfect for tucking away journaling or memorabila especially when you have a small layout like this. These bags also fit perfectly in a 3×4 pocket page protector.

BeWITCHingJournalPocket A 6x8 BeWITCHing layout!

I am absolutely addicted to these little bags and I thought it added a real fun element to the page.  There are a bunch of patterns and colors in the Whimsical Twist shop, Check them out HERE!

Also don’t forget there is a bonus ephemera pack that you will receive if you buy any of the Whimsical December Days kits this week! I have been featuring the kits that are currently on sale and shipping in the shop. Today I am giving away a set of EXCLUSIVE Flair buttons made to match Merry And Bright!!

Merry and Bright Flair

These will of course go with any of the kits but especially Merry and Bright! If you havent seen the Merry and Bright kit, check out my video going through the entire kit.

Make sure to leave your name and location for a chance to win a set of this awesome flat backed button flair.

Also I am giving away a spot in the Whimsical December Days class! You can read more about that HERE. Lots of things to win this week. I will be announcing all my winners Monday morning so be sure to go back and enter each of this weeks giveaways!

Whimsical Twist December Days Class

I hope you all have a Fun, Safe, and BeWITCHing Halloween!

The Crafty Pickle

Fall Bucket list and Gratitude.Documented.

Happy Autumn Friends!

Taniesa's Bucket List @ WhimsicalTwist.com

I am so excited to share with you today the beginning of my Autumn album! I was first going to do a 6×6 mini bucket list album but I have “Fall”en in love with so many gratitude albums I have seen and the Gratitude.documented concept that Shanna Noel has started that I decided to expand to a 6×8 album. This is my first year doing a mini album for Fall and so far I love it! I am thinking about adding to the same album next year but it will depend on how full this one gets. I decided to use the Simple Stories Faux leather 6×8 album which matches my 12×12 black We R Memory Keepers albums for my project life this year. I wanted to dress it up a bit though so I decided to add a few charms that reminded me of Autumn and family.

Here is a look at the album cover/spine.

Taniesa's Gratitude album @ WhimsicalTwist.com


Taniesa's Gratitude album @ WhimsicalTwist.com


Taniesa's Gratitude album @ WhimsicalTwist.com


Taniesa's Gratitude album @ WhimsicalTwist.com

It was really simple. I just wrapped around some bakers twine and hemp twine where the front cover met the spine of the album and tied on some pretty charms I found while collecting some autumn supplies.  The label for the album is a ticket in Kraft that I cut down to fit. I took white sticker letters and colored them with a copic marker to get the watercolor like effect.

For the first page I took brown woodgrain cardstock and cut out the framed “gratitude” from a cut file I created with my Silhouette software. The second page is shimmery cream cardstock with the adorable Logo from Shanna Noel’s Gratitude.Documented.

Taniesa's Gratitude album @ WhimsicalTwist.com


Taniesa's Gratitude album @ WhimsicalTwist.com

Next page shows off my family’s Bucket list for this Fall. I cut the apple basket , apples and title from my Silhouette all out of cream colored cardstock and then colored them all in using my Copic markers. I wrote out the list using a typewriter font and cut them in strips. I sewed those along the left lower side and to finish off the page added a little Whimsical Sequins for a bit of shimmer. (Silhouette Design ID #47269 used for the apple basket and the font for the title is Jenna Sue)

Taniesa's Gratitude album @ WhimsicalTwist.com

Taniesa's Gratitude album @ WhimsicalTwist.com

Taniesa's Gratitude album @ WhimsicalTwist.com

Taniesa's Gratitude album @ WhimsicalTwist.com

I did want to prep a few pages for the busy days I won’t have a lot of time to scrapbook. I am sure I will move things around as I develop my photos. The papers and embellishments I am using throughout my album is the Basic Gray Persimmon collectionthe Family Traditions line from Websters pages, and some embellishments from My Minds Eye. I really love the combination of the oranges and browns mixed in with the navy and baby blues. I am also adding in some Project Life cards, Pre-cut cardstock, Prima wood accentsHey Kid sticker labels from Pink PaisleyWhimsical Twist sequins, and some other items from my stash to add texture and color.

Here are a few of the “put together ahead of time” pages I have done so far.

Taniesa's Gratitude album @ WhimsicalTwist.com

Taniesa's Gratitude album @ WhimsicalTwist.com

Taniesa's Gratitude album @ WhimsicalTwist.com

For this next page I decided to make a partial transparent divider type of page using some sequins and Prima wood disks. I just sewed the two pockets closed. I will add a filler card or photo in the other two spots.

Taniesa's Gratitude album @ WhimsicalTwist.com

Taniesa's Gratitude album @ WhimsicalTwist.com

One of our bucket items is to make our own Halloween costumes this year. My little girl decided to be a traditional witch this year so I set these two pages aside to show off her costume and a photo of her trick-or-treating. I love the little whimsical sacks to hold tags for journaling!

Taniesa's Gratitude album @ WhimsicalTwist.com

Taniesa's Gratitude album @ WhimsicalTwist.com


Taniesa's Gratitude album @ WhimsicalTwist.com

Taniesa's Gratitude album @ WhimsicalTwist.com

One of the key things with this project as well as any seasonal Mini album project is to simplify and organize. Some items in my craft space I keep where I always keep them but sometimes it helps me if I pull together the collection of items I might want to use for the project. Looking at all the Autumn product together is very inspiring for me. Some things that I have done to help myself along is pre-cut my cardstock in 4×6 and 3×4 pieces, take my 6×6 papers and put them in a 6×6 clear iris plastic box to flip through quickly, Take a binder clip and clip together like items (sticker letters, enamel dots and gems, labels, sticker embellishments, stamps, etc), and put little items like sequins in the color combo that I will be using and wood veneer in small containers for easy access (bead containers from your local craft store work great for this).

I hope you enjoyed my little preview into my Autumn album. I will be back for this series next month to show you my near completed album!

One little bit of exciting news today is that all Basic Gray and My Minds Eye product is now on sale at 20% off in the Whimsical Twist shop!!! The sale lasts from now until November 3rd . So, if you were wanting to get your hands on some great supplies for your autumn and holiday scrapbooking now is a fantastic time! Enter Code MME20BG at checkout!

All Basic Gray and My Minds Eye now on sale at Whimsical Twist!!!!!


Happy Autumn!

The Crafty Pickle


The BIG December Days Kit “Merry and Bright” Video!

Hi Pickle Pals!!!

I have been so excited to post about my Merry and Bright kit that I created for the Whimsical Twist shop and today is finally the day I get to share it all in detail with you! I really thought that photos would not do the kit justice so I made you all a little (ok, it’s a little over 15 minutes but its worth it) video!

Before we get to the video I wanted to talk a little bit about what I tried to achieve when I put the contents together. Last year was my first year doing December Daily and I loved the project so much that it lead into my commitment to do Project life for the entire year. well this year I am doing both and I wanted a kit that could not only fill my December Daily album but one that I could pull from for my PL album for the month of December. There is a lot packed in this little kit and for the price you really can’t go wrong. The Price of the kit is $50 but for TODAY ONLY they are in the shop for 15% off (the sale ends 10/18 at midnight so make sure you run over to Whimsical Twist and nab yours as there is very limited quantity!) You can also get a discount on the December Days class when you purchase a kit (50% off) for only $10! It’s a super fun class that offers free digital files, inspiration, challenges, and lots more. Going on now, and lasts all the way into January! Even if you are using your own homemade kit you will get so much out of the class.

Now on to the video!

So to recap, the Merry & Bright December Days Kit includes the following contents:

  • Tis the Season 6 x 6 paper pad (Echo Park)
  • Christmas 3 x 4 Sn@p Cards (Simple Stories)
  • Christmas 4 x 6 Sn@p Cards (Simple Stories)
  • 12 x 12 Chalkstalk (Canvas Corp)
  • Hello Santa Banners stamp set (Ali Edwards for Technique Tuesday)
  • White Chalk Ink Edger (Prima Marketing)
  • December Documented Expressions Cardstock Stickers (Simple Stories)
  • December Documented Fundamental Cardstock Stickers (Simple Stories)
  • Magical Banners (Studio Calico)
  • Micro Mono alphabet stickers – white (Basic Grey)
  • Christmas Sprinkles (Doodlebug)
  • Star washi tape (Freckled Fawn)
  • 2 Bow clips (Webster’s Pages)
  • Assortment of sequins (Whimsical Twist)
  • *Bonus Package from Taniesa* while supplies last.

I really hope you love the kit as much as I do. I am excited to share with you what I do with the kit as well as see what YOU do with the kit.

To purchase the kit alone click HERE.

To purchase the kit with the discounted class admission click HERE

What would a reveal this big be without a fun GIVEAWAY to go with it?  Instead of giving away the kit (because its such a deal I know you are all going to rush over to get yours) we thought it would be more fitting to give away the perfect add-on kit to go with your Merry and Bright kit!!! Here is what you will receive if you are the lucky winner;

  • A red faux leather 6×8 album from Simple Stories.
  • A 6×6 December Documented paper pad from Simple Stories.
  • A Technique Tuesday/Ali Edwards 25 moments stamp set.
  • A Whimsical Twist exclusive matching Pickle Flair set (set of 6 that match the Merry and Bright kit)
  • A set of 31 numbered chalkboard Pickle Flair. Perfect for numbering each day in your album. *not shown*
  • a bag of mixed embellishments (Sequins, Wood Veneer, Confetti stars, ribbon, twine, and more) *not shown*
  • A set of three personalized Just-for-you flair. *not shown*
  • And if that wasn’t enough we are giving you free admission to our December Days Class that is going on now until mid January. We will stick by you from start to finish!

Win ME! www.thecraftypickle.com

To enter all you have to do is leave me a comment with your name and location. Want MORE chances to win? When you purchase a Whimsical Twist Merry and Bright Kit come back and leave a separate comment letting me know and you will have an additional entry! Follow Whimsical Twist on Facebook, Instagram, Twitter, and Pinterest? Leave a separate comment with I follow WT on ____ for each one and you can have more chances to win! Share the reveal video on your Facebook or other social media? Leave another comment with the link and get another chance! Follow @Taniesa on Instagram, Yep, another chance to win!!! You can get a total of 10 chances if you complete all of the above, how easy is that!

The giveaway entries will close Friday 10/25/13 at midnight PST and a winner will be announced Monday 10/28/13!

Best of Luck to you all and Happy (Holiday) Crafting!!!

TheCraftyPickle.com

Time for another Die-namites Dies Sketch Challenge and Dare!

Welcome to this months Sketch Challenge and Die~Namites Dare!!!

Every month a new sketch will be introduced….

the sketch can be interpreted as a card, layout or altered piece!

You need to use at least one Die~Namites Die in your creation.

You have until the last day of the month to post your creation on your blog,

with mention of the Die~Namites Die used and a link back to the Die~Namites Dies blog.

Link your blog post, using Inlinkz, to the Die~Namites Die blog.

A random winner will be chosen from eligible participants

for a $25 Gift Certificate to the Die~Namites Dies

Here is this month’s sketch…..

I had the honor of creating this sketch for our challenge and dare this month. For the sketch I decided to use two of the newest Christmas release dies. The Swirly Poinsettia Die and the Elegant Holly Die.

I used these beautiful dies to dress up a small gift bag. Here is my take on my sketch above.

Your dare this month is to use a tag (or more) in your design.

I can’t wait to see what you all do with the sketch! Don’t forget to link up your design on the Die-namites Blog for a chance to win!

Happy Crafting!

Fun October contests & Challenges going on now!

Hi there Pickle-Pals!

I thought I would drop a quick little post telling you about two awesome challenges that are going on for the month of October!

First up is the Whimsical Twist Fall Texture challenge ***Runs 9/30 through 10/11*** You could win a gift certificate to the Whimsical Twist shop! Check out the inspirational layouts posted by some of our design team on the blog post HERE.

fall texture challenge at Whimsical Twist

Also, Die-Namites is sponsoring Creative Scrappers Sketch challenges for the month of October! you could win some awesome Die-namites dies of your own! Make sure to check out their site HERE!

Creative scrappers challenges

Lots of fun for the month of October (and there is more to come too!)

Dont forget that the Whimsical Twist December Days class starts TODAY! 3 months of festive fun that you will definitely not want to miss! If you purchase one of the 4 december days kits offered in the shop you can get your class fee reduced to only $10! I am super excited to share the kit I have designed (Merry & Bright) very soon! Stay tuned to my blog, Instagram, and facebook for some sneak peeks! I have some really fab ideas for all you christmas crafters out there!!

December Days class at www.whimsicaltwist.com

Happy October everyone! I am so excited for this Fall season! I hope you are too

Happy Crafting!

The Crafty Pickle

Merry Everything!

Happy Friday crafty friends!

Today I am excited to share with you two of the newest release Die-Namites dies in action! I am using the Beautiful Bow die and the Pine Bough die.

These both are so fun to work with and I can think of lots more projects that I want to use them in but I am still working on making my 2013 christmas cards. Here is the photo of the card I put together using these two fabulous dies.

I used a brown glitter glue for the pine cones as well as sprinkled on some additional gold glitter on some of them. I took two colors of red cardstock for the bow cuts and layered the darker color on the bottom to give a shadow effect. I also used some foam dot adhesive to pop the bow up from the pine bough’s. I love the added dimension of the wood grain cardstock.

I have to say this latest release is by far my favorite. I just love Christmas paper crafting! I hope this inspires you to try some of  the beautiful christmas dies we have in the View the new arrivals! now!

Happy Crafting!

It’s beginning to look a lot like CHRISTMAS!!!

Welcome to our
NEW RELEASE BLOG HOP Die~Namites Dies has just released 32 new Fall and Christmas themed dies!

Dienamites Bloghop september
We are sooo HAPPY that you have chosen to join us for the event, September 20-22, 2013
Our theme is…
“It’s beginning to look A LOT LIKE CHRISTMAS!”
As you are hopping along be sure to
leave a little love on each of the Design Team blogs.
Make sure to leave a comment on the Die~Namites Blog for an entry to win the Grand Prize of a
$50 Gift Certificate to Die~Namites Dies along with
5 ~ $10 Gift Certificates.
You will receive additional entries for Liking us on Facebook,
Signing up for Email Notifications.
So Let the HOP Begin!

I have been working on my christmas cards since July, but I am nowhere near finished which was good because I absolutely fell in love with the new holiday release from Die-namites! For today’s card I am using the Pine Wreath die. I love the intricate details of the pine, something I definitely could not achieve with a digital cut or punch.

Pine Wreath Die

I began by cutting 6 shapes out of two different colors

Dienamites-Christmas-1

I started with the full cut on the bottom and layered pieces of the die that I had cut apart on top filling in the empty spaces to add more fullness to the die. I used a Zig ball point tip glue pen. I chose this adhesive because its not too messy but easy to get into fine lines and not dry too fast.

Dienamites-Christmas-2

Dienamites-Christmas-3

After layering all the greenery I made another cut out of red cardstock and cut the birds from the shape.

Dienamites-Christmas-4

I attached them using the same glue on top of the green cut that I started with.

Dienamites-Christmas-5

I glued the wreath to a white card (A2) and rounded the corners of the card. I attached some red gem dots (Recollections from Michaels)  to make the berries around the wreath.

Dienamites-Christmas-6

Then I added some silver polka-dot washi tape around a stamped sentiment on the bottom. It was super simple but I love the results!

Dienamites-Christmas-7

Dienamites-Christmas-8

What new release dies are your favorites? Be sure to keep an eye out on the die-namites blog for lots more holiday inspiration!

Now for more Holiday Crafting fun! Hop on over to Dunja Dücker’s blog! If you got lost along the hop the order is:

Lisa Tottle

Taniesa Vlasak  *you are here*

Dunja Dücker

Susie Moore

Peggy Lee Baker

Lynne Forsythe

Die~Namites Dies

Don’t forget to comment along your way to win one of 6 awesome prizes!!!

Happy Crafting!

The Crafty Pickle

Happy Friday! Let’s get ORGANIZED!

Hi Everyone!
I am on to my next organizing endeavor! this time tackling labels, tags, stickers and other project life supply goodness as well as my Die-namite dies!

Here are some before photos. First is my labels, tags, stickers, etc… that I use primarily for Project Life.

Get organized with help from TheCraftyPickle.com

And here is the drawer I had all of my Dies shoved into.

Get organized with help from TheCraftyPickle.com

What a mess! So I headed to Target (I love Target!) and in the office supply section I found these little gems!

Get organized with help from TheCraftyPickle.com

Now I am focusing on these small ones but there are lots of different size accordion files… you could use different sizes to organize different supplies. These coupon size files came with a little notepad. I took that out to lessen the bulk.

Get organized with help from TheCraftyPickle.com

I created some mini file folders. The first i created using my silhouette…. but I needed to make quite a few, and maybe I was a little lazy, so I just cut the cardstock to size, scored it, folded it, and put a tab on it.

Get organized with help from TheCraftyPickle.com

Then I separated everything into like item piles. A couple of tips to mention. You want to remove any unnecessary excess packaging, this adds extra bulk and sometimes will prevent the item from fitting.

Get organized with help from TheCraftyPickle.com

You also might want to cut down strips of labels to just the label and not the product name or bar code. If you want to retain the info just write on the back with a slick writer.

Get organized with help from TheCraftyPickle.com

For the folders in the sticker, tag, and label files I created one in each to put the items that were loose in, I didn’t want them falling in between the divided sections

Get organized with help from TheCraftyPickle.com

Get organized with help from TheCraftyPickle.com

For the die cut file, I made an individual file folder for each die, also when I use the die I cut a couple of extra shapes and put it in with the die, that way if I just want to grab a cut and not pull out my machine i have it right on hand.

Get organized with help from TheCraftyPickle.com

Get organized with help from TheCraftyPickle.com

And here is some end result photos. I really am enjoying this system, I love that everything is right at my fingertips. For now I am storing the files in the black box I picked up at target seen in the photo, but as I reorganize my IKEA Raskog, I might transfer them over.

Get organized with help from TheCraftyPickle.com

Get organized with help from TheCraftyPickle.com

Get organized with help from TheCraftyPickle.com

Get organized with help from TheCraftyPickle.com

Get organized with help from TheCraftyPickle.com

I hope this provided you with some organization inspiration. I have a pretty big project I am working on next and I can’t wait to share with you all SOON!

Have a fabulous weekend!

The Crafty Pickle