Intro To Pocket Letters GIVEAWAY Featuring EXCLUSIVE TCP Pocket Flair & Goodies!

intropl4Hi Crafty Pickle Pals!  This is my very first post as a new DT member for TCP and I’m super psyched to (maybe) share with you something NEW!  Have you heard of pocket letters?!  It’s a super fun, fairly “new” snail mail craze coined by creator of the concept Janette Lane.  Check out her blog to learn all you need to know about how to get started making and mailing your pocket letters too!  For now, I will give you a brief overview of what’s inside, and how TCP can help you stock up on all the goodies you need to WOW your Pocket Letter recipients!  Comment on this post for a chance to receive this letter and goodies from myself, and Taniesa at TCP shop.  AND If you are visiting me from the Pocket Letter Pals Facebook group you can comment on this post for an additional chance to win this awesome GIVEAWAY! 

intropl5

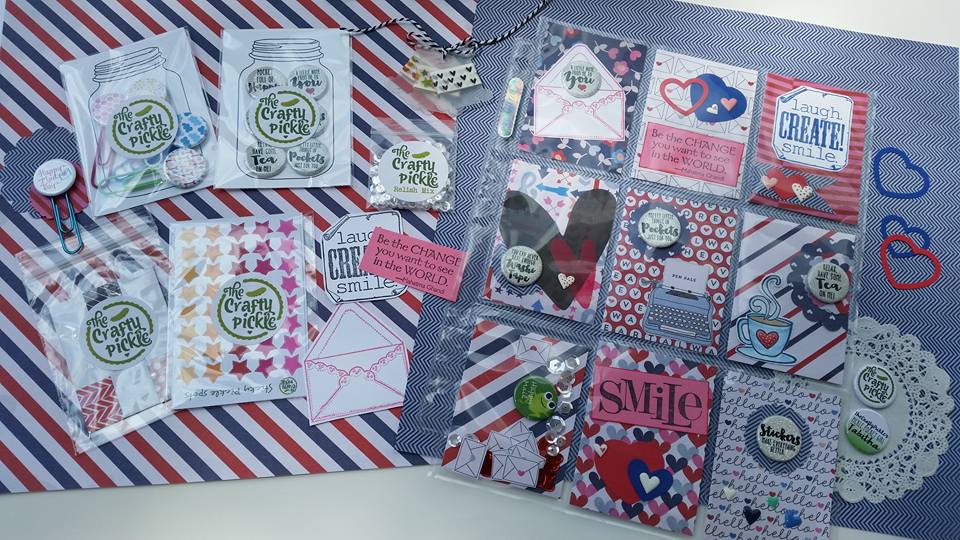
Note: You an click on the images to see them larger, and notice some of the fun little details included in my Pocket Letter!  For example, in the bottom left corner I created a fun shaker pocket using some sequins, little envelopes cut from patterned paper, and a piece of frog Happy Mail flair!!

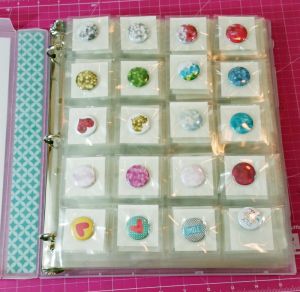
Using a standard 9-Pocket trading card/baseball card protector, hundreds, if not thousands of people are creating their own works of art to mail to people all over the world.  This movement in founded on the principles of friendship and fun, and is meant as a way to establish a connection with a pen pal.  One of the 9 pockets should contain a letter from you to your pal and you can create on-going trades with one (or many) friends, or do “one-time” swaps with multiple pals to simply collect artwork from across the globe.  The letters are often conveniently stored in handsomely decorated 3-ring binders to flip through on days when you need a smile or some of your own crafty inspiration.  Other recipients take a part bits and pieces of the letters to use goodies from the pockets and pieces of the art in their own projects, perhaps to make Project Life filler cards, greeting cards, scrapbook accents etc.  How you use the art and how you store it is unique to you! The lovely part about pocket letters is there is no right or wrong, and people cherish that you give apart of yourself and your time and your thoughtfulness in creating just for them!  intropl1

intropl3

intropl6
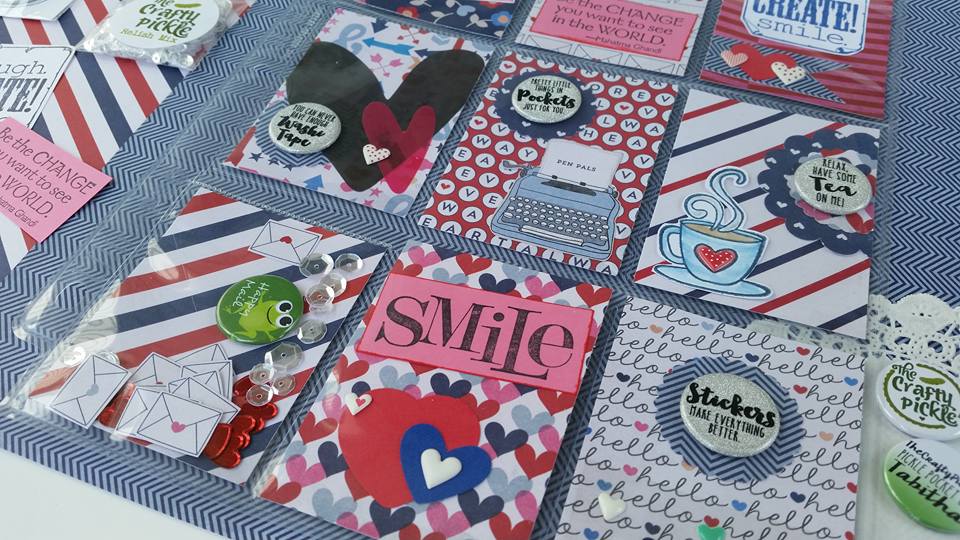
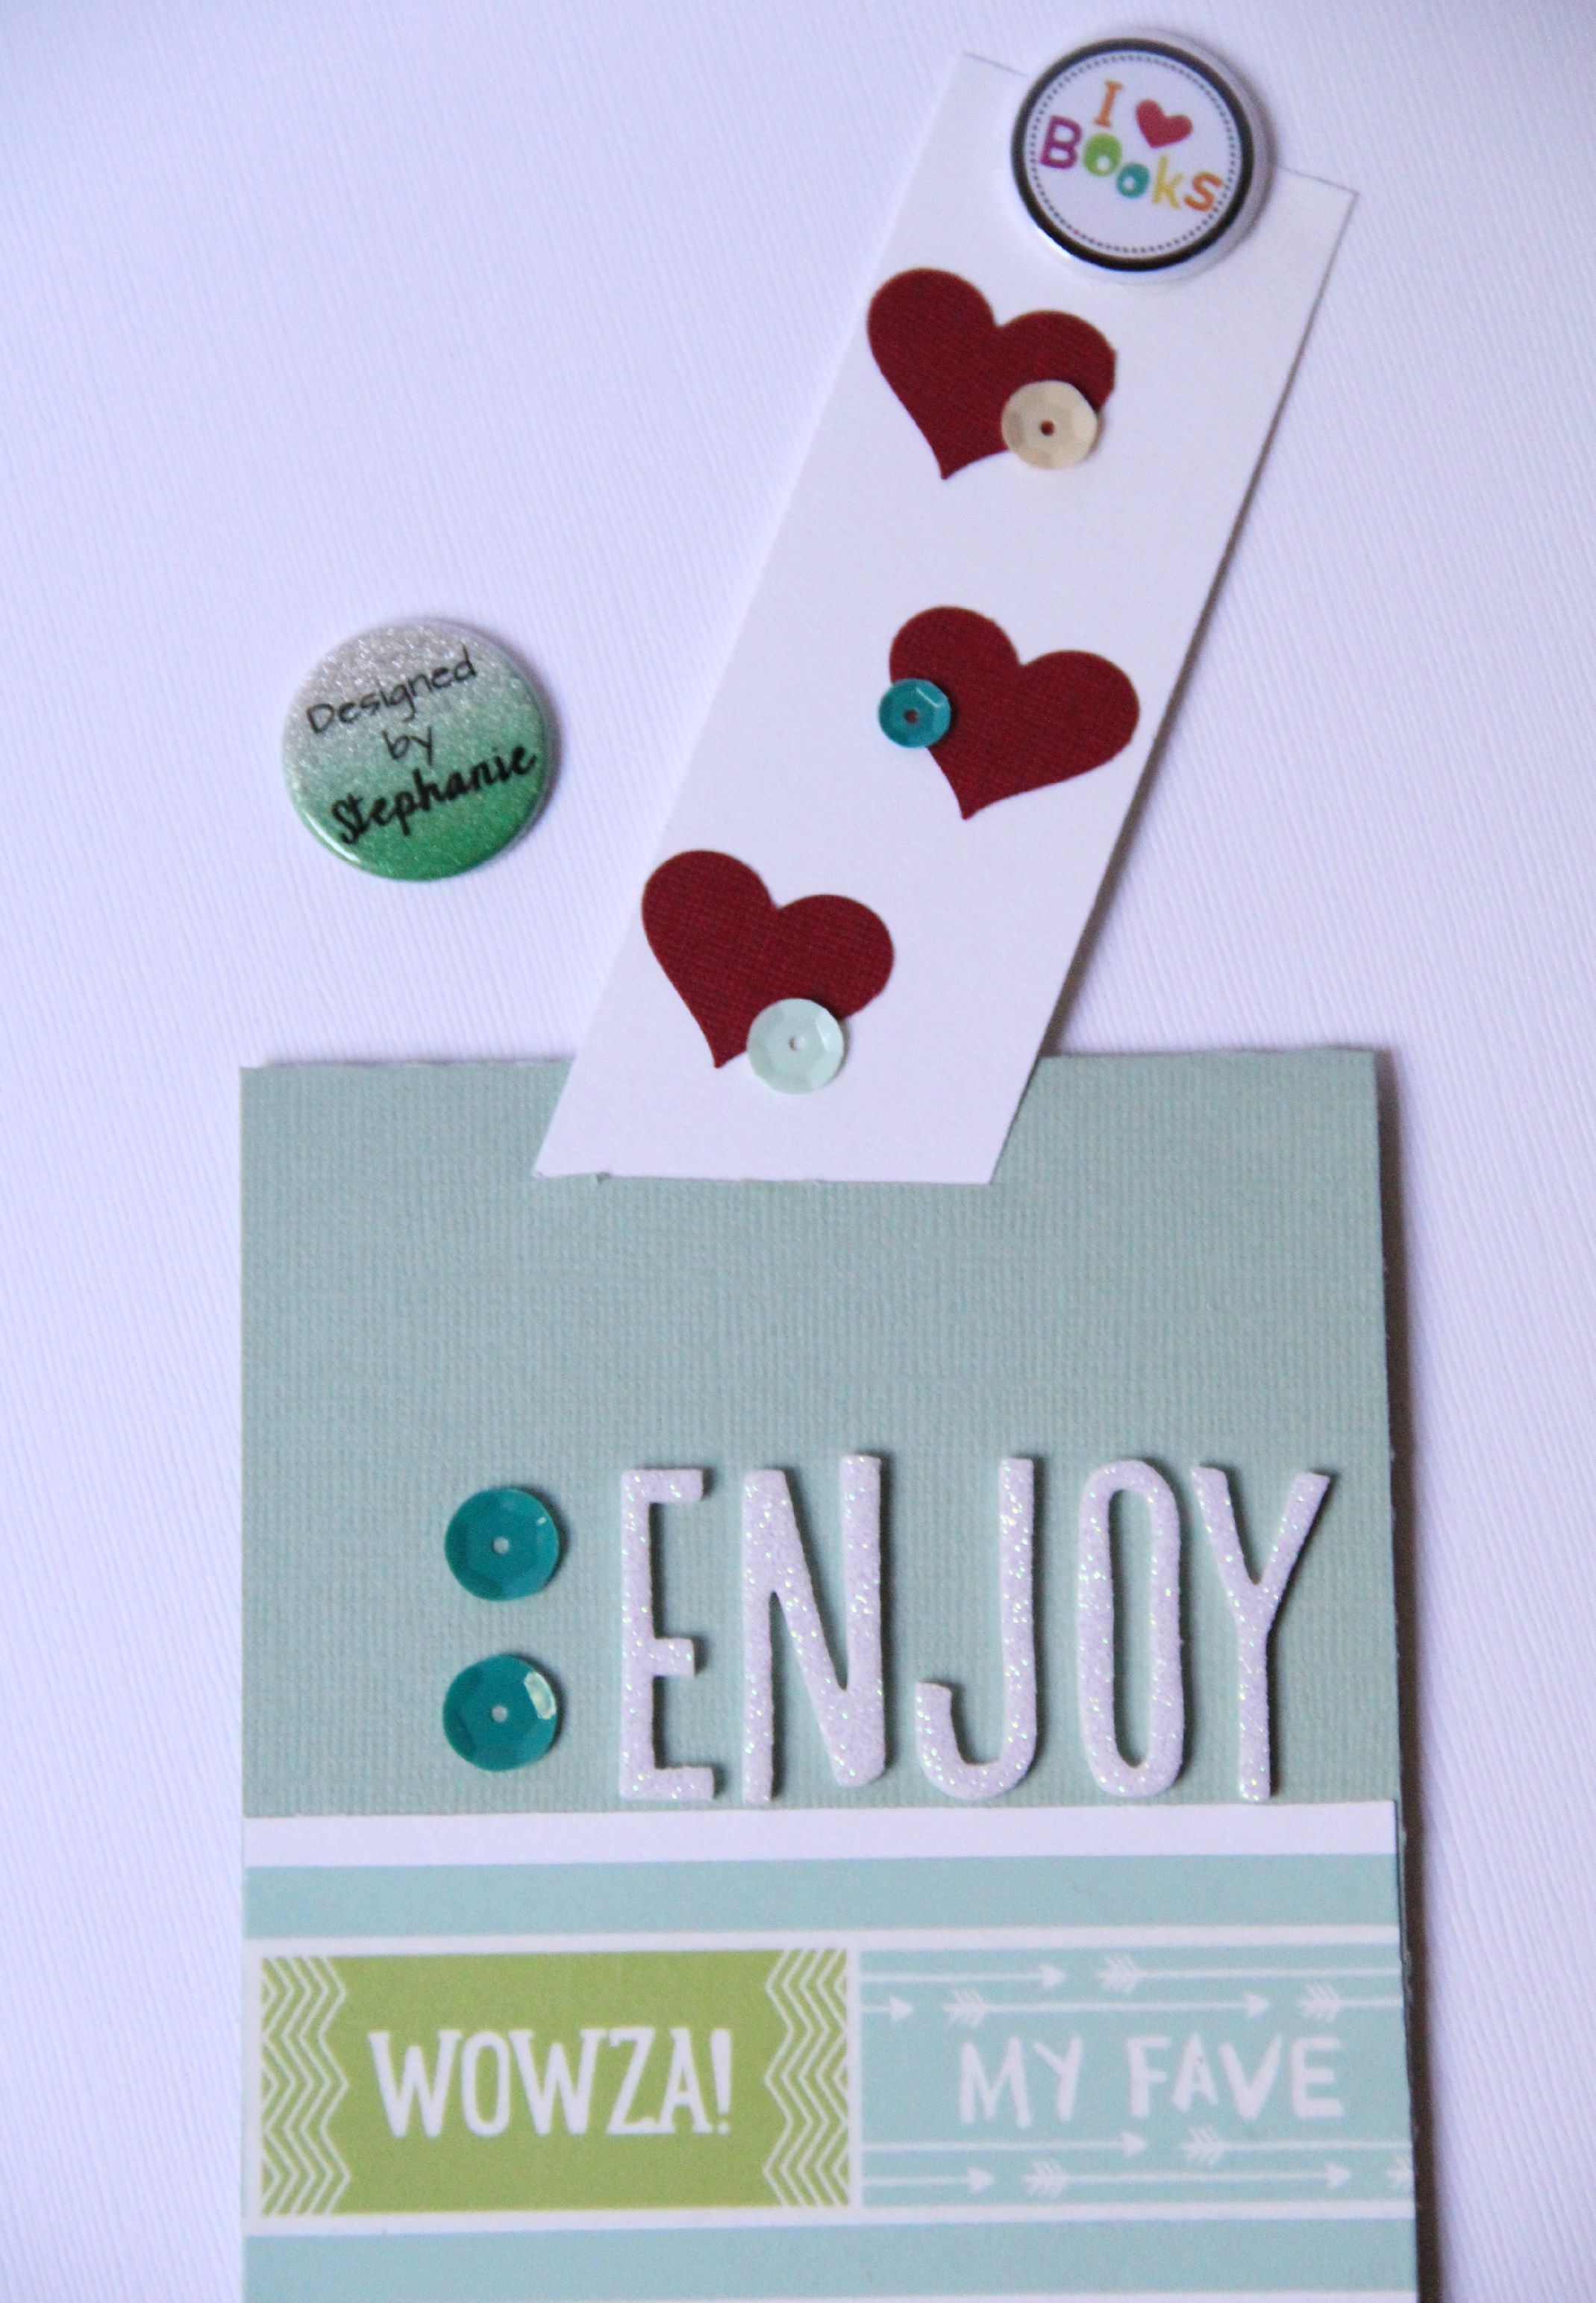
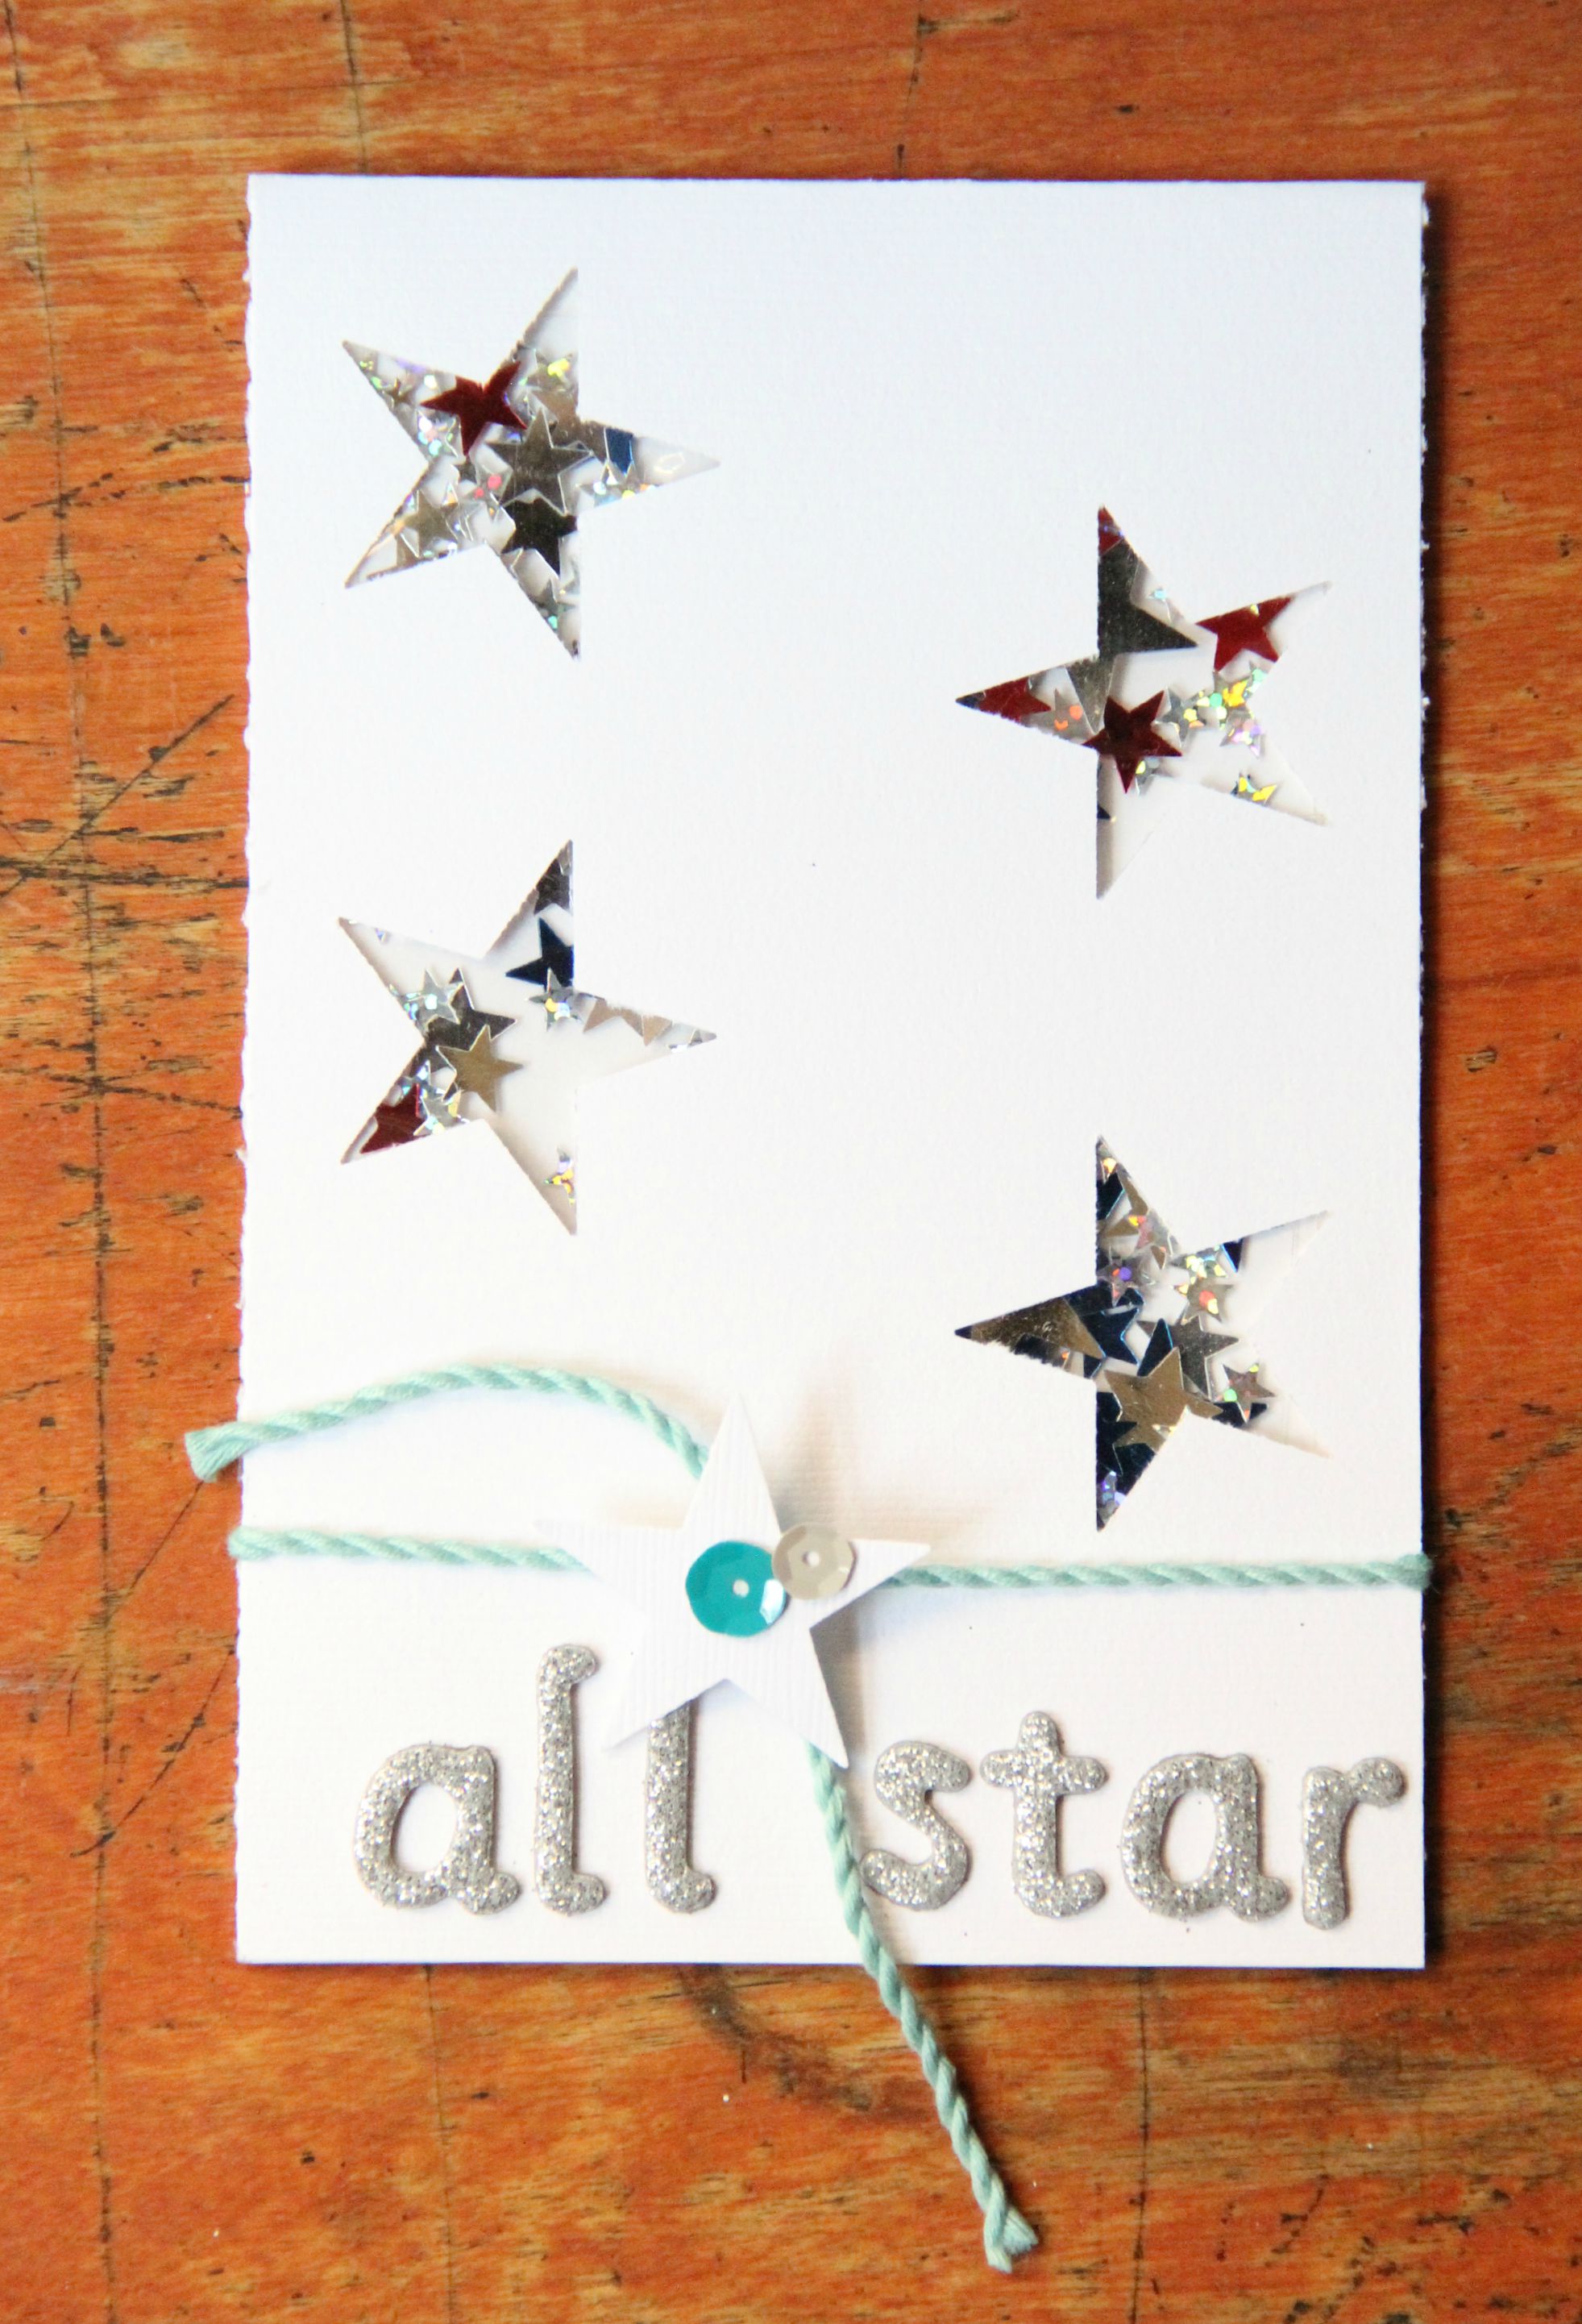
That being said, I will be the first to admit that part of the fun of Pocket Letters is that alongside the artwork, usually people share little bits and pieces and trinkets, and treats on the backside of the pockets (or sometimes in front if they are part of their design element).  Some of the most popular “goodies” that people include for their letter recipients are tea bags in fun flavors, washi samples, stickers, sequins, twine, fun sticky notes and page flags, decorative paper clips, flair, diecuts, stamped images, punched shapes and tags, small flat candy and gum etc.

This giveway includes all the fun goodies you need to get started in treating a pal of your own–special Flair from the shop that labels each pocket’s contents, sequin “pickle relish”, fun flair paper clips, washi samples, page flags, and new Sticky Pickle Spot stickers in a fun rainbow of colors and shapes.  I’ve also included some fun stamped images and extra punched shapes!

I hope you will join in the fun and friendship of Pocket Letters and enjoy checking out the shop for cute ways to customize your letters for your pals too!  Please comment with your email address on this post for your chance to win the GIVEAWAY by 8/23/15 9 p.m. EST.  intropl2I will randomly choose a winner to send my letter and goodies to.  And be sure to check back in the coming weeks and months for more of my pocket letters designed with TCP Flair and other fun products!

HAPPY Snail MAILING!

Tabitha sig

TheCraftyPickle is taking a short break.

Hi Crafty Friends.

Due to the huge amount of orders we have received we are closing the shop temporarily. We will be opening back up soon. Make sure you hit the notification button to receive an email when we are back open!

Thank you!
Taniesa


New New New Products!!!!

Hello Tuesday!!!

So in love with all the new products in the store right now …she is hitting on all my new crafting projects that I am working on right now …scrapbooking, pocket pages, planners, journaling bible and so much more….

planner-front

Here is the front of my new organizer…so easy …feed the cording thru the wonderful magnetic charm and tie it in a knot and you are ready to go….I added a little ribbon to mine!! LOL. I love this personalized planner charm system!

I will start with my planner calendar this month… now this is all new to me ..I am just getting started so using all the wonderful products from The Craft Pickle really gets me started on the right foot!!!

Products Used:
American Craft Stick Note Planner
American Craft Sticky 1 2 3 note pads
Pickle Planner Flair and Magnet
Magical Mouse Relish Mix
Rock Candy Relish Mix
Black Heart Washi Tape
Cute Colorful Cars Washi Tape
Road Pattern Washi Tape
Gold Wash Tape
Studio Calico Baxter Vellum Hearts
Sticky Pickle Spots: Asterisks
Vintage Camera Flair
I love Books Button Flair

This is the month of August for me …last week of summer here in Texas and then my boys start to school next Monday!!! So …it is all about getting in doctors appointments, going to the Houston Texans Training Camp and one last road trip… I had to use the supper sweet flair of the boy reading the book and the Vintage camera is one of my favorites because it can go on anything because if you are like me I am all ways taking pictures!!!

planner-3

plannerplanner-2planner1

Then I made my own little dashboard with some of my favorites from the store!!! I use a piece of acetate and then punched holes in it to fit in my organized then added Don’t worry I have a plan clip and all my goodies to it!!!

planner4

Hope you liked looking into my organizer!!!!

kristin for ThecraftyPickle.com

Bookmark/Card

Hi TCP friends!! It’s Stephanie from Bits & Pieces (& Scraps) here today to share my latest project using The Crafty Pickle flair & CTMH products. I made a card that could be given for many different occasions-birthday, congratulations, thank you, etc.

enjoy card

I used the “I Love Books” flair button, some washi tape and self-adhesive sequins, all from The Crafty Pickle shop.

IMG_0408

IMG_0410 IMG_0413

I love to read! Unfortunately, my kids do not love it that much and I am constantly trying to entice them into reading. I thought this card might do the trick!

I slipped in a little bookmark that can be pulled out of the top of the card & used when reading. I also thought it would be nice to give the card with a bookstore gift card inside!

Products used:

CTMH Boardwalk washi tape

I Love Books TCP flair

Thanks for visiting!

stephanie for ThecraftyPickle.com

Summer Fun Days!!!

Happy Monday to everyone!!!

We love summer time down here in Texas…especially now that I have a pool in the backyard!!!  This flair just goes so perfectly with the look of the scrapbook page that i wanted to create and the sequin just keeps coming and coming out of that little package …it is just so awesome with all the stars!!!

Product used:
Blue & Green Pop of flair
Relish Mix

Summer Time Flair

CTMH Washi tape pack Boardwalk

IMG_20150802_180721091 IMG_20150802_180729511 IMG_20150802_180749265

And then here are my close-ups …come and visit the store in a couple of weeks when the big new reveal comes up!!

Be sure to select the notify button so that you can be notified when the shop opens back up!!! Check it out right .HERE

From Simple to Fabulous… Just add Flair

Happy Hump Day!  Here is a little crafty inspiration to get you through the week. 

  I am part of a group on facebook that creates and swaps handmade Project life style cards and embellishments. You can find us here – Projectlifecardswaps.com   Our own Taniesa is one of the hostess in our group.  She hosts a new swap every month called JAF – Just Add Flair.  For this swap we are to create a 3×4 or 4×6 PL card with a spot for the receiver to add a flair button. 

Here is the card I created for this round of swaps.  The red flower is where the receiver can add their own flair button or embellishment to personalize their card.

So This is my card that I personalized using a custom flair from TheCraftyPickle shop

This is a special flair button that Taniesa sent me as a sample of the beautiful gold foil flairs that will soon be released in several amazing designs in TheCraftyPickle shop around August 14th. You can say you saw it here first. A special Sneak Peek just for you!  These are really beautiful in person.  So be sure to check back and see the entire New release on August 14th. 

Carrie for ThecraftyPickle.com

All-Star Card

Hey TCP friends! It’s Stephanie here today from Bits & Pieces (& Scraps).

I have a card to share that I made for my son who was selected to play on our Little League’s All Star team. He was at practice yesterday & fractured his finger when a ball popped up & hit his finger. I figured this card was perfect to give him some encouragement & support right now!

all star

I punched stars from my card with my Fiskars craft punch. I then used leftover acetate from an old package to place on the inside of my card. Once the top piece of acetate was strongly secured to the card, I filled it with the Star Spangled Relish Mix sequins from the shop. After I had the desired amount of sequins inside, I secured the other side of the acetate with redline tape.

I then added some twine, one of my punched stars & some self-adhesive sequin dots.

IMG_0371

IMG_0374

I hope this helps my little guy feel a bit better!

Thanks for stopping by! Make it a crafty day!

stephanie for ThecraftyPickle.com

“Celebrate” Birthday Card

Joann here today, thank you so much for stopping by!

Today, I am sharing a a fun birthday card that I made using the CTMH Art Philosophy Cartridge and some fabulous TCP Relish Mix.

I cut the card image on pg. 71 of the Art Philosophy handbook twice. I cut one of them in half, I did this because I wanted to sandwich the acetate piece in between to help hide the glue in the inside of the card. I took some mini glue dots, TCP Something Shiny Relish Mix, TCP Winter Relish Mix and placed them to create my icing and the cupcake liner to the cupcake image.  I didn’t mind that the mini dots showed on the inner side, it actually looked really cool and clean.

I cut my sentiment out 4 times from the CTMH Artbooking Cartridge (pg. 65 in the handbook) then stacked them one on top of the other to help add some great dimension.  To finish off the card I scattered a few stars from TCP Cinema Relish Mix.

That’s all for today and thanks so much for stopping by!

Supplies used

CTMH Art Philosophy Cartridge

CTMH Artbooking Cartridge

TCP Something Shiny Relish Mix

TCP Cinema Relish Mi

Organizing FlairTastic Friday!!!

Happy Friday Y’all!!!

This is the last in our series in FlairTastic Friday!!  It is all about organization organization organization!!! Let us see what you got in the order of organization…

This is what Taniesa has for you:

I saw ideas of putting them flat in CD cases. Putting them in packaging inside a basket and flipping though them, even putting them in coin page protectors and placing in a binder. All very clever ideas but none of which I thought would work for me.

I knew that they needed to be organized by color. If you have seen my previous posts you know that I organize nearly everything by color. I also knew that I needed something that would have room to add more than my current collection. I didn’t want to have to have multiple cases for one type of embellishment (except washi tape and PL cards, those don’t count ).

While I was at Michaels in the beading section I came across a fantastic sectioned organizer (for bead organization) and it was really reasonable ($5.99) It had more space than a embroidery floss organizer box ($2.99) and I figured it just might work. Here is my little button collection.

Organize your Flair buttons! More @TheCraftyPickle.com

Organize your Flair buttons! More @TheCraftyPickle.com

Organize your Flair buttons! More @TheCraftyPickle.com

In addition to organizing by color I have 4 sections dedicated to seasonal buttons. Spring, summer, fall, and winter. There is also multi-colored button sections and spaces for specific themed flair.

This is from Joann:

She sent me this idea that she found on the internet- Clipboard at a glance -love this idea..check out the link!!!

11751855_842149952507343_7309660276640616122_n

Here is a link to her post:

http://studiombymarian.blogspot.com/2015/01/flair-button-embellishment-organization.html

This is some great ideas that I found out on Pinterest:

ae294eb4a7cf4796871367c58b637118

Use an old letterpress drawer or curio shelf to organize embellishments….

Here is a link to her blog to see how she used this letter press to organize here project life embellishments

And then one last one I had to share…. Here   

3a47865cb145b59cbddfe3176e190774

Thus looks so awesome and you can for sure see all your fair in one place!!!

Stop by The Crafty Pickle Etsy Shop if you haven’t been by recently. We will be releasing a few little things between now and our next big release. We will also be having a big TCP Birthday celebration in August with giveaways and a brand new exclusive foil flair!

Dont forget to use the hashtag #FlairTasticFriday to play along with us!

thecraftypickle.com

Flair On A Layout

Hey TCP friends! It’s Stephanie from Bits & Pieces (& Scraps) here today to share my latest layout with you. I created a Fourth of July page using the All American flair set.

I have to admit, I don’t create many patriotic pages! They intimidate me, but these flair buttons make the process fun and exciting!! I used three of the six in the set. be free

the crafty pickle flair layout

I hand cut several banners to accent the top corner and have one laying on top of my photo. I love how this takes away some of the blank space of my photo. I added a chipboard arrow & the “Happy Birthday America” flair. LOVE this one!

the crafty pickle flair layout

More hand cut banners under my photo act as a matt. I then mounted the “July 4” flair onto a punched scalloped circle. The paint here acts as my journal block.

layout created using the crafty pickle flair

A pre-printed banner at the bottom & “the Land of the Free Because of the Brave” flair finish off the bottom of my page.

I kept my layout pretty simple and love the dimension the flair buttons add to my page! I could have used them all but wanted to save the remaining three for another page (or maybe cards)!!

Thanks for stopping by!  Enjoy the day!

stephanie for ThecraftyPickle.com

Christmas in July!!!

Happy Saterday, thank you so much for stopping by!!

Today I am sharing a Christmas card I made using the CTMH Cricut Art Philosophy Cartridge and a coordinating stamp set.

This cartridge collection is fabulous and if you haven’t seen the cuts this cartridge has, click here to take a look!
And then here is a link to her blog:

I used the cartridge to cut a frame (pg. 62) and used the Perfect Fit- Frames Flair stamp set to stamp my image on the frame with some Cranberry Ink. I then cut the tree (pg. 31) and stamped my image with the coordinating stamp set that comes with the CTMH Art Philosophy Cartridge bundle with some Pear Ink.

This cartridge has some fun borders that you can cut out, I took the border on page 63 and cut it out using some fun CTMH Silver Glitter cardstock. Using the same stamp set as my tree, I stamped my sentiment on some vellum with some StazOn. I finished my card by adding some foam adhesive to my images and some TCP Winter Sequins Mix.

Thanks so much for stopping by, have a wonderful day!
Here is link to her Blog

Supplies used
CTMH Ink- CranberryPear
CTMH Stamp Set- Perfect Fit- Frames Flair