Candy Bar Treat Boxes

Hi friends, Joann here today with you! Thank you so much for stopping by!

Today I am sharing with you something that I have been working on for a craft fair that I will be participating. I shared this project last year in December, a step-by-step on how to make the box treat, but this time around I used my Cricut and a couple of the CTMH Cricut Cartridges to decorate my boxes.

Here are a couple that I’ve made so far…

I used the CTMH Artistry Cartridge to cut out my snowflakes out of some glitter card stock and added some foam dimensional to add a bit of dimension to them.

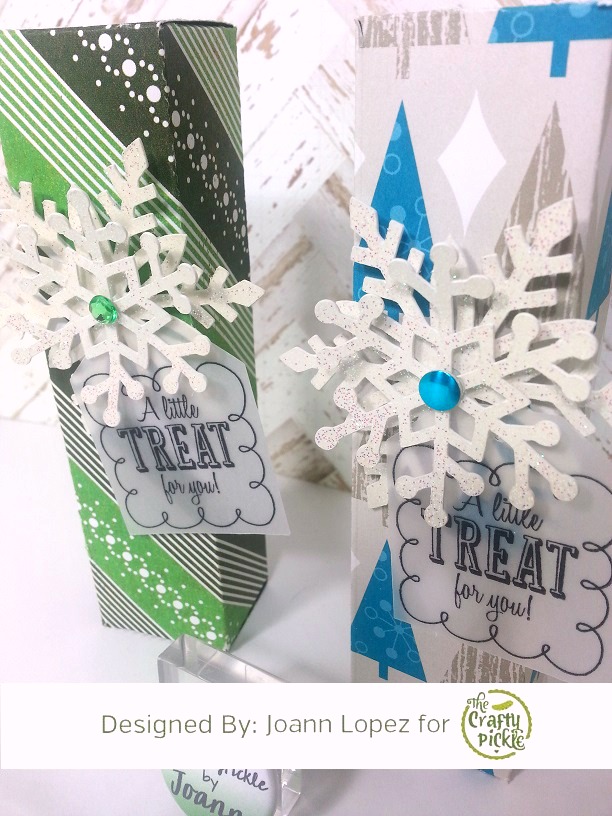
 I took the Treats of Friendship stamp set, also from Close to My Heart, to stamp the cute image on my tag.

The deer and the design behind the deer came from the CTMH Artistry Cartridge and the ornament was cut using the CTMH Artiste Cartridge. For the sentiment on the deer box, I used the CTMH Holiday Tags stamp set to add my sentiment.

I still have a few to finish, but I wanted to share the ones that were done and in case you were interested in the tutorial click HERE to read that post.

Thanks so much for stopping by, I hope you have a fabulous day!

“Happy Birthday” CTMH Build-a-Cake Stamp Set

Hi, Joann here today sharing a birthday card with you using the Close to My Heart “Build-a-Cake” stamp set!

Here it is…

This is a really fun stamp set to have! I started off my stamping my cake image using CTMH Inks in colors Black, Honey and Cotton Candy! I did want to point out that the top layer image of my cake is part of the stamp set (the original image has some flowers, but after I stamped my image I took a blending pen and some of the Cotton Candy ink and filled those flowers in to give me a polka dotted cake layer). I then took a black gel pen to outline my cake and add some small details to my flower on top and simply layered my top panel to some pattern paper.

I completed my card by stamping my sentiment onto some vellum and adhered both my sentiment and some AWESOME TCP Relish Mix to my card. I know in the first picture my top left sequins look a bit purple but it’s actually pink, I think my light was hitting it a bit too much, but you can see the pink in the second photo a lot better.

Well that is all for today, thank you so much for stopping by! Have a fabulous day!

Here is a look at the stamp set I used!

“Grateful for You” CTMH Cricut Artistry Cartridge

Happy Tuesday, friends! Joann here today sharing a card with you using the Close to My Heart Cricut Artistry Cartridge.

Here is my simple card for today…

This cartridge seriously has some fabulous cut designs! I used the image on page 45 in the handbook to create my card with my Cricut. I started out by placing a 4 x 5 1/4 rectangle on my screen and placed the solid image (pg. 45 ) right in the center. I then hit the slice button to cut the image out, I used some CTMH Cardstock (this exact pattern is the retired one, but you could definitely pick up the new patterns HERE) to use as my top panel. I also cut the coordinating “Grateful For You” image from the same page out of some brown card stock.

I then took my card base and placed my top panel on top and traced my image to it to cut it out with a craft knife, I did this because I wanted to add some acetate to see through the card. So when I was done with that I glued my acetate piece to my card base then layered my top panel and finally glued my “Grateful For You” image right in the center.

I finished my card by gluing some TCP Relish Mix and added some Wink of Stella glitter to my image. Super simple card but I really like the way it turned out! It’s also a great card to make multiples of if you need several because of the simplicity of it.

Well thanks so much for stopping by, have a FABULOUS day!!

“Oh Happy Day” CTMH Cricut Artiste Collection

Hi friends! Joann here today on The Crafty Pickle blog, thank you so much for stopping by!

As you may know, I own 4 out of 5 of the Cricut Collections that Close to My Heart offers. I absolutely love them. So with that being said I took one of the stamp sets from the Cricut Artiste Collection to create my card!

I started out with stamping and masking some balloons onto my front panel using CTMH Inks in colors Lagoon, Cotton Candy, and Honey and stamped the balloon strings using the same stamp set with some CTMH Black Ink.

Using the same stamp set from the Cricut Artiste Collection, I took one of the sentiments and stamped it with some Honey Ink and used my scissors to cut it out, there is an image on this cartridge that will cut this banner.

Before gluing my top panel to the base of my card, I took an older CTMH stamp set One Way Border and stamped one of the images multiple times with Black Ink to create a background. I finished it off by gluing my top panel down and gluing some TCP Relish Mix to my card.

Hope you enjoyed and thank you so much for stopping by! Have a fabulous day!

Supplies used

Cricut Artiste Collection

CTMH Inks LagoonCotton CandyHoneyBlack

CTMH stamp set One Way Border

TCP Relish Mix

Scary Halloween to you!

Hi there Crafty friends, it’s Lisa here today to show you a card I created for The Crafty Pickle.

IMG_6773

For this card I used the Close To My Heart Thriller set. To obtain the “grunge” look for the background, I used Ranger’s Alcohol Ink and the Alcohol Blending solution. I mixed these together on a blending sponge and made quick dabs all over the cardstock. Once the cardstock was covered in color, I added the blending solution to the sponge and made quick dabs all over the cardstock. This blended all of the ink and made the colors look more cohesive. Once I achieved the look I was aiming for, I then sprayed the cardstock with the Black Soot Distress Spray to darken up the background a bit.

p2

I stamped the sentiment “scary Halloween to you” on cardstock that I distressed with the Frayed Burlap Distress Ink. To finish the card up, I added a few sequins to the sentiment and the background from the Crafty Pickle Relish Mix.

I hope you enjoyed looking at my card, as soon as the Crafty Pickle shop reopens, be sure to take a peek at all the awesome Relish Mixes and Flairs to add fun to your projects.

Happy Monday!

11755895_10207394051838338_7400886623599559816_n

“Make It Merry” with Close to My Heart Stamp Set

Hi, Joann here today sharing two Christmas cards that I made using the Close to My Heart  “Make It Merry” stamp set.

Here is my first card…

I used CTMH Artbooking Cricut Cartridge to cut my tag, which coordinates with this stamp set. I took CTMH Pear and Topiary Inks to stamp my image onto my tag (I tried to create an ombre effect, it’s acutally a bit more noticeable in person). I cut a piece of vellum a bit smaller than my colored card stock and then tied some ribbon to my top panel before gluing it down to my card base.

I finished it off by adding a bell to a bow I tied, scattered a few TCP Relish Mix and popped my label on some foam adhesive to add a bit more dimension to my card. That is all for this card!

Now my next card is mimicking a card that I posted on my blog a few days ago. I loved how it turned out, I did make a few changes to make it a little different.

Here it is…

I took some stitched circle dies I have to cut my circles out of some pattern paper. I stamped my sentiment, also from “Make It Merry“, onto some vellum with VersaMark and heat embossed it with some black embossing powder.

I drew some white lines and then glued my circles down, adding some dimension to 2 of them.  I scattered some tone on tone TCP Relish Mix to match with the pattern paper. Super easy and simple!

Well that is all for today! Thank you so much for stopping by!

Supplies used

CTMH Artbooking Cricut Cartridge

Close to My Heart  “Make It Merry” stamp set

CTMH Pear and Topiary Inks

TCP Relish Mix

VersaMark

Mini Note Card Set

Hi friends, Joann here today sharing some mini note cards that I created for my son’s teacher using CTMH Treats of Friendship stamp set!

I stamped my images on some watercolor paper and colored them in using some Zig Clean Color Real Brush markers. I stamped my sentiment and layered my top panel to some fun foam for some dimension and stacked that onto some colored card stock.

I finished my cards by adding a bit of glossing accents to my sprinkles…really liked the way they turned out. Well that is all for today, thank you so much for stopping by! Have a wonderful day!

Supplies used

CTMH Treats of Friendship

Zig Clean Color Real Brush markers

Glossy Accents

CTMH Archival Black Ink

Organizing Tip: Cling Stamps & 6×6 Paper Pads!

Good Morning!  Today I’d like to share with you one of my favorite organizational products ever!  And it just happens to be the My Acrylix Organizers from Close to My Heart!

ctmh container6As a former consultant for 5 years (and my best customer), and having been a loyal customer ever since, I have amassed quite the My Acrylix stamp collection!  I absolutely LOVE the quality and versatility of the clear cling stamps–and with the CTMH My Acrylix organizers the stamps are so easy to store and access quickly when I want to sit down and craft.  The containers are stackable, have a hinge-top lid with a handle (so you can pack up your favorite sets easily for crops!), and they retail for only $14.95 each. ctmh container1I have added to my container storage as I have added to my stamp collection and it has been well worth the investment to have a cohesive place to keep all my stamps neatly (especially since my craft room is also our family dining room). ctmh container2

Each container stores 15 CTMH stamp sets right in their envelopes!  ctmh container3

And if you have collected other brands of cling stamps, you can make them fit to flip through them and store them in the containers as well.  I ordered Avery Elle clear stamp envelopes to store my sets where the plastic packaging had ripped and they fit right in! ctmh container4

I have also recently discovered that my hoard of 6×6 paper pads will also fit inside of these handy storage boxes–which opens a whole new world of organizational possibilities!  Think about putting together little “kits” with these boxes to make pulling one down and crafting quick and easy without having to dig through your whole stash!  For example, you can put your Fall 6×6 pads, stamp sets, and a few embellishments all in one organizer!  (Each organizer comes with 2 removable dividers that create 3 sections inside.)  ctmh container5

I hope that you learned of a useful product on the market today that will help you get organized and therefore make it easier to access and use more of your stash!  I really couldn’t live without these and it’s a system that really works for me!

Happy Crafting!

~Tabitha

Tabitha sig

It’s Almost Time for Pumpkin Spice!

I am sad to see summer come to a close in New York as fall makes its way in, but nevertheless it’s coming…my parents are visiting from North Carolina and we even made a trip to the apple orchard for cider donuts already, and I had to buy fleece pajamas for my 17 month old because our evenings and mornings are getting chilly.  Chilly weather is perfect for warm beverages–especially a hot cup of coffee!  So of course to celebrate Pumpkin Spice season and to play with my new Fuse tool and my new “Treats of Friendship” stamps from Close To My Heart, I had to make a coffee Project Life shaker card!  Here is a link to the shop to order the stamps HERE
fallcoffee2

I stamped the coffee cup on 3 different patterned papers and cut out the pieces to layer them together for a fun fall to-go cup.  Then I stamped the sentiment “I like you a latte” on my background paper.  I inked just the first part of the sentiment and stamped it, and then inked and stamped the word “latte” into the heart.  Clear stamps are the best for tricks like that!  I created my shaker pocket with my fuse tool and used coppery orange leaf confetti and real coffee grounds inside!  Yum!

fallcoffee4Tabitha sig

I love you more than doughnuts!

Hello, Carrie here with a sneak peek at some New items coming soon to TheCraftyPickle shop this Friday. 

Doughnuts are a big thing around our house with the teenagers.  I recently purchased this adorable stamp from CTMH ( Close To My Heart ) Its called “Treats of Friendship”  

 I created this adorable card,  embellishing it with one of the new release flairs.  Notice the sweet sprinkle washi tape? This too will be available as part of the new release.  We are adding a ton of washi and New design flairs to the shop so be sure to pop in on Friday.

 Here is a close up look at my card. I added some glossy accents to my frosting on the doughnut for some dimension and shine.  And of course a few pickle relish sequins to finish off my card.

 See you Friday for the BIG release and Grand Re-Opening of the Pickle Shop

Here is a little sneak photo for you showing the doughnut flair and a few other yummy new flair too!

 Flair Sneak @thecraftypickle.com

Carrie for ThecraftyPickle.com