It’s *NEW* Release day at Honey Bee Stamps!

Welcome to the Honey Bee Stamps November Release Honey Hop!!!

All this week we have been showing you little sneaks of our awesome new embellishments, stamp sets and dies! Well, here they all are! Everything will be available for purchase today in our shop HERE.

Honey Bee Stamps New Release for November!

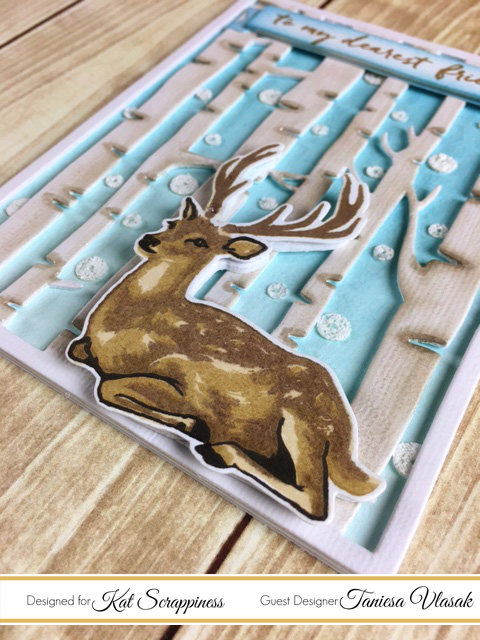
 For my project today I am using the “Little Pickup” stamp set and the “Sending You” Sentiment set along with their coordinating die sets.

I just love this cute little truck! I knew that I wanted this cute stamp to be center stage so I gathered some scene building dies (Mountain range & stitched hills) and started assembling!

sending-you-card-3

You might have seen this lil sneak on instagram when I was putting my “Little Pickup” together.

Honey Bee Stamps Little Pickup | Taniesa Vlasak www.thecraftypickle.com

Now you don’t have to cut out all the pieces you see in this photo but it sure makes it fun. I love that the die set includes the tires and the window dies so you can make layered and interactive cards with this set. I fussy cut the fenders and popped them up with a bit of foam tape. I covered the wheels in glossy accents after die cutting them from another truck stamped image.

sending-you-card-8

I had this Daniel Smith watercolor I have been wanting to use for a long time called Autumn Mystery Duochrome. I thought it gave the truck a rusty type of look while still looking oh so sparkly and pretty, The color changes slightly depending on the angle you are looking at it from.

sending-you-card-7

Neat, Huh?!?!

After I got my truck assembled I glued the tree to the bed of the truck and added just a bit of the new Honey Bee Stamps exclusive glitter glass. I thought it gave the perfect icy-snowy texture. I also added the same glitter glass to the top of the mountains, and all the snowy hills. I used some Ranger Multi Medium in the Matte finish to glue on the glitter and gently pushed the glitter into the glue so it would stick very well. Once it was all dry I dusted off the excess.

I attached the truck to my scene with some foam tape. I stamped and die cut the sentiment on the front hill and attached that below the truck with a double layer of foam tape.

sending-you-card-6

To finish it off I added some dots of glue and sprinkled on some glitter glass that I hand-dyed a soft blue color. *Video Coming Soon on embellishment dyeing process*

Sending you ... Little Pickup Christmas Card| Created for Honey Bee Stamps by Taniesa Vlasak

This was SO much fun to piece together. You all are going to love playing with this stamp set and all of the wonderful new releases from Honey Bee Stamps.

What’s a Honey Hop without some sweet prizes, right? One winner will win a gift certificate to purchase new goodies in the Honey Bee Stamps Store.
All you have to do to win is comment here (on my blog), on the Honey Bee Stamps blog, and again at each one of our designer’s blog by Sunday, November 13th. Winner will be announced on Monday, November 14th at Noon PST.

I am the last stop on this blog hop… but if you started with me you can just hop to the beginning, which starts with the lovely and Oh-So-Stinkin’ Talented Laura Bassin right       —>HERE <—

Thank you so much for Honey Hoppin’ to my blog! I hope I inspired you to buzz on over to your crafty workspace and create something sweet! Check back on Tuesday when I will have some AH-MAZE-ING inspiration using Honey Bee Stamps with Essentials By Ellen products!

Have a BEEutiful day!

Taniesa Vlasak | TheCraftyPickle.com

A winter card with Kat Scrappiness and Hero Arts!

Hi Friends!

Happy Thursday! Today I have a fun card that can be used for Christmas or any occasion. When I saw this Birch Background die at Kat Scrappiness.com I knew I wanted to create a card with this die taking center stage.

To pair with this fantastic Die I chose the beautiful Hero Arts color layering Deer stamp set. I love that you can layer different ink colors quickly and not have to worry where your shading will go.

Dear Friend Winter card for KatScrappiness.com | Taniesa Vlasak www.thecraftypickle.com

I knew that I wanted the trees to have some dimension to them so I took a piece of adhesive backed foam and a piece of adhesive backed cardstock and I stuck the cardstock on top of the foam. You could always use a product like stick-it to glue the cardstock to the foam, these were just in my supply stash. I find that it is easier to glue foam to a intricate die cut prior to cutting if at all possible. I cut the cardstock covered foam with the Birch Tree Background die in my big shot a couple of times to ensure everything cut though. This will smoosh your foam down a bit but it will puff back up.

Dear Friend Winter card for KatScrappiness.com | Taniesa Vlasak www.thecraftypickle.com

I carefully removed the waste from the die cut leaving just the background. I removed the adhesive backing on the foam and placed this on a piece of heavy weight cardstock that I have blended a bit of Broken China Distress ink on. I kept the ink darker at the top and lighter at the bottom.  After that was glued together, I took  W-01 and a W-03 Copic markers and added some shading to the trees. This added a bit more dimension and texture.

I stamped my deer using three shades of hero arts ink that I had on hand (Soft Sand, Latte, and Brown Bark) and then stamped the final detail stamps in Versafine Onyx black ink. I cut the deer out with the coordinating die set then popped the deer up with the leftover scraps of foam from my trees.

Dear Friend Winter card for KatScrappiness.com | Taniesa Vlasak www.thecraftypickle.com

I took some of my favorite sparkling snow sequins from Kat’s shop and glued them down on the blue panel with some Ranger Multi Medium Matte finish adhesive so that they looked like snow falling. To finish off the card I added a sentiment banner from the same Hero Arts stamp set.

I love the multiple layers on this card and it really came together quickly. I could see so many possibilities with this background die. It’s great for all seasons!

Dear Friend Winter card for KatScrappiness.com | Taniesa Vlasak www.thecraftypickle.com

I hope you enjoyed my card today. I appreciate you stopping by. Please check out the links below for supplies I used today.

Have a wonderful day!

Taniesa Vlasak | TheCraftyPickle.com


Products used today (Affiliate links used if available):

The Jar is OPEN!

Hi Friends!!!

I am excited to announce our store is back open. Thank you all for being incredibly patient while we relocated to Washington state. We added a few new items to the store so make sure you check it out 🙂

TheCraftyPickle.Etsy.com

We wish those of you in the states the happiest Thanksgiving holidays!

Happy Crafting!
Taniesa for ThecraftyPickle.com

Hello Santa!

Hi Crafty Friends! It’s Lisa here today from Happy Paper & Ink to share a new Project Life card that I created. I am doing some preparation for my December Daily album, so that is what inspired me to create this card.

 tcp22

For this card, I started with Pink Paislee Merry & Bright 6×6 paper pad. I cut a tag and a 4×6 project life card from the paper pad. I then cut strips of paper for the side border to add some interest. I cut a snowflake tag  on white and red paper using my Silhouette Cameo. I also cut the title using gold glitter vinyl and my Silhouette Cameo for the title “Hello Santa”.   I doodled around all the edges with a black 0.8 American Crafts Black Pen and inked with black Memento Ink.

tcp23

To finish off the card, I used The Crafty Pickle’s Black & White Color Pop Flair and applied it to the top of the snowflake tag. I added some sequins to the corner of the card from The Crafty Pickle. Adding any of the Relish Mixes to your layout or cards gives a fun, sparkly and thin embellishment. These come in all colors, I used the Magical Mouse mix for this card. I layered the sequins and put red glitter stickle dots on top of some of the sequins to change the look a little. And finally, I tied a bow at the top of the snowflake tag to tie it all together!

tcp21

I hope you enjoyed my Project Life card & are inspired. Look for some more blog posts showing my December Daily in the future!

Thanks for looking & Happy Crafting!

lisa sig

Getting Ready….

December is right around the corner ….and I am so getting ready for December Daily and I am pulling out all my fun flair and pickle relish that I can add to my album this year….

product

Here are some pictures from my album last year …I did an “Elf on a Shelf” last year with all of Steven’s fun adventures around the house …my son loves the album …this year I will be mixing in Steven and daily prompts from The idea Room with a daily calendar …this should be fun!!!

We will see how this goes …in the mean time …here are a few pages from last years album that are my favorites…thanks for looking!!!

Thanks for looking at my work!!!

Hope everyone has a wonderful time during this holiday season and gives many thanks to the loved ones you get to see!!!

kristin  for ThecraftyPickle.com

December Daily – The Joy of Christmas!

Hi Crafty Friends! It’s Lisa here today from Happy Paper & Ink to share a new Project Life card that I created. I am in the beginning stages of working on my December Daily album, so that is what inspired me to create this card.

IMG_6989

For those of you not familiar with December Daily, Ali Edwards created it to document the days of your December. Basically, you do a page for each day spotlighting the activities of the day to include your family traditions, etc. This will be my first year to do this, and I am super excited!

For this card, I started with Pink Paislee Merry & Bright 6×6 paper pad. I cut a tag and a 3×4 project life card from the paper pad. I then used The Crafter’s Workshop Positive Stencil and texture paste to create the black cross or plus signs on the paper to add some dimension and interest in the corners. I doodled around all the edges with a black 0.8 American Crafts Black Pen and inked with black Memento Ink.IMG_6987

To finish off the top of the card, I used The Crafty Pickle’s Black & White Color Pop Flair and wrapped a ribbon around it. I added some sequins from The Crafty Pickle. Adding any of the Relish Mixes to your layout or cards gives a fun, sparkly and thin embellishment. These come in all colors, I used the Magical Mouse mix for this card.

IMG_6988

The title on the card is made by using American Crafts cardstock stickers and American Crafts Be Merry Red Thickers Alphabet.

I hope you enjoyed my Project Life card & are inspired to start a December Daily! Look for some more blog posts showing my December Daily in the future!

Thanks for looking & Happy Crafting!

lisa sig

Candy Bar Treat Boxes

Hi friends, Joann here today with you! Thank you so much for stopping by!

Today I am sharing with you something that I have been working on for a craft fair that I will be participating. I shared this project last year in December, a step-by-step on how to make the box treat, but this time around I used my Cricut and a couple of the CTMH Cricut Cartridges to decorate my boxes.

Here are a couple that I’ve made so far…

I used the CTMH Artistry Cartridge to cut out my snowflakes out of some glitter card stock and added some foam dimensional to add a bit of dimension to them.

 I took the Treats of Friendship stamp set, also from Close to My Heart, to stamp the cute image on my tag.

The deer and the design behind the deer came from the CTMH Artistry Cartridge and the ornament was cut using the CTMH Artiste Cartridge. For the sentiment on the deer box, I used the CTMH Holiday Tags stamp set to add my sentiment.

I still have a few to finish, but I wanted to share the ones that were done and in case you were interested in the tutorial click HERE to read that post.

Thanks so much for stopping by, I hope you have a fabulous day!

“Make It Merry” with Close to My Heart Stamp Set

Hi, Joann here today sharing two Christmas cards that I made using the Close to My Heart  “Make It Merry” stamp set.

Here is my first card…

I used CTMH Artbooking Cricut Cartridge to cut my tag, which coordinates with this stamp set. I took CTMH Pear and Topiary Inks to stamp my image onto my tag (I tried to create an ombre effect, it’s acutally a bit more noticeable in person). I cut a piece of vellum a bit smaller than my colored card stock and then tied some ribbon to my top panel before gluing it down to my card base.

I finished it off by adding a bell to a bow I tied, scattered a few TCP Relish Mix and popped my label on some foam adhesive to add a bit more dimension to my card. That is all for this card!

Now my next card is mimicking a card that I posted on my blog a few days ago. I loved how it turned out, I did make a few changes to make it a little different.

Here it is…

I took some stitched circle dies I have to cut my circles out of some pattern paper. I stamped my sentiment, also from “Make It Merry“, onto some vellum with VersaMark and heat embossed it with some black embossing powder.

I drew some white lines and then glued my circles down, adding some dimension to 2 of them.  I scattered some tone on tone TCP Relish Mix to match with the pattern paper. Super easy and simple!

Well that is all for today! Thank you so much for stopping by!

Supplies used

CTMH Artbooking Cricut Cartridge

Close to My Heart  “Make It Merry” stamp set

CTMH Pear and Topiary Inks

TCP Relish Mix

VersaMark

Christmas in July!!!

Happy Saterday, thank you so much for stopping by!!

Today I am sharing a Christmas card I made using the CTMH Cricut Art Philosophy Cartridge and a coordinating stamp set.

This cartridge collection is fabulous and if you haven’t seen the cuts this cartridge has, click here to take a look!
And then here is a link to her blog:

I used the cartridge to cut a frame (pg. 62) and used the Perfect Fit- Frames Flair stamp set to stamp my image on the frame with some Cranberry Ink. I then cut the tree (pg. 31) and stamped my image with the coordinating stamp set that comes with the CTMH Art Philosophy Cartridge bundle with some Pear Ink.

This cartridge has some fun borders that you can cut out, I took the border on page 63 and cut it out using some fun CTMH Silver Glitter cardstock. Using the same stamp set as my tree, I stamped my sentiment on some vellum with some StazOn. I finished my card by adding some foam adhesive to my images and some TCP Winter Sequins Mix.

Thanks so much for stopping by, have a wonderful day!
Here is link to her Blog

Supplies used
CTMH Ink- CranberryPear
CTMH Stamp Set- Perfect Fit- Frames Flair

Merry and Bright

Hi Crafty Friends!

   I hope you are all enjoying your Christmas Eve. This evening designer, Alicia, has a fun Holiday card to share with you all. 

Hello  everyone Alicia Here again with another project for DT Crafty Pickle this  time i make a
portrait( this  how i call it) i  use  the December button Flair and Shine Glitter flair
and  the Christmas  Holidays Sequins  love the  color  they are very  bright
at  https://www.etsy.com/shop/TheCraftyPickle plus i use  CTMH stamps Chairs to you
#  D1456 and Always Grateful  # C1559.

Before i go  be sure to visit  https://www.etsy.com/shop/TheCraftyPickle
to see more of the great supplies of flair and sequins ,happy crafting!!!!

So clever using flair as ornaments, Alicia! Thanks for sharing!

From all of us at The Crafty Pickle, we wish you a very Merry Christmas and a blessed and exciting new year ahead. 

The Crafty Pickle