It’s a Circus! Pocket Letter

circus1

Happy Saturday Crafty Pickle Pals!

 I am here to share my latest Pocket Letter created with goodies from TCP!

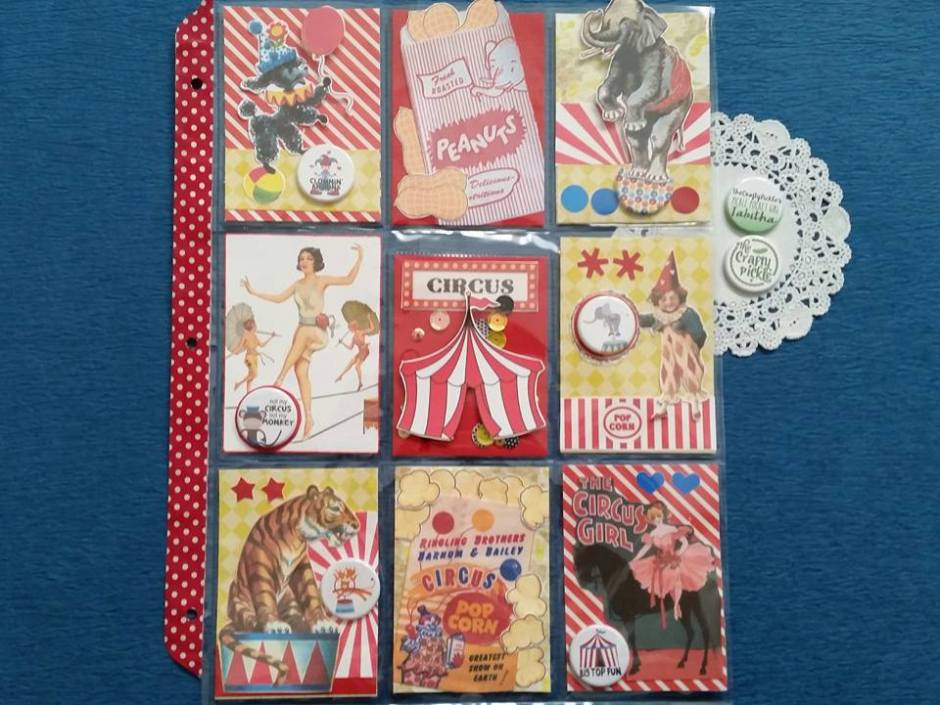
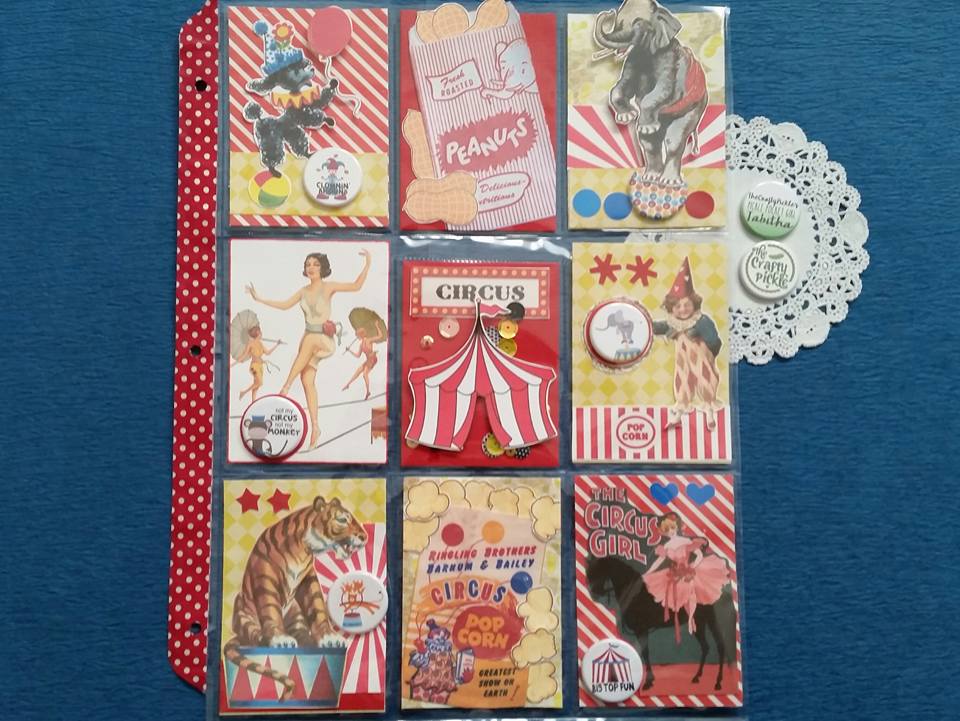
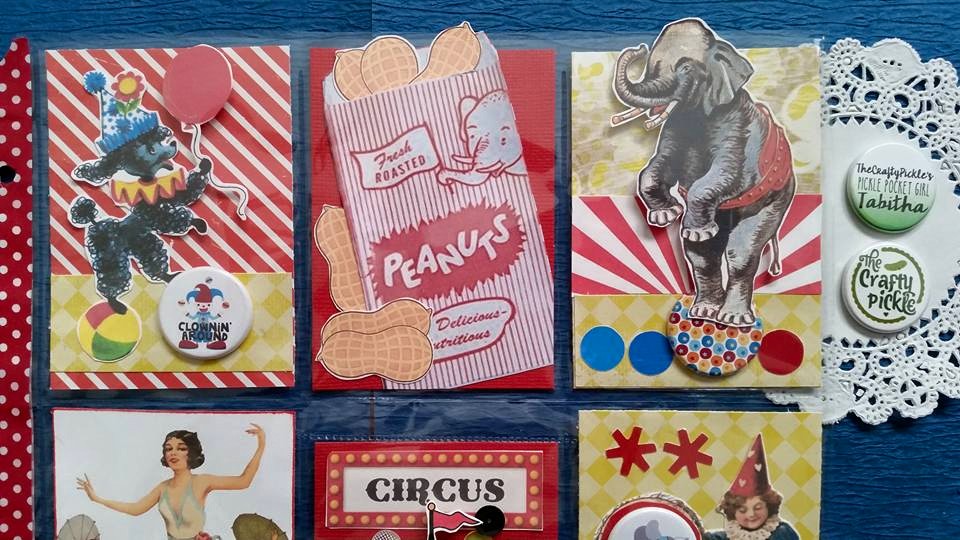
 I fell in love with the Circus flair set when I saw it in the shop so I let it inspire this letter.  When I don’t have paper or stamps to fit the themes I want to create with, I utilize Pinterest and Google image searches to find unique pictures and clip art to use in my letters.  I create my own collage sheet of sorts by copying and pasting the images into Microsoft Word documents and resizing them to fit my needs.  For this letter, and many that I do, I enjoy juxtaposing vintage imagery with more current clip art for a unique look.  I created this letter using the clip art I found and fussy cut, as well as the Circus flair, sticky pickle spots, and the Disney Relish Sequin Mix from the shop (I picked out the Mickey head sequins so I was left with the fun black spotted ones and the red and yellow to match my color scheme in my shaker pocket).  Check out some detail shots below and don’t forget to click on the photos to see them larger!

circus2

circus3

circus4

I can’t wait till the shop reopens so I can add some more fun goodies to my stash!  I haven’t been to a circus since I was small–but this theme was so fun to work with and I never know what will inspire me next from The Crafty Pickle.  I hope I inspired you too!

Happy crafting!

Tabitha sig

Candy Bar Treat Boxes

Hi friends, Joann here today with you! Thank you so much for stopping by!

Today I am sharing with you something that I have been working on for a craft fair that I will be participating. I shared this project last year in December, a step-by-step on how to make the box treat, but this time around I used my Cricut and a couple of the CTMH Cricut Cartridges to decorate my boxes.

Here are a couple that I’ve made so far…

I used the CTMH Artistry Cartridge to cut out my snowflakes out of some glitter card stock and added some foam dimensional to add a bit of dimension to them.

 I took the Treats of Friendship stamp set, also from Close to My Heart, to stamp the cute image on my tag.

The deer and the design behind the deer came from the CTMH Artistry Cartridge and the ornament was cut using the CTMH Artiste Cartridge. For the sentiment on the deer box, I used the CTMH Holiday Tags stamp set to add my sentiment.

I still have a few to finish, but I wanted to share the ones that were done and in case you were interested in the tutorial click HERE to read that post.

Thanks so much for stopping by, I hope you have a fabulous day!

Some of Kristin’s Favorites!!!

Happy Tuesday y’all!!!
Kristin is here with some of her favorite pickle products ….I love everything that she makes but some of my fav’s I am going to post today in hoping that the store will be up and running soon!!!!

Flair Flair Flair is always at the top of my list ….it is the Bread & Butter pickles for me …my most favorite!!! You can add a piece of flair to almost any project you are working on!!! She makes them so flat that is hardly added any bulk to your page …and I love that about her flair!!!

IMG_20151103_084159colorMy all time favorite flair is the pop color flair …she has those in jest about every color!!! Love Love Love!!!

99f59-page3 75652-product

Then the December Daily Flair do not even get me started on how wonderful it was to use in my Elf Book last year!!!

And then the relish on top you can always sprinkle on some sequin to make your project extra special!!!!
tag 2Exclusive sequin/confetti mix @ TheCraftyPickle.com

These are two of my favorite things at The Crafty Pickle Store!!!!

kristin  for ThecraftyPickle.com

Minnie and Me!!!

minnie
Hi Friends!
It’s Paula here with a layout share.
http://https://www.youtube.com/watch?v=6XpT5Sw0a64
 minnie close

For the base I used white cardstock and some Queen & Co. patterned paper. I made some ink splats with my black india ink and scattered some Disney pickle relish from the shop around the layout. The stamp set I used is from Close to My Heart. I attached some washi tape and a Disney flair from the shop and used Thickers to create my title.
Thanks for stopping by and I hope you enjoyed my layout share!
Supplies Used:
Close to My Heart stamp set – Happy Hooray
Disney Flair
Disney Relish Mix
Heart Washi Tape
Patterned Paper
Thickers
Paula Sig

Starbucks Gift Card holder

Hi It’s Carrie here!

It’s never too early to start making those handmade Christmas projects.  For me once Halloween is over I become focused on Christmas gift buying and crafting.  I like to have gift cards on hand to give as thank yous and small gifts for teachers and friends.  So in preparation for this I will create cute gift card holders. Then when a gift is needed I am ready to slip in the gift card. 

Starbucks is an easy one, a lot of my friends love to splurge on a Venti coffee any chance they can.  


The coffee cup from the “Treats of Friendship” stamp set by CTMH is perfect for this project .  

 To create my Red cup I stamped the coffee cup several time on white cardstock.  Using my distress ink, I watercolor painted my cups red with a green band.  Then I punched a 1/2″ circle from green pattern paper and used that for my label.  Then I fussy cut the lid and attached it to my cup for dimension. 

I stamped the merry, Merry ( also a CTMH stamp ) for my sentiment.  Adding the red and white twine to finish off my card. 

I attached the Starbucks gift card to the back with some double sided tape.

Perfect for a grab and go gift when needed. 

Happy Scrappin’

Carrie for ThecraftyPickle.com

“Happy Birthday” CTMH Build-a-Cake Stamp Set

Hi, Joann here today sharing a birthday card with you using the Close to My Heart “Build-a-Cake” stamp set!

Here it is…

This is a really fun stamp set to have! I started off my stamping my cake image using CTMH Inks in colors Black, Honey and Cotton Candy! I did want to point out that the top layer image of my cake is part of the stamp set (the original image has some flowers, but after I stamped my image I took a blending pen and some of the Cotton Candy ink and filled those flowers in to give me a polka dotted cake layer). I then took a black gel pen to outline my cake and add some small details to my flower on top and simply layered my top panel to some pattern paper.

I completed my card by stamping my sentiment onto some vellum and adhered both my sentiment and some AWESOME TCP Relish Mix to my card. I know in the first picture my top left sequins look a bit purple but it’s actually pink, I think my light was hitting it a bit too much, but you can see the pink in the second photo a lot better.

Well that is all for today, thank you so much for stopping by! Have a fabulous day!

Here is a look at the stamp set I used!

Sweet Cute Fast Page!!!

IMG_20151021_141443330

So in love with these stamps from Close to my Heart …it made it so easy for me to complete this fast and easy page…i tried t keep it black and white with just a little pop of color from Ace’s cat bed!!! Ace is such a sweet cat and loves our family and we love him right back!!!

Here are a few close-ups of my page:

IMG_20151021_141458811

IMG_20151021_141450597Thanks for looking!!!

And here are the products that I used:

Close to my Heart- Hello Summer Everyday Life, Hopscotch Alphabet, Love My Cat Everyday Life

Flair Meow

Flair “I love you to the moon and back”

“Grateful for You” CTMH Cricut Artistry Cartridge

Happy Tuesday, friends! Joann here today sharing a card with you using the Close to My Heart Cricut Artistry Cartridge.

Here is my simple card for today…

This cartridge seriously has some fabulous cut designs! I used the image on page 45 in the handbook to create my card with my Cricut. I started out by placing a 4 x 5 1/4 rectangle on my screen and placed the solid image (pg. 45 ) right in the center. I then hit the slice button to cut the image out, I used some CTMH Cardstock (this exact pattern is the retired one, but you could definitely pick up the new patterns HERE) to use as my top panel. I also cut the coordinating “Grateful For You” image from the same page out of some brown card stock.

I then took my card base and placed my top panel on top and traced my image to it to cut it out with a craft knife, I did this because I wanted to add some acetate to see through the card. So when I was done with that I glued my acetate piece to my card base then layered my top panel and finally glued my “Grateful For You” image right in the center.

I finished my card by gluing some TCP Relish Mix and added some Wink of Stella glitter to my image. Super simple card but I really like the way it turned out! It’s also a great card to make multiples of if you need several because of the simplicity of it.

Well thanks so much for stopping by, have a FABULOUS day!!

Cuties-A Scrapbbok Page

Hi Crafty friends! Happy Monday to you all. Hope it is going well so far for you!

I have another layout to share today using flair buttons from the store. Today I used a button from the gold foil collection that I absolutely adore and one from the “Life Documented” collection.

cuties

I started with a sketch from Let’s Get Sketchy this month and kept my page pretty simple. I love this photo of my two kiddos along with their cousins on St. Patrick’s Day! I wanted it to stand out and the flair buttons placed at each end of the picture really  help to anchor it yet also make it pop!

IMG_0974

IMG_0973

I chose the “Oh Happy Day” button to compliment the beige and green on the page.

IMG_0972

The “Today” flair button worked well with the St. Patrick’s Day theme!

Try adding some fun flair to your next scrapbook page! I guarantee you’ll love the results!!

Thanks for stopping by!

stephanie for ThecraftyPickle.com

Pumpkin Spice Latte Addict’s Coffee Flair Pocket Letter

Happy Friday Pickle Pals!

I am super psyched to share one of my most recent Pocket Letters with you today!

I will be the first to admit that Pumpkin Spice lattes are actually NOT my cup of tea (or coffee), if you will.  However, I DO adore me some caramel frappoccino’s whenever I get close enough to our local Target with a Starbucks inside.  It’s good for my hips and my wallet that it’s not convenient to go to on a daily basis!Ha!! Ha!!!

coffee3

The basis for my pocket letter was centered around some clipart that I found through Pinterest and Google–the memes, e-greetings, and pretty doodled coffees paired so well with a DCWV Fall paper stack, some old Target dollar spot felt leaves and pumpkins, some new Target dollar spot gold leaf stickers, and last but not least–my awesome coffee flair pieces, twine, and sequin relish mix from The Crafty Pickle shop!  Check out some of my detail shots below–click them to see them larger.

coffee2coffee4 coffee1

I hope you get to enjoy your own cup of coffee today and the beauty of fall before winter sneaks in!  We have flurries on the forecast here in the northeast this weekend.  It’s too early for me to even think about saying that FOUR letter word–haha.  Keep checking back because our shop should be reopening soon!

Tabitha sig

~Tabitha