The Honey Bee Stamps Fall Release is finally here and available in the Honey Bee Stamps shop HERE. There is a wonderful selection of products to celebrate the fall season.
I have just a couple of cards to share today but I will be sharing more throughout the season!
I have been spending a lot of time away from home lately, and while it is hard to carry lots of supplies I stamped a bunch of impressions from the Gather together stamp set onto a bunch of patterned papers I had in my supply stash. I love this cute bunch of critters.
Sometimes I am in the mood to just cut paper… fussy cutting is not always my favorite but perfect for on the go. Instead of coloring the images I “colored” all of the bits and pieces by using different patterns of paper. This adds a lot of texture and interest to the card I think. After I cut these pieces I would glue them to a piece of cardstock I did some ink blending with and I used the stamped impression as a guide to lay the pieces in place.
Next card is so super simple and quick.
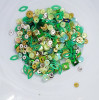
I found this cute piece of paper in one of my 6×6 patterned paper pads. I cut it down to an A-2 size and stamped HELLO (from the Gather Together stamp set) in the right hand corner. I added more patterned paper behind and a little sparkle too by using my glitter pen and some brand new sequins in the Honey Bee shop that you can find HERE.
Thank you so much for stopping by my blog. To see ALL of the new products from Honey Bee Stamps, Click HERE (affiliate link used at no additional cost to you, thank you for supporting this blog!)
Be sure to visit each blog & leave a comment… Honey Bee Stamps is giving away TWO $50 gift cards to the Honey Bee Stamps store!
Winners will be posted on the Honey Bee Stamps blog Monday, September 25th!
Make sure you read all the way through for details on how you could win one of two $30 gift certificates to Ellen Hutson!
I have absolutely fallen in love with the Sending Sunshine stamp and die set designed by Honey Bee Stamps for Ellen Hutson, as well as some coordinating items from Honey Bee stamps! I created quite a few cards using this new release in no time at all. Let me show you a few.
First is a fun ” You are my sunshine” this card features a shaker sun center using the Honey Bee Stamps Partly Cloudy die set and the new Sunny Day sequins mix. The small frame around the sun circle made this shaker come together quickly. (Affiliate links used where available at no cost to you, thank you for supporting this blog)
The fun thing about this card is that the sun rays actually spin!
I assembled the layers using a paper fastener (aka brad) which allows the top two layers to spin around. My daughter who loves her fidget spinner, loved playing with this card and I think it would be great for any tween or teen!
Next card is a simple ink blended rainbow for an inspirational ray of sunshine!
First, I created a shaker card using foam and the a-2 sunburst cover plate die. I added my Sunny day sequins to the center and then covered with acetate. I cut the A-2 cover plate from glitter and white cardstock. For the white piece I taped off sections and used my distress inks to build a rainbow from the center of the sun. once that was done I layered that over the shaker foam layer and then pieced in the glitter rays. I stamped and embossed the sentiment from the Ray of sunshine stamp set. I did some simple die cut inlay for the “sunshine” word. both from glitter cardstock. To finish it off I added some Bokeh lights confetti with my Silver Moondust Nuvo glitter drops. I love how you can see a bit of sparkle though the confetti.
The last card I have for you is one that takes a bit of time but can be well worth the time spent. This is a pop up box card with a little handmade gift included too!
To make the box I followed THIS tutorial which was super easy! I covered the front flap with strips of colored cardstock and then trimmed away any excess. I took some Nuvo Moonstone glimmer paste and spread a thin layer over all the cardstock strips and let try. Once the glitter was dry I cut a cloud border using the Honey Bee Stamps cloud border dies and glued to the bottom of the rainbow. I cut this from white glitter cardstock and I also cut pieces to go around the outside of the box. the inside of the box has 4 layers and in between the front flap and the first layer I attached a bit of cotton to give a fluffy cloud look.
The back panel of the box card is the sunburst cover plate die cut pieces together and glued on that back piece. This gave the box extra stability too. I set the almost finished box aside and went to work on some cute planner clips for a friend who loves to decorate in her planner.
I cut felt pieces from the partly cloudy die set… the sun as well as the largest cloud in the set. I cut three pieces of each. I glued the ribbon on one layer and then once dry I sandwiched the other two pieces around the ribbon covered pieces and hand stitched them together. I am not the best when it comes to stitching and sewing but it was a lot of fun to make. I did sew the large paper clip to the middle layers before stitching all the way closed.
I added a row of sequins along the bottom of the cloud, each by hand, from the Honey Bee Stamps cloudy day sequins mix.
once finished I clipped these both into the layers of the box card.
Because this can be quite bulky I thought about making a band of sorts to go around the closed box for mailing. I took a piece of 12×12 cardstock and wrapped it around the box to make sure it fit ok and then using a heavy-duty tape I glued the two ends together.
It was a really fun gift to put together. I am already thinking of more things I can do with the box card idea not to mention more fun felt paper clips!
That is all for today. Thank you so much for stopping by to view my projects. I hope you found them inspiring. To win one of two $30 gift certificates to Ellen Hutson, simply just comment below on this post and the other designers in the blog hop as well. I am the last stop in the blog hop but if you missed anyone don’t worry, you can head HERE to the honey bee stamps blog and get the entire line up.
If you missed my video highlighting all of the great new Sending Sunshine products you can check out that post HERE and watch my video showing all the products mentioned today and more.
Supplies used are listed below(affiliate links where available at no cost to you)
I am so excited that I get to introduce new products from Honey bee stamps including an exclusive stamp set for Ellen Hutson! take a look at my video and then you will also see still shots and links to both shops to purchase these products (some products only available at the Honey bee stamps shop. Affiliate links are used where available at NO cost to you. Thank you for supporting my blog!)
You will find links to the new and related products below! I will be sharing lots of projects all week-long on Instagram and on Thursday I will show them all on my blog.
Here is the complete list of new and supporting products from Honey Bee Stamps available NOW!
Are you looking for the Blog Hop post from Friday 7/14/17 for Honey Bee Stamps new Under the Sea release? If so, Click HERE! If you haven’t seen my post for this release yet, check it out (after reading the announcements below of course). Here is a sneak Peek!
Okay Friends…Grab your pennies! It’s another super awesome crafty sale!
Affiliate links used where available at NO cost to you. Thank you for your support!
I just had to let you know of acrafty salegoing on NOW thru 7/17. Ellen Hutson is having a BUY MORE SAVE MORE sale where your discount increases the more you spend. Your discount can be 10% up to 20% off. If you happen to be a frequent shopper at Ellen Hutson, then you can use your frequent shopper discount on top of this fantastic sale!
Want to shop but need some ideas on what to grab? I am listing a few of my top picks if you need suggestions:
Distress oxide ink pads…. first set of 12 and just in the warehouse yesterday is the NEW set of 12! Click HERE to see them all!
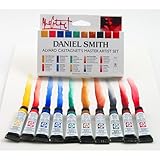
Newest Ellen Hutson release. I am so in love with that Mermaid Tail and I scooped up the new Crafty Lady already too. Look for card examples from me coming SOON! Click HERE to see all the Essentials by Ellen line of products. Daniel Smith Watercolors. Hands down these are the best watercolors and Ellen has them at an unbeatable savings already, but the sale is on top of these low prices so scoop them up. If you are just starting out you may want to grab the Essentials Set, There are also some sample dot cards available from Sandy Allnock and Hero Arts, both great selections and this allows you to try a bit before buying a bunch!
Nuvo Gilding Flakes. I am absolutely in love with these lately and you can use a little or a lot. These jars go a very long way and I don’t see myself ever needing to buy more!
Essentials by Ellen storage pockets. These are super thick and durable. They come in all the sizes one would need for stamps and dies. Now is a great time to stock up. Find them all HERE.
Hopefully that gives a few suggestions to go on but I am sure you will find SO many things on your wish list.
Just a couple of Announcements…
Honey Bee Stamps just released some amazing products. See that new release HERE and join the blog hop fun… you could win one of two $50 gift certificates! More info HERE!
Cricut Mystery Box Launch! These are known to sell out super fast but as of writing this there are still some available! See HERE for more details!
and Last but not least…
I am planning on doing some Facebook Live videos now that summer is here and I find more time. Make sure you check out and like my Facebook pageHERE so that you are notified when I am going live! I am such a newbie at this so have some patience with me please while I figure it all out 🙂 I am excited to share tips and tricks with you and haul videos! If you have something you would like to see me show or share please let me know in the comments below!
I hope you found these announcements helpful! I will be back next week with some more projects to share.
If you are already swimming along, then you should have arrived here from the blog of the kind and beautiful, Patricia! If not, don’t worry, you can always go to the Honey Bee Stamps blog<— and see all of the amazingly talented designers that are inspiring you today.
Limited quantities of the NEW July Under the Sea Stamp bundles are available. click the photo or see the end of the post for links.
Everything is available for purchase today in our shop HERE.
So let’s Shellabrate with some splashingly sweet prizes!! We will have TWO winners that will each receive a $50 gift certificate to purchase new goodies in the Honey Bee Stamps Store.
Enter to win one of two $50 shopping sprees to HoneyBeeStamps.com for participating in our new release Blog Hop!
All you have to do to win is comment here on the Honey Bee Stamps blog and again at each one of our designer’s blog by Sunday, July 16th. Winners will be announced on Monday, July 17th at Noon PST.
So swim along and get ready to SEA some inspiration!
Affiliate links used where available at NO cost to you, Thank you so very much for your support!
I cut the card in half at the score line and started assembling the two pieces with a double layer of foam tape. Once that was finished I added some of the new Seaside Treasures shaker kit as well as some glitter and sequins from various new embellishment kits. I covered the shaker with a piece of acetate and then again covered that up with the card panel. I took that vinyl detail piece (which already has adhesive on the back) and stuck it in the opening of the panel on top of the acetate. I put more foam tape around the Seashell shaker to cover the top panel and then glued all of that on an off white mat base, and then to a heavy weight beige cardstock card base.
I am in love with this die and it can do a lot more than just a shaker card. It can be a stand alone card or used within a traditional card like my example. There is a lot of possibilities with this die and I am sure you will be seeing a lot of great ideas using this card die in the near future!
This is the card (closed) with two pieces layered on top . Just one of the options that you can create with this die set!
Here are the main die pieces of the Seashell card Die set. There are two small circle dies that are not pictured below that are great for making a pearl to go inside your shell!
I cut out the cover plate die in two shades of yellow cardstock and glued the pieces of the other color inside the cut panel. This will make two cards, so it’s a great timesaver too! I took the border stamp in the ocean borders and I stamped, heat embossed in clear and then masked the first border stamp at the bottom of some light blue cardstock, I repeated this process of stamping, embossing, then masking about 5 times. Once I had a about a half of a card panel worth of ocean borders I took the Ocean Borders Die that just cuts the top of that wave-like border and I cut the top of that masked border stack. I glued some foam behind that piece and set aside.
I stacked a couple of pieces of cardstock and glued those together, Then I cut that stacked cardstock piece with the Mermaid die from the Swimming by die set. I used the same die and with just using the bottom half of that die I cut some Cricut holographic Opal vinyl. I stuck that to the cardstock piece and cut off everything below the tail, I glued just the bottom portion of that tail to the card base just below the circle part of the sun, I then glued the waves on top of that, which completed the scene. I finished the card off by adding some new Bubbles Sequins and Bokeh lights confetti and a sentiment from the Mermaid song stamp set. I heat embossed that with the Nuvo white power and cut a little flag end to the left. I popped this up on foam tape and glued to my card. I really love how that Vinyl is shiny and iridescent like… perfect for under the sea and beach papercrafting!
Thank you so much for stopping by. Your next stop in this swim-a-long is the fabulous and super-duper talented Tracy! Swim on over and see what amazing things she has to share with you today!
I’ll SEA you soon, with MORE ideas and inspiration using the new release items!
If you are a Student (or have a student in your home) you can get a discount on your Prime membership and you get a 6 month free trial!, for more info click HERE.
Here are some of the deals I have found that I can personally recommend:
Amazon Echo : We have two of these (one upstairs and one down although you really only need one + A dot in any other room you would like) I love these and I have one in my craft room to listen to music with Amazon’s new Music service or ask questions …. admittedly most of the time it is “Alexa, how do you spell _____” LOL! The Echo is normally $179.99 but today it is $89.99
Echo Dot : great for rooms in your home if you already have your Echo! My husband loves to hook up all our lights to it. Remember the Clapper? LOL I am sure I dated myself but this is MUCH better than that LOL! Under $35 today only.
Kindle Paperwhite reader: I really love mine. I have an iPad so I didn’t think I would want one but this is so lightweight, portable, and I can read it in the sun or in bed when its dark, No glare, very easy on my eyes and you can adjust the font size several times to a font that is easy for you to read. There are several options available and all are $30 off today.
Or if you enjoy listening to books (maybe while you are crafting?) Try out Amazon’s Audible service
Amazon now has a Etsy like section where you can buy handcrafted items. It is still pretty new but I am really loving what I am seeing so far. Check it out HERE .
Okay, the most FUN family game ever….. Watch Ya Mouth! This game is a ton of laughs for all ages! $12.88 (normally $19.99)
Did you know that Amazon had prime sample boxes??? Me either! They DO and they are neat! Check them all out HERE!
You can get an extra $10 off your pantry box today. Shop the Pantry HERE.
This Office chair is great, we got one for my Son and he loves it. We really do enjoy the Amazon basics line of products. I get the Amazon Basics Batteries all the time and save a ton.
****OK so here is the specific CRAFTY THINGS!!!***** You can see the main Crafty Deal page*HERE*!
Cricut Explore Air 2: So this is something I do not own yet, Although its been on my wish list a while. I own a Silhouette Cameo and although I love it’s functionality I really hate its wireless capability. I was opposed to the Cricut for a long time but now that you don’t have to buy endless cartridges I am really really wanting this pretty aqua machine! My friends who own it LOVE theirs and I am very jelly! It’s only $199 today! *This deal ended but there is another Cricut machine on sale, see the end of this list*
BEE watercolor paper: This paper is really good quality, I was surprised when I tried it. It is not as good as Arches but better than Canson XL and today it’s under $10 which makes it pretty affordable!
Zig Clean Color Real Brush Markers: These are a FANTASTIC water based marker and very popular right now. I love mine, I started with a small set and quickly upgraded. So… the 80 set is limited and not too many left when I checked but it is only $104 which is a steal! I LOVE these markers and Amazon always seems to have the best prices. There is also other sets at great prices…. The 36 count set, 48 count set, and set of 60
Artbin Super Satchel storage $19.76 (reg $30.99) This is a great storage tote for all sorts of crafty things (and a pretty color too)
Thin Profile Light Pad $31.99 (I bought one very similar for over $50) I really get a ton of use from this light pad. I am so glad I don’t have to deal with that bulky light box anymore.
Silhouette Portrait Craft Bundle $115.50 (Reg 199.99) I LOVE my Cameo but if I had to buy one all over again I would get this smaller sleek-looking machine. I love that you can do so much with it and cut out any font on your computer. Personally I think this is a must have for any paper crafter.
500 count Velcro Dots (great for boxes, gift packaging, organization, and 3D projects).. you’ll never need to buy any again LOL! $11.19 (Reg 19.99)
Bowdabra Bow Maker: I don’t have a sale price on this yet as it is an upcoming deal but this is a great tool! I own the mini and love it!
Colored Pencil Storage: $22.99 (Reg 25.99 and I have seen similar for up to $75.00) Holds up to 150 pencils!
Brother XM1010 10 stitches and Auto Buttonhole Sewing Machine: Upcoming deal mid morning. Reg is $101.99. I am watching this one closely for my daughter who is just getting into sewing. Brother Machines have always been very durable and dependable for me.
Derwent Water Brush set (of three): Upcoming deal Reg $ 20.99 This is a great set of water brushes. I got mine for around $14 and I really love them and have used them a lot without any problems at all. One is this firm marker like tip that is interesting and that I haven’t seen anywhere else.
THESE Watercolor box tins are traditional and usually expensive. I have purchased them on the amazon sale price which is a great deal but now they are priced at $11.99 to 15.99 which is CRAZY. They have them in three different sizes with full or half pans included (you can also get them without pans. This is a must grab deal!
There is SO much more… Some things that I cannot recommend personally but I am purchasing today for the first time. There are lots of items for every kind of crafter and I am sure I did not see everything yet. Be sure to check out the main deal page and the craft specific deals throughout the day. You can even set notifications for the upcoming deals so you can get alerts when it goes live.
I hope this list helps you in your shopping today. I will update the list as I see new deals worth mentioning. If you have a deal you think I should share please let me know in the comments below this post!
I will be back this Friday with the Honey Bee Stamps Under the Sea new release blog (swim) hop! Make sure you check social media and the Honey Bee Stamps page for sneak Peeks!
I hope you are all having a FINTASTIC summer! Today we are kicking off the sneak peeks for the Under the Sea with Honey Bee new release!!! I am so excited for you all to see what an amazing collection of stamps, dies, and embellishments will be in the Honey Bee Stamps store this Friday 7/14!
Today fellow designer, Lisa, and I are sharing a look at one of my most favorite stamps in this whole release over on the Honey Bee Stamps blog today. The Under the Sea stamp set features two adorable mermaids, one of which is featured on my card today! You can see more at Honey Bee Stamps HERE.
Here is my Card for today featuring the Under the Sea stamp set! If you are wanting to know the products I have used for this card there will be a supply list at the bottom of this post.
I had a lot of fun making this textured background and of course coloring this sweet little mermaid! I plan on showing you more later this week, including how I did my background. Until then here is a few more photos of my sneak peek card for today.
Supplies Used:
(supplies are linked to a shopping source below where available. Some links may not work until release day. Affiliate links used where available)
Affiliate Links used in this post where available at NO cost to you! Thanks for your support!
I love what Illustrated Faith has brought to Christian Creatives, and I have grown deeper in knowledge and in my faith since beginning to create in and outside of my bible. I believe that Faith based art and papercraft is more than just for the pages of my bible , so when I saw that Shanna Noel (that incredibly inspiring and kind-hearted woman) was kicking off a 30 day happy mail challenge, I got very excited and knew I had to participate. I also think this challenge can be different for everyone….. you can customize it to fit YOU. That being said I will share what I have in mind for the challenge (as I see it) and how I will be approaching it!The basic idea is that you send some old-fashioned snail mail to a different person every day for 30 days. That’s it in a nutshell. This doesn’t have to be super time-consuming or cost more than a postage stamp and paper. Email is quick and convenient and pretty much the norm when communicating with our family and friends. So when you actually receive a letter or card in the mail, it just FEELS special. Can you remember the last time you received a letter or card or gift in the mail? Did it bring you joy? I am betting it did. Who wouldn’t want to be apart of something fulfilling and FUN like that! We definitely need more Joy, more Kindness, and more encouraging and lifting each other up.
To make things easy on yourself, you might want to gather a few things and keep them organized by your desk or a designated spot. The supplies you will want to pull together will really depend on how elaborate or simple you want your happy mail to be (BOTH are good!). I am going to list a few basic things and optional things that I am setting aside for myself, maybe that will help you figure out what you want to pull together.
I encourage you to use whatever you have on hand and try to think of new ways to use the supplies you already own. I am linking my favorite things that are tried and true and that I really do love, but again, you do not need to spend anything to make this challenge work for you! Another option is to get together with friends and share supplies! Any excuse for crafting and fellowship sounds great to me!
Paper Trimmer: THIS one is my favorite and is by Tonic. I also really love THIS one by Fiskars.
Scoreboard: (only if you already have one, a trimmer can do the job just fine if you don’t) I am using THIS mini one which is by Martha Stewart. There is a number of them on the market though.
Bone Folder: I recommend THIS teflon bone folder, It’s a little pricey but it will last you forever and it will be the only one you ever use! The reason for the teflon is that when you use it to crease your paper you will not get that shiny streak on your cardstock that other bone folders leave behind.
Cards and envelopes: (unless you are making your own of both) You can pick these up anywhere but THESE envelopes are my current favorite , and some of them have a slight shimmer. I also like THESE that are made of vellum. As far as card bases, I prefer to use this heavy weight cardstock HERE and cut and fold my own. This pack of 25 will make 50 A-2 size card bases. They also sell it in 250 count reams HERE. I find they are more sturdy and I like top fold cards better.
Envelope template or tool: (if you are making your own envelopes) HERE is the one that I use and love!
Adhesive: (wet, dry, or both, whatever your preference is) My prefered Wet Adhesive Currently is THIS ONE by Nuvo and for dry adhesives I am liking THIS one by Tombow since my old favorite has been discontinued. For a very strong dry adhesive I love THIS tape, and it comes in lots of different widths. It is great for applying glitter and foil to as well.
Black ink pad: (and other colors if you wish) My favorite is THIS black ink pad for crisp lines which is also waterproof when dry. For copic coloring or any alcohol based ink I like using THIS particular Hero Arts ink pad. For colored ink I really love the distress inks and especially the Distress Oxide ink pads. There is a great deal HERE If you are looking for them.
Die cuts: (Ephemera, Die cut packs, Digital cut apart, Die cuts you cut from your Cricut or Silhouette) I love the die cut packs from Illustrated Faith and Bella Blvd., Doodlebug is another company I buy ephemera or die cuts from often.
Some people are choosing to swap addresses with their online friends and do the 30 day challenge that way, some are randomly sending out happy mail to various people they know, Some are sending cards to friends and family. You don’t have to know who you are sending to for the whole challenge, Like Shanna said, you could decide that day who you’re sending to or you can make a list one week at a time if that works better for you. The HOW you approach thischallenge is whatever works for YOU, and the great thing is, you can figure that out as you go along the 30 days, or you can plan it all out now. That being said I will go ahead and share my ideas and plans for my 30 Days of sending HAPPY MAIL!
Every day I will be sending out some kind of Happy mail to someone. (basic idea, right? right! but read on!)
Some days it will be a handmade card that I have already made, or will make that will be going to friends, family, or even people like my mailman, or the grocery store clerk that always seems to remember my name, Maybe even my favorite barista at Starbucks (who does not get enough credit for making my coffee PERFECT every time!) I really like the idea of surprising people who go about doing their jobs but don’t just do their job, they do it with a smile, detail, pride, and kindness… that should be acknowledged more I think, Even if it’s just a card saying, Hey! I think you are AWESOME!
I might also sent some postcards. Like THESE postcards from the Illustrated Faith Collection. You can even embellish those premade postcards or you can make your own postcards! See my post HERE where I show ideas for making your own postcards. How nice to make the people who handle your card along its journey, smile as it travels to its destination. If you’re sending a traditional card, you can decorate your envelope as well. It may even encourage some one that sees your happy mail to send some happy mail of their own!
I love giving little unexpected gifts so some of my happy mail will include some DIY gifts that are fun to make and fun to send to some unsuspecting friends or family! Care packages are always a great surprise and can really make someone’s day.
A few cards of mine will make their way to some people I do not know personally, but who I am aware are struggling with something, They need to know they are loved and are being prayed for.
And maybe along the way there will be mini cards left on a windshield, in with a bill that has to be paid, or handed to a mom who looks like she’s had a rough day, a simple card with a note of encouragement. I definitely think little acts of Card Kindness can be apart of this challenge, Not everything has to have a stamp on it. You may also consider writing your message on a removable paper inside the card with another note that encourages the recipient to write their own message inside and send to someone they want to encourage! Simon Says Stamp actually sells THIS post-it style pad just for that reason! Look for a post coming soon that has directions on how to create your own!
At the end of the month I want to know that I made 30+ people smile, feel special, be encouraged, and know THEY MATTER enough that I will take the time to create and send them (or hand deliver) a paper hug!
I do plan on documenting my Happy Mail Month on my blog as well as social media. Sometime during the month I might just do a video as well. Make sure to subscribe to my blog for updates or follow me on Instagram ( @taniesa ) where I will update as well!
SO How about you? Want to jump into the challenge with me? You don’t need anything fancy, Just use what you got, grab some stamps if you need to, and send some love for 30 days (and if you can only commit to a week, then that is ok, make it your 7 days of happy mail challenge!) I think that in the end, the person it will benefit the most, is really those of us doing the sending!
The fun starts Tomorrow , July 1st and wraps up on the 30th (but if you want to be the overachiever and go to the 31st, then you go, girl! I will cheer you on and may even do that extra day with you!)
As a special bonus I am going to do a random giveaway to one of my readers that participates in the Illustrated Faith 30 day Happy Mail Challenge too! A bundle of new paper crafting items that will be useful no matter what type of papercrafter you are….a Scrapbooker, Bible / Art Journaler, Cardmaker, Planner girl, or any other artistic papercrafter, There will be things in this bundle anyone would be able to use and enjoy! There was no way to photograph EVERYTHING but there will be stamps and dies, washi tape, stickers, ink, embossing powder, embossing folder, roller stamp, sequins, and so much more stuffed into a large padded envelope! This giveaway is open to anyone (Yes even international!)
If you are participating in the challenge and you want to be entered to win my giveaway, Link up one of your cards between July 1 and July 31st using the blue Link up button below and on August 1 I will randomly draw someone to win! *Edited to note that you may link up as many times/projects as you would like during the challenge duration! I hope that it will add even more inspiration to others participating in the project.*
Stay tuned for more ideas for this happy mail challenge as well as what I am doing for my 30 days of Happy Mail!
Until then! Have a fantastic weekend!!!
*All supplies mentioned are linked within the blog post are in BOLD font. To enter TheCraftyPickle Happy Mail giveaway click the blue button below and link up one of your cards that is for the 30 Day Happy Mail Challenge hosted by Illustrated Faith.
How to add your project to the link-up : Click the blue button with the frog below. Add the URL link to where your project is located (blog, Instagram, Flickr, other) add the required info and enter! You should see the photo of your project below. I created a Flickr group for those of you that don’t have a blog or don’t want to blog but you do want to upload your projects and share. You can find that group HERE! If you have any problems or questions please leave a comment in this post or email me at Taniesa@thecraftypickle.com.
My name is Taniesa and I am addicted to coffee. I am also addicted to papercrafting so how perfect is this challenge, right?! What Challenge you might ask? Why, it’s that time again, The Summer Coffee Lover’s blog hop! Projects, Prizes, and SO MUCH inspiration!!
Affiliate Links used at no cost to you. Thank you for supporting this blog!
Have you ever spilled your coffee when you’re walking out of Starbuck’s or tripped on a Lego in the am and your mug went flying? It sure starts the day off in a super crummy way. This is a great card for someone who has had that kinda day or just needs to know that you are there for them and you “got their back”. Both cards feature products from Honey Bee Stamps. There are source links in my post but you will also find a supply list at the end of the post.
So I started by drawing a floor. I drew a line where I knew I wanted the edge of the floor to be and then I drew in the vertical lines at an angle to give a perspective view. After I had that penciled in I stamped the bunny from Honey Bee Stamps Blah Bunny stamp set, I masked that part and stamped the little rug that goes underneath him. Before I got to the coloring of the bunny and rug, I colored the floor with Pumice Stone Distress Ink. I made sure to make the back and sides of the floor portion darker so that it highlighted the bunny in the center I added little nails with a copic marker (N6 + N0) The bunny and the rug are both colored using Copic Markers. For the rug I used YG67, YG63, YG61 and for the outside edge I used G28. For the Bunny I used E31, E33, E34, E35, and E37. I also used R20 and R21 for his ears, noses, and the bottom of the feet.
For the wall I used an Echo Park stencil that is older and blended on some Old Paper Distress ink. after I used the stencil I went over the top of the card again with more distress ink so it would soften the stark white the stencil left. I felt it needed something more so I took a small leaf from the Honey Bee Stamps Country Blooms Stamp Set and stamped it with Peeled Paint Distress Oxide ink in between the diamond shapes on the “Wall”.
I stamped, fussy cut, and then shaded the mug using some cool gray copic markers (C00, C1) and I drew in a little heart using a Copic AtYou Spica red pen. I took a craft knife and cut around the bunny’s paw, and then slid the handle of the mug underneath.
I attached the gift card with these removable Glue Dots. This is such a great way to stick gift cards and other removable things to your cards and gifts, It holds well until you want to pull it off, and the best part is the glue dot comes off your project cleanly too!
I have another card to share today too!
This card is super simple and easy to make. Here is the front of the card:
and here is the inside
Simple but Cute right? Such a fun way to give a coffee to a friend who needs a little pick-me-up. One thing I love *Almost* as much as coffee is gifting starbucks gift cards so I always have a small stash of gift cards on hand in case I need to give a last minute gift or Happy Mail to someone needing a smile.
For this card I just colored a cacti from the Honey Bee Stamps Stick with me stamp set. I stamped the planter then covered it with a post-it note so I could stamp the cacti coming out of the planter. I colored the Planter with Copic markers E31, E33, E35 and the Cacti with YG61, YG63, YG67, and a little G21 in the highlight portion. I stamped the sentiment under that and cut out the square using some stitched square dies.
I placed that square on a scrap of black cardstock and adhered the matted square to the card base with foam tape. I blended a little Vintage Photo Distress Oxide ink around the edges and then finished off the front with a few gold sequins.
For the inside of the card I did the same thing as the cacti but I stamped a coffee mug. This coffee mug I bought at one of my Local Scrapbook stores, Impress Cards and Crafts. If you ever are in Seattle this shop needs to be on your “To-Visit” List! It’s a stamper’s candy store! I stamped the Stay Strong from Honey Bee Stamps Prickly Sentiments stamp set. I drew in the little circle to make it sorta “Starbucks-ish” and colored the inside of that green, and then I shaded the cup with some Cool Grey copic markers and the sleeve with some warm grey markers.
I cut the square with the same stitched square dies and matted that on black. I did not add foam tape on this piece though. I just glued it in using the Nuvo liquid adhesive. To attach the gift card I decided to use the new Lawn Fawn simple gift card slot dies. I die cut the bottom portion of the card and then just popped the gift card right in, super easy
So that wraps up my projects for this year’s Summer Coffee Lovers Blog Hop. In addition to all the great prizes you can win by participating in the Coffee Lovers hop, I also decided to do a fun giveaway both here on my blog, and next week on Instagram! All you need to do to be entered in this giveaway here on my blog is comment below. For the second giveaway that will be going on next week, follow @Taniesa on Instagram.
Hurry, contest ends June 30th! This giveaway includes TWO stamp sets , a exclusive Free-Bee and matching die, and a bottle of Nuvo drops all donated by Honey Bee Stamps! The other items include a Hero arts INtense black ink pad, a set of watercolor pencils, a 3×4 etched grid stamp block, Crate paper embellishment pack, Bazzill Marathon adhesive runner, and a set of watercolor pencils are all items I have purchased for this giveaway. A prize package worth $80.00!!!
Honey Bee Stamps has graciously donated the Blah Bunny Stamp set, The Blah Blah Blah Sentiments stamp set, Free Bee stamp and die, and Nuvo drops. Thank you Honey Bee Stamps! I have also put in things I have purchase for this giveaway and in total the package is worth over $80! Enter by 6/30. Winners to be announced on Saturday, July 1 at noon PST.
*** Karen Ladd !!!! You are my winner! Please email me at Taniesa@thecraftypickle.com with your mailing information. Thank you to all that entered and for the kind comments! ***
Head on over to the Honey Bee Stamps Blog where there are even more prizes to be won AND there is a link to Honey Bee Stamps Designer, Lisa where you can win another prize!
Thank you so much for visiting. You will find the supplies I have used linked in the post but also listed below. I encourage you to modify these ideas and use your crafty stash as well!
Thank you so much for visiting my blog on todays 1st Celebration Blog hop for KatScrappiness.com. Today is so exciting! Not only will you be inspired by the designers projects along this hop, there is a lot of fantastic prizes to be won! You should have arrived here from the Kat Scrappiness blog where it all starts! If you happen to get lost along the hop you can find the full link-up list at the end of this post or on Katscrappinessblog.com.
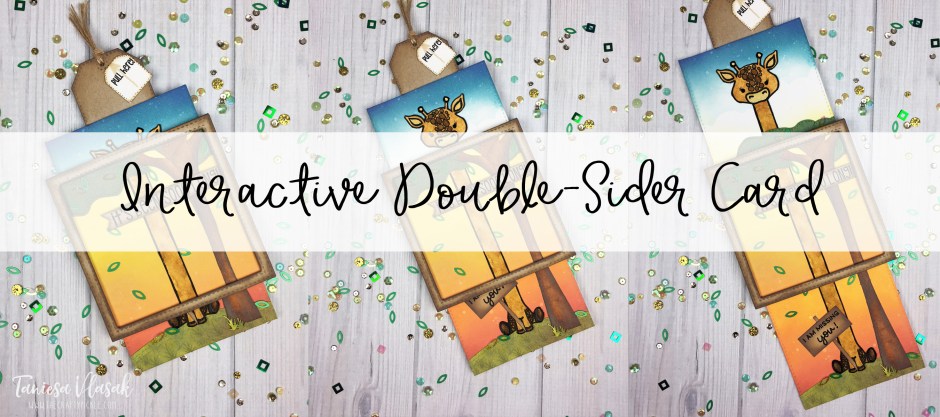
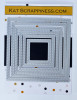
For my project I wanted to create a missing you card with Lola the Giraffe. and I wanted a chance to use the interactive stamp set so I decided to do a double slider. Here is a picture of the card closed.
and here is one with it completely open.
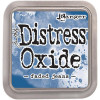
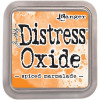
There are many variations on how to make a double slider card, I watched a bunch of videos and took bits and pieces of advice from various sources. To see the basic construction of the double slider click HERE to watch a video. The video shows a version that is similar to how I put this one together. The differences with the one I made were that I did not fold one long piece of cardstock, Instead I layered die cut panels and a card base together with foam tape, this allowed for the 4″ square card. I cut the squares with the Kat Scrappiness Double stitched square dies. The largest was for the main card panel and the second largest was for the two panels that slide out. After I cut the stitched square pieces, I blended on some distress oxide ink in Fired Brick, Spiced Marmalade, Fossilized Amber , Broken China, and Faded Jeans. I layered the two dies together and cut a frame for the top panel out of Neenah desert storm cardstock, and then blended on a little Vintage Photo Distress oxide ink as well.
I stamped the Giraffe head and half the body on watercolor paper and did the same with his lower half using versafine onyx black ink (Favorite ink for using on watercolor paper). Then I freehand drew a long neck off each piece. I watercolored the giraffe with a combo of Zig Clean Color real brush markers and Vintage Photo distress ink (re-inker). I cut a tree trunk out of scrap watercolor paper and did the same watercolor process but this time darker.
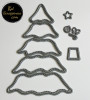
I took some dark green cardstock and cut the Kat Scrappiness Christmas Tree die several times. I applied some Peeled paint Distress Oxide ink on the green cut out pieces and pieced together a tree that looked more like one you would see on Safari rather than Christmas pine. I misted the pieces lightly with water and blotted right away. Here is a photo when I was piecing the tree together. It’s a nice way to stretch a christmas die and use it year-round.
I cut a small hill from the Lawn Fawn stitched Hillside borders for underneath the giraffe and a sentiment banner and sign. The “It’s been sooo long” sentiment is from the same Giraffe stamp set and the “I am missing you” is from the Lawn Fawn Loads of love stamp set. Once everything was painted, fussy cut, and glued down I assembled the card.I cut the smallest of the scalloped tags from the die set and glued that to the back of the top slide out panel. I freehand cut a tag and stamped “pull here” and an arrow pointing up both from the interactive card instructions stamp set. I glued that to the tag to make a good handle to pull the slider.
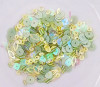
To finish things off I added on some sequins from the Lucky Charm and Spring Leaves sequins mixes. I also added eyelashes to the giraffe and darkened the eyes with a glaze gel pen. I think it came out pretty cute. I love this interactive design. I plan on making more cards following the same design because it was so much fun. Pre making the card base is fairly easy and with it being square you can use it vertically like I have here or horizontally like the video I linked. below is a clip of the card in action!
I hope you have been inspired by my double slider card. In order for your chance to win one of the brand new stamp sets, or one of the three GRAND prizes, you must comment on all the designers blogs and the Kat Scrappiness blog. That is 10 chances to win! Winners will announced at 12 noon pst on 6/25/17, you have until 12:00 midnight pst Saturday 6/24/17 to enter!
If you are reading this post between 6/19 and 6/25 2017 Kat is having a 15% sale. She already has lower prices on most of her items so this is like getting 20% to 35% off retail! Stock up on your favorites HERE. Remember to use code SUMMERVACAY at checkout.
Next person in the hop is the ever so talented, Maria! Hop on over and see what’s next! Thank you for participating in the very first blog hop for KatScrappiness.com. Below you will find the blog hop line up as well as a list of products I used today.


 Affiliate links used below where available at NO cost to you. Thank you for your support!