Summer Fun Days!!!

Happy Monday to everyone!!!

We love summer time down here in Texas…especially now that I have a pool in the backyard!!!  This flair just goes so perfectly with the look of the scrapbook page that i wanted to create and the sequin just keeps coming and coming out of that little package …it is just so awesome with all the stars!!!

Product used:
Blue & Green Pop of flair
Relish Mix

Summer Time Flair

CTMH Washi tape pack Boardwalk

IMG_20150802_180721091 IMG_20150802_180729511 IMG_20150802_180749265

And then here are my close-ups …come and visit the store in a couple of weeks when the big new reveal comes up!!

Be sure to select the notify button so that you can be notified when the shop opens back up!!! Check it out right .HERE

Kids and Project Life

Hi there, its Treasa here today and I wanted to share how I get my granddaughter involved in my Project Life album. Of course I have tons of photos of her and memorabilia from places and events but I wanted to have her add a personal touch to my album. So I have her draw me a picture or write me a note on a PL card. I think it will be a great way to look back on and remember that time.

Today I gave her a plain 4×6 piece of heavy weight cardstock and asked her to draw me a picture of her and I and this is what she came up with:Art by KayleeI just added a star for the flair to sit on and added the date to the card. In case you can’t tell that is her and me sitting by the pool.

Art by Kaylee2I love how I can get custom flair from The Crafty Pickle to help make my PL album more personalized. The Art by flair is also available in several different colors and you can also get it as a magnet and display your little ones art on the refrigerator.

Art by Kaylee3So grab some blank PL cards and hand your kids some crayons, markers, pencils and let them help make your PL album more personal and special.

Thanks for stopping by and have a wonderful week!!!

Treasa for ThecraftyPickle.com

Organizing FlairTastic Friday!!!

Happy Friday Y’all!!!

This is the last in our series in FlairTastic Friday!!  It is all about organization organization organization!!! Let us see what you got in the order of organization…

This is what Taniesa has for you:

I saw ideas of putting them flat in CD cases. Putting them in packaging inside a basket and flipping though them, even putting them in coin page protectors and placing in a binder. All very clever ideas but none of which I thought would work for me.

I knew that they needed to be organized by color. If you have seen my previous posts you know that I organize nearly everything by color. I also knew that I needed something that would have room to add more than my current collection. I didn’t want to have to have multiple cases for one type of embellishment (except washi tape and PL cards, those don’t count ).

While I was at Michaels in the beading section I came across a fantastic sectioned organizer (for bead organization) and it was really reasonable ($5.99) It had more space than a embroidery floss organizer box ($2.99) and I figured it just might work. Here is my little button collection.

Organize your Flair buttons! More @TheCraftyPickle.com

Organize your Flair buttons! More @TheCraftyPickle.com

Organize your Flair buttons! More @TheCraftyPickle.com

In addition to organizing by color I have 4 sections dedicated to seasonal buttons. Spring, summer, fall, and winter. There is also multi-colored button sections and spaces for specific themed flair.

This is from Joann:

She sent me this idea that she found on the internet- Clipboard at a glance -love this idea..check out the link!!!

11751855_842149952507343_7309660276640616122_n

Here is a link to her post:

http://studiombymarian.blogspot.com/2015/01/flair-button-embellishment-organization.html

This is some great ideas that I found out on Pinterest:

ae294eb4a7cf4796871367c58b637118

Use an old letterpress drawer or curio shelf to organize embellishments….

Here is a link to her blog to see how she used this letter press to organize here project life embellishments

And then one last one I had to share…. Here   

3a47865cb145b59cbddfe3176e190774

Thus looks so awesome and you can for sure see all your fair in one place!!!

Stop by The Crafty Pickle Etsy Shop if you haven’t been by recently. We will be releasing a few little things between now and our next big release. We will also be having a big TCP Birthday celebration in August with giveaways and a brand new exclusive foil flair!

Dont forget to use the hashtag #FlairTasticFriday to play along with us!

thecraftypickle.com

Flair On A Layout

Hey TCP friends! It’s Stephanie from Bits & Pieces (& Scraps) here today to share my latest layout with you. I created a Fourth of July page using the All American flair set.

I have to admit, I don’t create many patriotic pages! They intimidate me, but these flair buttons make the process fun and exciting!! I used three of the six in the set. be free

the crafty pickle flair layout

I hand cut several banners to accent the top corner and have one laying on top of my photo. I love how this takes away some of the blank space of my photo. I added a chipboard arrow & the “Happy Birthday America” flair. LOVE this one!

the crafty pickle flair layout

More hand cut banners under my photo act as a matt. I then mounted the “July 4” flair onto a punched scalloped circle. The paint here acts as my journal block.

layout created using the crafty pickle flair

A pre-printed banner at the bottom & “the Land of the Free Because of the Brave” flair finish off the bottom of my page.

I kept my layout pretty simple and love the dimension the flair buttons add to my page! I could have used them all but wanted to save the remaining three for another page (or maybe cards)!!

Thanks for stopping by!  Enjoy the day!

stephanie for ThecraftyPickle.com

Wearable Flair? Yes!!!! Hello FlairTastic Friday!

Happy Friday Everyone!

#FlairTastic Friday

Every Friday though the summer months we will bring you a new idea/concept using flair. Your not going to want to miss these fun posts! These ideas will come from not only our designers but also super neat flairtastic ideas we find from our customers and other talented papercrafters. Make sure that when you share any of your projects on Instagram or Facebook using flair, that you tag it #FlairTasticFriday. You just might see your own photo featured here on our blog!

This week we will be showing you a few ideas taking flair off your pages to actual wearable art!

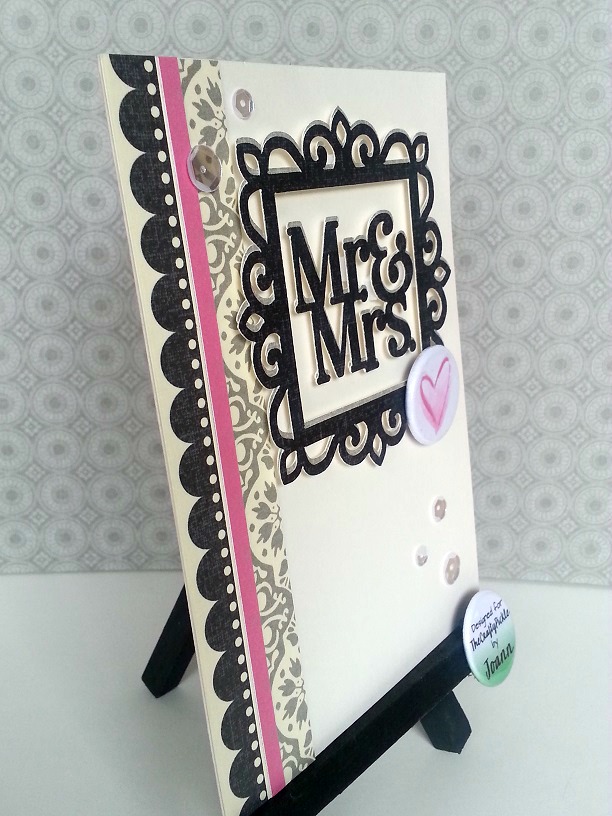
First up we have an adorable project created by our designer Joann!

Add the perfect touch to headbands @ TheCraftyPickle.com

Joann added some flair from our Cute Bugs set for her adorable little girl. How precious are these? I think they would be great in the center of a bow as well. Totally adorable, Joann!!

Next we have a few ideas that have caught our eye… Take a look!

Button Ribbons http://toostinkincute.blogspot.com/2012/07/flair-badges.html

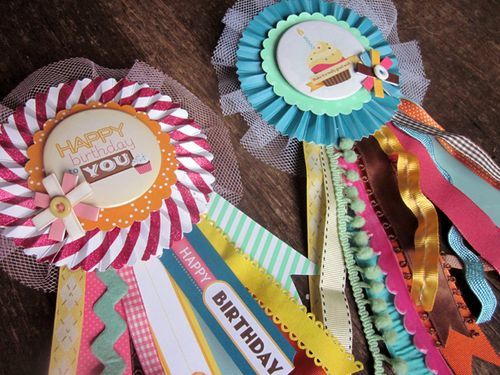
These adorable flair ribbons are just too adorable and would make a perfect wearable award or celebration pin. Love this for birthdays, weddings, achievements, and so much more. These were designed by Page Evans.

Jacket flair found on pinterest

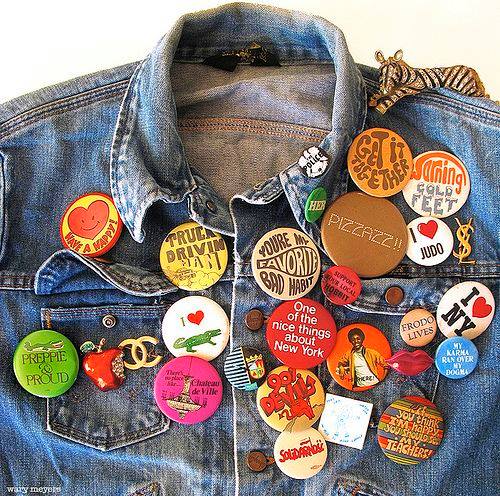
If you were an 80’s or early 90’s kid chances are you had a jacket similar to this one. I remember wearing my collection on my varsity jacket in high school. (photo found on pinterest)

Flair button Bracelet band found on Pinterest.

What a great idea of wearing a bunch of pin back buttons of the same theme? We saw this photo on pinterest and fell in love with it!

Kid designed wearable buttons http://thesoutherninstitute.com/2013/03/buttons-book-characters.html/

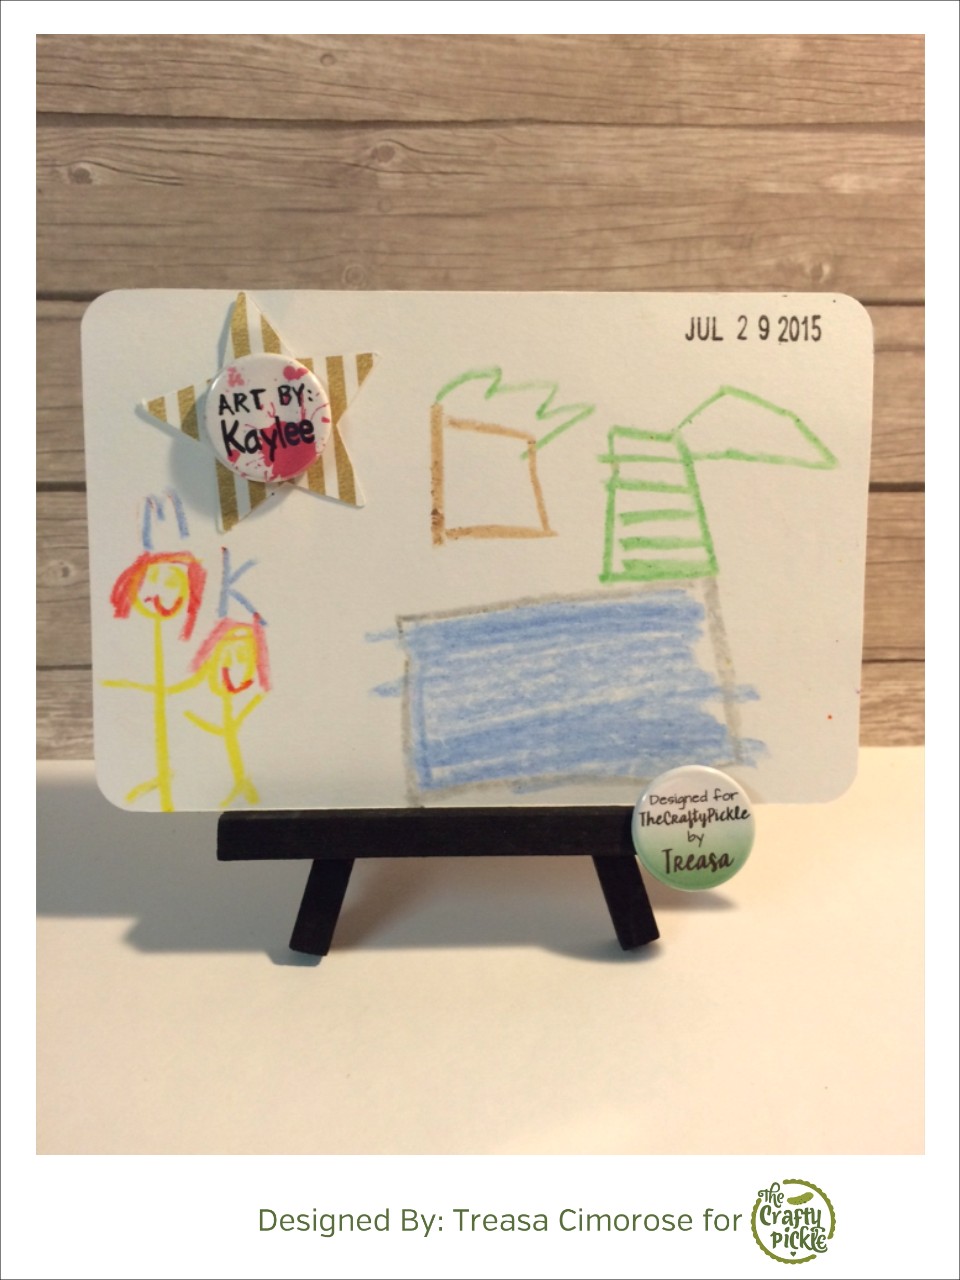
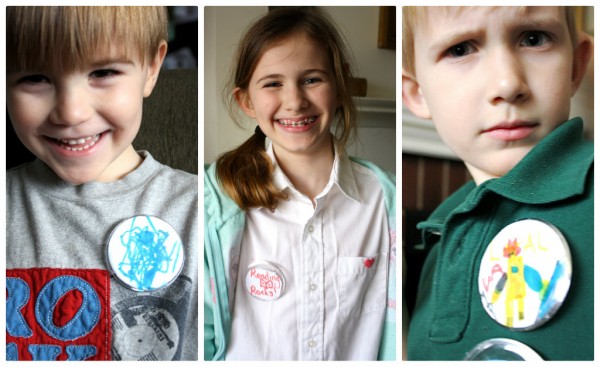
I love that these are kid designed buttons. You can read more about it HERE. For a smaller option our “Make your own Flair Buttons” would be a similar and fun idea.


Last but not least we have a photo share from one of our very own customers!

liz and daughter wearing custom Button necklaces from TheCraftyPickle.com

Customer Liz ordered a custom button necklace with her loved ones names inside our glitter heart flair, we thought her daughter needed one as well. Aren’t these two just adorable!

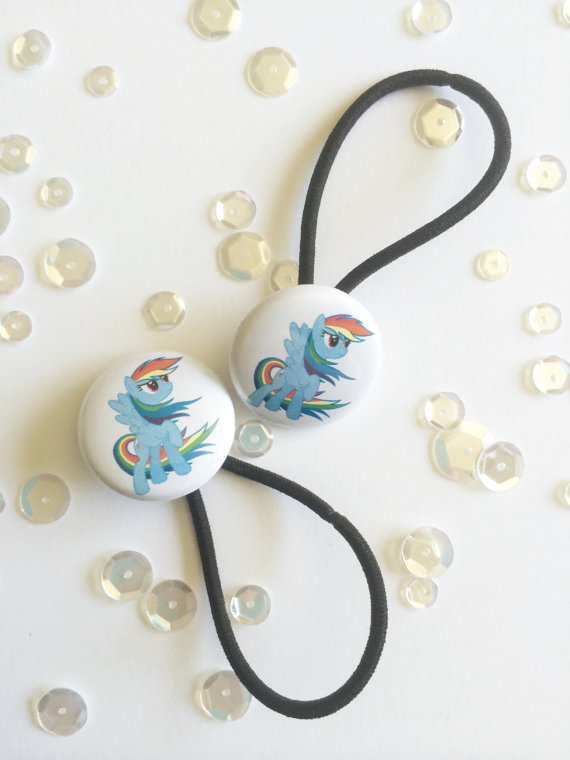
Not only do we carry necklaces, but these adorable Hair ties as well.

custom hair ties @ TheCraftyPickle.com


We can make these hair ties with any flair in the shop or even a custom design.

Keep your eye out for our new wearable interchangeable magnetic jewelry coming to TCP’s shop in just a few weeks!

It must be the kid in me that loves flair so much. I loved wearing it then and I love wearing it now. Adding it to my papercrafting is an added bonus.

How do you wear your flair?

Stop by The Crafty Pickle Etsy Shop if you haven’t been by recently. We will be releasing a few little things between now and our next big release. We will also be having a big TCP Birthday celebration in August with giveaways and a brand new exclusive foil flair!

Dont forget to use the hashtag #FlairTasticFriday to play along with us!

See you for more FlairTastic Ideas next Friday!

Till Then….

Happy Crafting!

thecraftypickle.com


Lights, camera, create!

Hi there, its Treasa here today to share with you some cards I created using flair from the Movie Night set and the Cinema Relish Mix from The Crafty Pickle Shop.

First up  I created a popcorn gift card holder. I used the movie tickets flair from the Movie Night set and the reel from the Cinema Relish Mix.

MG1You pull the popcorn out and the gift card is tucked up inside. I also added a star from the Cinema Relish Mix as well as some Film Strip washi tape from the shop.

MG2I also wanted to create a couple cards for my Project Life album.

MG3I created the base of both cards digitally then went to town adding some items from the shop.

For the Movie Night card, i used the Popcorn flair from the Movie Night set and a reel, movie camera and stars from the Cinema Relish Mix as well as used some of the Film strip washi tape.

For the “I Reely Love You ” card, I put two reels from the Cinema Relish Mix together and added some thin ribbon to look like the film . I also used some of the stars from the Cinema Relish Mix too.

Thanks so much for stopping by!!

Treasa for ThecraftyPickle.com

Cute on the inside as well as the outside! Card by Stephanie.

Hey TCP friends!

It’s Stephanie from Bits & Pieces (& Scraps) here to share my project today. I am featuring flair from The Crafty Pickle in a greeting card. I created this thank you card to send to our family members that recently hosted us at their lake house.

Dress up a greeting card with flair @ TheCraftyPickle.com

I began with a pre-made card and then punched 3 butterflies in coordinating colors. The flair I used here is the adorable butterfly from the “Cute Bugs” set. I love the added touch of something pretty when you open the card too! You can find this, as well as so much more, in the shop!

Thanks so much for stopping by!

stephanie for ThecraftyPickle.com

Sequins Technique for a fun tag!!!

products

Product used:
Something Shiny Flat Sequin
Star Spangled confetti mix
Painted Spot Button Flair

tag

First I added this mask across the tag and then added some texture paste to the tags to make some dimension to the project

tag 2

Next, I added all the fun sequins to the bottom of the tag with glossy accents to add a little shine to the tag and to make sure it all stays stuck down!!!

tag 3

Last …the finished project is this fun little tag to either go on a scrapbooking page, card or in my pocket pages album …it is ready to go!!!

Thanks for looking at my work!!!

kristin  for ThecraftyPickle.com

Fantastic FlairTastic Friday!!!!

Happy Friday Everyone!

Every Friday though the summer months we will bring you a new idea/concept using flair. Your not going to want to miss these fun posts! These ideas will come from not only our designers but also super neat flairtastic ideas we find from our customers and other talented papercrafters. Make sure that when you share any of your projects on Instagram or Facebook using flair, that you tag it #FlairTasticFriday. You just might see your own photo featured here on our blog!

Super fun finds today on the blog ….we are going to be showing you different ways to display all of your beautiful flair!

First, check out the fun things we found using flair in artwork and displays!

5c097fd3e9a836c27949b06b707e97ea 3265ace006265a94b41edd0b64327f27 7ab17e5e99dafd4fd85af681e09da285 8d8360c5255ab41e009dee3637a35c75

We just loved all the different ways that people used flair as artwork and home decor…such wonderful idea to display all the fun flair from the store!!!

Found on
wedding decor ,Heart canvas ,Hoop , Frame it!!!

Next we have a few ideas from the TCP Designers!

First, we have an adorable table display that would be perfect for any party or even a wedding.  Carrie used some custom TCP flair and Graduation flair to decorate a table at her daughter’s graduation party.To see more about the custom flair that Carrie had created view her previous blog post HERE.

#FlairTastic Friday's: Displays @ TheCraftyPickle.com

Next, Joann is displaying something adorable and useful for your everyday. She decorated this inexpensive metal display board at the local craft store, added a bit of washi and some number flair from the TCP shop and she now has a great visual daily/weekly reminder of things going on for her family. Did you know you can make any flair button in the shop into a magnet? Setting up a fun calendar like this can be done in a snap! Stop by Joann’s blog for more info!

#FlairTastic Friday's: Displays @ TheCraftyPickle.com

Next up is Taniesa who has a special gift she created for her daughter for her birthday. Using pieces of clipart she found, she created flair that represents everything her 8 year old daughter is into at the moment. She then attached it to a painted canvas and filled in spots using buttons, gems, enamel dots, and other fun bits and pieces. Tutorial on this project is coming soon! You can create fun flair like this too by choosing the Create your own Flair listing in the TCP Shop!

#FlairTastic Friday's: Displays @ TheCraftyPickle.com


How will you display your flair?

We are so excited for this month and can’t wait to share with you all the exciting things we have planned! Foil Flair is coming and you will LOVE our Pickle Planner Flair! SO many more cute things too. It is going to be a very exciting month ahead! Stop by The Crafty Pickle Etsy Shop if you haven’t been by recently. We will be releasing a few little things between now and our next big release. We will also be having a big TCP Birthday celebration this month with giveaways and a brand new exclusive foil flair coming mid July!

Dont forget to use the hashtag #FlairTasticFriday to play along with us!

See you for more FlairTastic Ideas next Friday!

Till Then….

Happy Crafting!

thecraftypickle.com

Super Sweet Wedding Card!!!

Happy Tuesday!
Joann here today sharing a wedding card that I made using the CTMH Cricut Artiste Cartridge!
When this cartridge came out I fell in love with it. It has so many great cuts, which include tons of 3D items, boxes, labels, cards with envelopes, phrases and much more (check out the handbook here).  I cut the frame (pg. 60) and the phrase (pg. 61) from the CTMH Artiste Cartridge.
I cut both images twice, once out of black and once out of a light grey cardstock to help add a little shadow. I also cut a few stripes of pattern paper to add to the left side of the card and a stripe of CTMH Cotton Candy cardstock to help add some color.
I finished my card by adding a heart flair from TCP Watercolor Hearts and some TCP Something Shiny sequins.
That is my card for today, thank you so much for stopping by! Don’t forget to stop by the shop to take a look and pick up some goodies!
Supplies used
b600a-tcp2bdt2bpost2bbadge