Red, White, and Blue Week!

I’m so excited to share a bit of news and a challenge with you! This week over on the Honey Bee Stamps Blog is “Red, White, & Blue Week!” Designers will be sharing their project using this color palette.

RWB Color Palette

Of course it ties in with the 4th of July festivities but it does not have to be an Independence Day or Americana project, It can be anything using any types of products (not just Honey Bee Stamps)

This fun will run starting Today, Monday 6/27 Thru Monday 7/4. During this week, the Design Team will be posting their creations using the Red, White & Blue color theme and you will have a chance to participate in the fun (not to mention have a chance at winning a prize!)

THE CHALLENGE

We would love to challenge our customers, friends & crafty kids to play along with us. Share your creations on the Honey Bee Stamps Website, Honey Bee Stamps Facebook Page or on Instagram using the hashtag #HBSChallenge so that we can see everything you create!  We challenge you to share anything crafty (cards, scrapbook pages, mixed media). While we love to see you use Honey Bee Stamp products, they are not required to participate. The color palate above is just a starting off point. It can be ANY shades of red, white, and blue.

I will be playing along too! Both here on my blog and on my instagram account as well as on the Honey Bee Stamps blog. Look for a few fun projects from me and the rest of the Honey Bee design team!

Have a FANTASTIC week, my friends!

Happy Crafting!

Taniesa Vlasak for Honey Bee Stamps

You Color My World

Hi Sweet Friends!!!

I am excited to share with you my first official design team project for Honey Bee Stamps. I have had the pleasure of doing some guest work for HBS in the past, but I am so excited to be apart of what is an extremely talented team!

Today I will be working with the Color My World stamp set. It’s an adorable 4×4 stamp set that just reminds me of the current coloring book craze.

Colormyworld by HoneyBeeStamps.com

What spoke to me when I saw this stamp set is a card I knew I wanted to make for my daughter. Every birthday and christmas, for as long as I can remember, I have given her a coloring book. Far before the amazing coloring books that are available currently.  I would search and search for the perfect one ( in the past I would buy her a lot of coloring books from Dover) With her birthday coming up I knew this would be the perfect card to go with the new coloring book that I got for her.

I decided to go with a non traditional card size. I picked up these cute envelopes from my LSS that are 3 1/2 x 6 1/2. My card panel measures 3×6 and my card is 3 1/4 x 6 1/4 unfolded. The card base is Bazzill Marshmallow cardstock and the panel is Strathmore Bristol 300 series. This size envelope is perfect for making cards from a 6×6 paper pad!

Taniesa Vlasak for HoneyBeeStamps.com

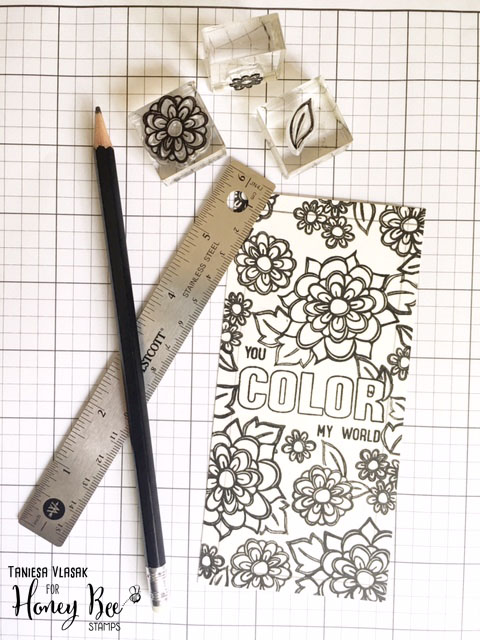
First I stamped all of the images using Tsukineko VersaFine Onyx Black ink. I love this ink because it gives a crisp bold black line and it is waterproof. I did a little masking but not too much. I first stamped the sentiment and then the florals and leaves. I tried to stamp using a visual triangle to balance the card.  After I had everything stamped, I measured out a 1/4 inch border around the entire card.

Taniesa Vlasak for HoneyBeeStamps.com

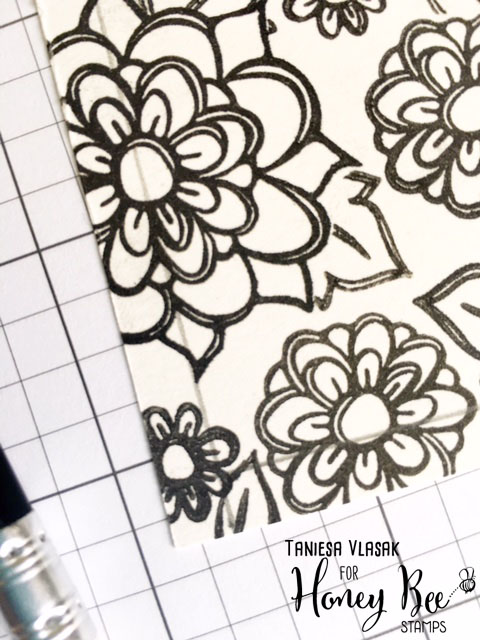
I sketched the border lightly in pencil so that I could erase easily. Sometimes I am just not careful enough. While I was doing all the inking, I got some smudges and inky fingerprints on my card (sad face).

Taniesa Vlasak for HoneyBeeStamps.com

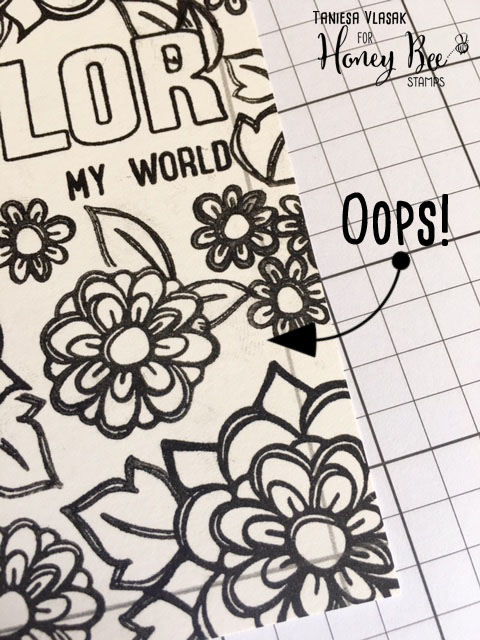
Now when something like this happened before I would more than likely start all over, but I found an amazing eraser that cannot live without now!

Taniesa Vlasak for HoneyBeeStamps.com

The Tombow MONO Sand Eraser is a magic wand!! You just lightly rub the mistake/smudge with the eraser, and if you rub off some of your inked up image you just go over it with a waterproof pen/marker. I used my trusty Sakura Pigma Micron pen (I used the .05 here but you can match up your stamp line width to the different size micron pens available).

Taniesa Vlasak for HoneyBeeStamps.com

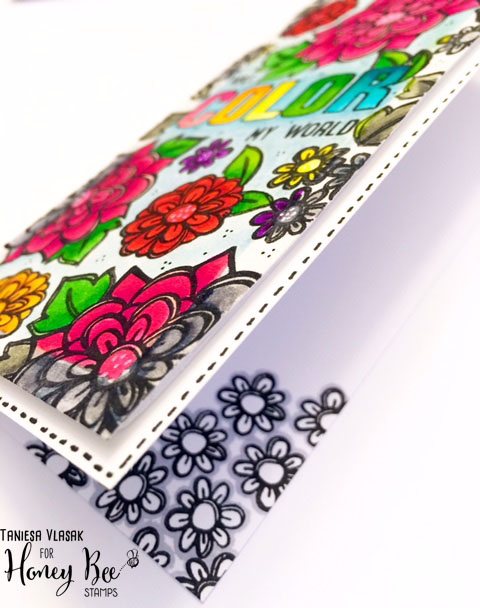
I thought I would break out my Zig Clean Color Real Brush markers for this project. They haven’t been getting enough love lately and I love using them on the bristol cardstock. I used a light, medium, and dark shade of all the rainbow colors (Some color groups had 4 shades because I couldn’t decide) but any color combo would look lovely. The technique I used for this card is called “spotlight coloring”. The 1/4 border that I made around the edge will be colored with shades of gray and the inside will be the vibrant color. This really pops the color in the center of the card and emphasizes the sentiment of “Coloring my world”.

Taniesa Vlasak for HoneyBeeStamps.com

With the border, I colored and shaded the images with all gray markers. I shaded these just like I would with the different shades of colored markers. Even if you don’t have a wide range of the brush markers I would recommend picking up at least one Gray Clean Color Real Brush marker as it is perfect for adding a shadow to stamped images and text. Now on to the fun part!

Taniesa Vlasak for HoneyBeeStamps.com

I colored in all of the florals and leaves with the markers and chose a very light shade of blue for the inner rectangle background. I left the border background white. It was at this point that I felt that my sentiment didn’t pop out enough. I decided to take a darker shade of blue and color around the sentiment area making that more of a focal point.

Taniesa Vlasak for HoneyBeeStamps.com

I also added some glitter using my Spectrum Noir Sparkle Glitter Brush Pen in clear. It is hard to see in the photo but it really made the word COLOR super sparkly! I added some faux stitched outline on my card base and popped up my panel with some fun foam so it is slightly raised. I used the full panel of fun foam as it will be going through the mail and I didn’t want it to get smooshed.

Taniesa Vlasak for HoneyBeeStamps.com

I think it’s the little details that really make a handmade card something really special. I took the smallest floral stamp in the set, and stamped the lower right and the upper left corners with a cluster of just the flower, then I outlined them with a grey marker to give a shadowed effect.  I was on a roll and couldn’t stop there so why not dress up the back of the card and the envelope too!

Taniesa Vlasak for HoneyBeeStamps.com

The same idea as the inside of the card. I took  the medium size floral and stamped the corners of the envelope and outlined in gray. I decided to leave these just black and white because I wanted the card to be the center stage of color. I will position the postage just to the left of the floral cluster and I think it will add a great touch when it is all addressed and ready to go.

Taniesa Vlasak for HoneyBeeStamps.com

The handmade stamp was a custom stamp (Coming to The Crafty Pickle Etsy shop SOON) and I added the small daisy and leaf stamp from the set to tie it into the card design. This one I did color. I felt it added the perfect final touch.

Here is a look at my final card.

Taniesa Vlasak for HoneyBeeStamps.com


I hope you enjoyed my first Honey Bee Stamps DT Project, and even more I hope my daughter loves this card! I can’t wait to give it to her (Lexi if you read this blog post just act surprised LOL)

Listed below (and within my blog post) are the links to the products I have used for this project. Affiliate links may be used, this means if you make a purchase I receive a small commission at no additional cost to you. I really appreciate your support toward the costs of running this blog.

Color My World Stamp Set: Honey Bee Stamps
Slim Envelopes at ImpressCardsandCrafts.com
Bazzill Basics Paper Card Shoppe Heavy Weight Cardstock, 25 Sheets, 8.5 by 11-Inch, Marshmallow
Strathmore Smooth Bristol 300 Series
Tsukineko Full-Size VersaFine Instant Dry Pigment Ink, Onyx Black
Tombow MONO Sand Eraser
Sakura 8-Piece Pigma Micron Pen Set, Black
Zig Clean Color Real Brush Marker Set
Zig Clean Color Real Brush Marker, Cool Gray
Spectrum Noir Sparkle Glitter Brush Pen Clear Overlay, 3 Piece

I hope you all have a blessed and wonderful weekend!

Happy Crafting!

Taniesa Vlasak for Honey Bee Stamps

Spring Cleaning!

Hi Friends!

Are you starting to get some nice spring weather where you are? The sun is shining in Seattle and I am pumped to get my house more organized! We are having a city-wide garage sale that I am excited about (need to purge so much) and I am re evaluating my craft space.

I find that it can be lots of fun going through things that haven’t been gone though in a while. It is like shopping all over again! <wink>

In May I will be bringing a new crafty organization series to the blog (and I might just have some discount codes to share with you all) so stay tuned!

Organization week @ TheCraftyPickle.com

In the meantime there is a great spring cleaning challenge happening now over on the Scrapbook/Craft Organization group in Facebook. You can get to the event page directly by clicking HERE.

Scrapbook/Craft Organization Facebook Group Spring Cleaning event!

Several companies have donated many items as giveaways (Motivation people, Motivation!) as well as some sales during the event.


A huge thanks to the sponsors, they will be highlighted in more detail during the May Organization Series right here on TheCraftyPickle.com

Stamp-N-Storage
Totally Tiffany
Organize More
Close To My Heart
and more!

See you soon!

Taniesa for ThecraftyPickle.com

Happy Birthday Honey Bee Stamps!!!

Hi and welcome to Honey Bee Stamps 1st birthday blog hop!!!

12994413_10100195422994386_9040328030175265407_n

Thanks for joining us on our week-long birthday celebration! Today the designers are featuring the brand new stamp set “Happy Everything” with a sweet little kit put together by designer Lisa Cisneros. We have lots planned for you this week and of course lots of prizes! Just leave a comment on our designer’s blogs along your hop for your chance to win!
You should have arrived here from Holly’s Blog, but if not click HERE to start at the beginning!

Here is a photo of the kit we got to work with along with the Happy Everything stamp set:

13035410_10100195286947026_1188573436_o

For my project I wanted to do a little something different with the stamping. Did you know that if you own a foiling machine or laminator, you can actually foil your stamping work?

All you need to do is do your stamping with a very good black ink. Using a stamp positioner like the MISTI tool can really help. If you miss any spots in your stamping be sure to go over it with a marker or a fine tip pen.

Then take your stamped paper and photocopy onto cardstock using a toner based printer or photocopier. Your image is ready for foiling! Note: This should ONLY be for personal use due to copyright, do not share your photocopy images with others.

That is exactly what I did in my project below. You can see the aqua colored foil in the close up photo. I love how it shimmers right along with all the sequins in the shaker card.

TheCraftyPickle.com for Honey Bee Stamps

TheCraftyPickle.com for Honey Bee Stamps

I hope my little tip got your creative wheels-a-turnin’! I know that I want to foil ALL THE THINGS now! LOL.

I sure hope you had fun hopping along with us today for Honey Bee Stamps very first birthday blog hop. Make sure you have left a comment below as well as one on every designer’s page and of course the honey bee blog as well. Keep checking back  on the Honey Bee Blog all week long for more inspiration and new products…. better yet join the Facebook party HERE for your chance to win lots of awesome prizes.

Happy Hopping!

Taniesa for ThecraftyPickle.com

The Jar is OPEN!

Hi Friends!!!

I am excited to announce our store is back open. Thank you all for being incredibly patient while we relocated to Washington state. We added a few new items to the store so make sure you check it out 🙂

TheCraftyPickle.Etsy.com

We wish those of you in the states the happiest Thanksgiving holidays!

Happy Crafting!
Taniesa for ThecraftyPickle.com

The Pickles are on the move!

Hi Crafty Friends!

Some of you might already be aware but we wanted to make a formal announcement here on our blog. Due to my husband receiving a fantastic job offer we are needing to relocate to the PNW! We will be moving to the Seattle area within the next three weeks (YIKES!)

TheCraftyPickle.com

This is a huge move for this California born and raised girl! Because of this our Etsy shop will remain closed until we settle in our new home. I am hoping that this will not take us terribly long. Our TCP designers will still be bringing you fun ideas on our blog.

Thank you so much for your prayers, well wishes, and support you have given since finding out about our relocation. I appreciate them so much.

Pickles to the Pacific Northwest. Watch out here we come!

Taniesa for ThecraftyPickle.com

Get EXCITED!!! Our jar is full of some pretty awesome stuff!!!

Hey there sweet pickles!

I am so stinkin excited for today!!! I have been shopping and creating long and hard for weeks leading up to this release all with my very sweet customers in mind! Here is a little bit of what you will find in our “little” Etsy shop right now

Grand Reopening of TheCraftyPickle.etsycom


We have so many new things like:

Seriously, there is so much I can’t even begin to tell you all about it. Hop on over to our store and check it out!

Oh! While supplies last every one of our customers will be receiving an exclusive limited edition can’t-buy-it-anywhere gold foil flair just for placing an order! Our Wish flair is perfect for birthdays, christmas, or maybe made into a clip for your Crafty Pickle WISH list!

wish gift flair limited edition for customers of TheCraftyPickle.etsy.com


Happy Shopping, Friends!

xoxox

Taniesa for ThecraftyPickle.com

PLAN on shopping TheCraftyPickle TOMORROW!

Hey there Sweet Pickles!

Bad pickle pun aside, we are opening up the TCP shop tomorrow afternoon and you will definitely want to stop by and see all the new pickle picks! Some of which we are showing you today!

First up is something I am so excited about. Midori’s and Fauxdori’s are all the rage right now and you know how us girls love to accessorize! We have created this cute little customizable Midori Charm to go on your bands….. but guess what? It’s interchangeable! The midori charm is magnetic which means you can add ANY of TCP’s buttons/flair designed or personalized to your midori charm! (this beautiful Fauxdori is the wide version from East And Rory , stop by, view her beautiful collection, and tell her The Crafty Pickle sent you. I love shopping small and handmade)

Midori Magnetic changeable charms @TheCraftyPickle.com

Midori interchangeable charms @thecraftypickle.commidori interchangeable charms @thecraftypickle.comNext up isn’t something terribly new (more like new and improved), you have seen the large 3 inch clips in our store before but now there are MORE planner designs than ever, we also have personalized planner flair to go on clips (or not) and more clip styles. The Crafty Pickle recently added three new very talented planner girls to our design team! You will be seeing these and a lot more pickle planner essentials in the shop tomorrow as well as their designs!  Just look at that gold foil flair on a gold clip? Swoon!

Planner clips @ TheCraftyPickle.com

Are you hyped yet? Well if not GET EXCITED because you have only seen such a small portion of what we have coming your way! I am hard at work listing everything this week. I tell ya, this pickle girl has been powered by caffeine to get all these pretty pickle things posted by tomorrow.

I want to take a moment to thank all of you, my readers and my customers for the support you have shown my little business. Without God and without all of you my store would be nothing. I am truly humbled by the growth and progress TCP has made in the last two years. Thank you from the very bottom of my heart!

See you all tomorrow for our GRAND RE-OPENING of THE CRAFTY PICKLE on Etsy!!!!

Pickle Hugs!

Taniesa for ThecraftyPickle.com

Are you ready for the biggest, craftiest, pickle store update ever???

Hi Sweet Pickles!

TheCraftyPickle.com Sweet Embelishments for all your papercrafting projects!

Are you all ready for a huge massive store update this Friday (8/14/15)? Oh yeah, It’s huge! This is going to be the biggest update we have ever had. Thanks to all of our loyal customers and some new friends who just found us we are able to bring you not only some fabulous new flair that will knock your socks off but even MORE!!!

You love our “relish” so there just might be more, you love our washi tape. so there might even be more of that, BUT there is even MORE products going into the store that you’ve never seen at TCP! Can you tell I am super excited?

Join us every day this week for a little “Pickle Peak” at some new products that will be in the shop on Friday! Follow us on Facebook and Instagram too and you just might win a little Crafty Pickle Prize as well!

Here is today’s Shiny new Sneak Peek! Options to add a bit of shine to your projects… both with flair and a very HOT new tool! 😉

sneekpeak

I can’t wait to share more with you all, See you tomorrow for another look at our upcoming products!

Don’t forget that our store opens back up THIS Friday 8/14!

Happy Crafting!

Taniesa for ThecraftyPickle.com