If December is the month to send out Christmas Cards than January has to be the month to send out lots of Thank you cards! Today I have a card that turns a cute little honey jar into a snow globe!
One of my most favorite and most used stamps is the Honey Bee Stamps “Sweet as Honey” stamp set. I especially love using the honey jar for lots of things like a vase, and today, as a snow globe by just turning it upside down.
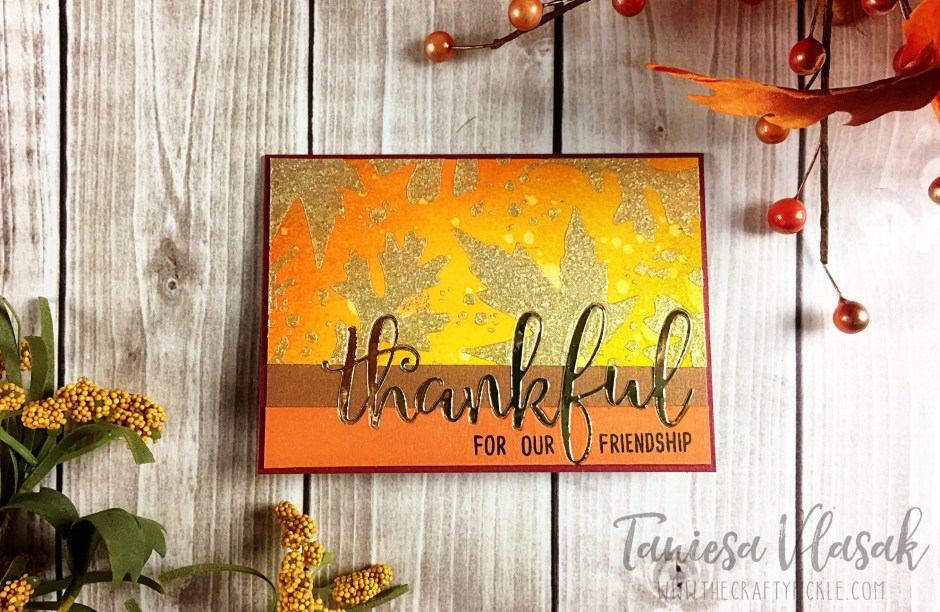
I started by stamping the jar on white cardstock using a light blue ink. This was mostly so I knew where to put my little scene. I used a cute little house and tree die cut from the Essentials by Ellen and colored the windows and tree as well as a little heart with copic markers. Then I cut out the Thanks word from the Honey Bee Stamps Thanks and giving die set.
After my little house and tree were glued down I applied a coat of white Neon Abilify. This stuff is so fun for snow. I let the first coat dry and then dotted on a bit more for a layered effect. I also dotted on some of the paint to the top of the thanks die cut to look like it was dusted with snow. After all was dry I used my heat gun to puff it all up. I love the dimension it adds.
On the same color grey cardstock as I cut out the THANKS sentiment I cut a small strip and stamped Snow and Much from the Honey Bee Stamps Flakey Sentiments stamp set. I then heat embossed it using bright white embossing powder. I added the ! in with a white gel pen.
The cute jar topper was stamped using Versafine Onyx black ink on some Lawn Fawn Perfectly Plaid winter paper and cut out using the coordinating die. I added a bit of May Arts natural twine.
For my card base I took a piece of white cardstock and blended a gradient blue from light to dark using distress ink. I ran the dried piece of cardstock through my big shot with a small dot embossing folder. I cut out a piece of the same blue and gray plaid patterned paper using a stitched 4 bar card die and adhered that piece to a white 4 bar card.
I cut out the jar upside down from the blue panel where I wanted the snow globe to be visible and then covered the (backside) opening with some snowfall acetate I got at my local craft store (Urban Scrapbooker). I covered the back of that panel with foam tape and lined the opening with my snow globe “insides” that i cut down.
I placed the main piece on top of the covered card base and then glued on the sentiment and sentiment strip on top using matte medium. I finished it off by lightly coating the die cut and sentiment strip with my Spectrum Noir clear glitter pen.
That’s it for my card today. I hope you were inspired to use your own stamps in a unique unexpected way!
All supplies used today are listed below (Affiliate links where available)
I am super excited and honored to be apart of the 12 designers of christmas celebration over at the Honey Bee Stamps blog! Today I will be working with the Zen Florals stamp set, The brand new Thanks die set, the Fresh Lilac sequins mix and the brand new Be Mine sequins mix! All of these items are on sale for TODAY ONLY (Saturday December 10th 2016) you can shop for these items and lots more on the honey bee stamps shop HERE
I challenged myself to make two simple cards for this project. Both cards use only one stamp from the zen florals stamp set! You can make this same type of card with any small stamp and a sentiment die cut.
The first card I stamped out the little leaf stamp all over the card base. I then colored using shades of green copic markers. It doesn’t matter what greens you choose your just going to want 3-4 markers that blend fairly well.
I colored the entire panel with my lightest color. I wasn’t too careful because I really only needed to get the leaves. After that was done I took my darkest marker and outlined each of the leaves… this took a little time but I was watching a movie with the family so it went by quick. I went around the darkest line with the next lightest marker and then filled in any gaps with the marker slightly lighter than the last.
Once the coloring was done I positioned the shadow die directly on my card base and cut it out. I adhered this piece to a heavyweight card base. I colored in some white cardstock with my matching copic marker and then die cut the “Thanks”. I glued that into the gap of the card base with some Ranger multi medium matte. I then went over the sentiment and leaves with a wink of stella clear glitter pen. I finished off the card with some sequins from the Fresh Lilac mix and some Nuvo Crystal drops. That’s it. Super simple and can be done with any stamp and die combo that you wish.
For the next card I die cut a heart from some masking paper and placed this over a heavy weight card base. I Blended in some Spun Sugar distress ink to the inside of the heart and darkened the edges with Worn Lipstick Distress ink. I then stamped the little floral cluster stamp over and over to make a pattern inside the heart with some versamark ink. I sprinkled on some white embossing powder (you want to make sure the distress ink is VERY dry before this step) and I heat set it all. I colored in the flowers and leaves with a couple of Zig clean color real brush markers. I added some sequins from the Be Mine sequins mix and placed a few nuvo drops like I did with the other card.
Once that was all dry I cut out the thanks shadow from some pink vellum that matched the spun sugar distress ink and I cut the “Thanks” from glossy white cardstock. I glued the two pieces together using the Ranger multi medium matte and then glued that to the card base.
These were “Almost” one layer cards. They are perfect for those who enjoy coloring! I could see making a note card set like this to give as a gift.
I hope you enjoyed my cards. I am so thankful to Honey Bee Stamps for having me apart of this event and for YOU all as well! This has been an amazing year for Honey Bee Stamps! I hope you all have a very merry christmas and a blessed new year!
I might have gone on a bit of a crafting spree lately, I was having so much fun with the new releases from both companies (and some of their older releases as well) and, well, tis the season for crafting!
The first project I have for you today is a fun card using Chibitronics lights! This card features the Merry and Bright stamp set from Honey Bee Stamps as well as the Essentials by Ellen Fat Pants stamp and dies (ornaments), Poinsettia and pine dies(Pine branch), Mistletoe and Holly stamp set(pine branch), Merry and bright stamp set (lightbulb), and the Bokeh dots stamp set for the background. (All products linked at the end of the post)
Here is the card with the lights off:
and the card with the lights on (you just remove the little paper that says “pull” and they turn on)
Using the Chibitronics was a lot easier than I had expected and it was so much fun making a card that lit up!
Next I have a couple of DIY Gifts that would be great for your holiday gift giving.
These were both SO simple and so quick to make. For the wine basket I purchased the decorative basket from Michael’s craft store for under $5. I heat embossed the Essentials by Ellen Fat Pants sentiment from the Fat Pants stamp set and tied the tag around the top of the basket with some red twine. Popped in a bottle of wine with some tissue and now its all set for a quick holiday gift.
Know someone with a sweet tooth? Try filling a mason jar with candy like I did with my snowman jar here. I just took a piece of cardstock and did some simple ink blending around some snowy hills. I stamped some snowflakes from the Honey Bee Stamps Flakey Friends stamp set. From the same stamp set I stamped out the snowman and die cut him with the coordinating dies. For the tag I heat embossed the sentiment from the Essentials by Ellen Holly Jolly stamp set and tied the tag around the jar with some Doodlebug twine. I think this would make a great gift for a teacher or coworker.
Next up is a fun way to present a coffee gift card. This cute little bear is from the Essentials by Ellen All inside stamp set (and matching die). I gave him a big cup of coffee from the Oh Frappe set and popped him on an action wobbler so he bounces inside the MFT decorative circle cut out. I stamped the background with the same stamp set and the sentiment is a combination from this stamp set and the new Honey Bee Stamps Sending You sentiments.
Here is the outside and the inside of the card:
For the inside, I stamped the”just for you” and hearts from the Sending you stamp set and heat embossed with WOW rich pale gold embossing powder. I cut the largest heart from the Essentials by Ellen Folk heart die set and put a bit of temporary adhesive on the gift card and stuck it to the stamped heart. I Glued that to the back of the card and with adhesive on either ends of the strip I laid that over the gift card. I think these are great to have on hand, especially around the holidays for quick gifts!
Another great thing to have on hand is some gift bags. I Love the WRMK Gift bag punch board and I thought that the Essentials by Ellen leaping deer die would make the perfect window for a gift bag.
This was another very easy to make project. I cut the bag according to the punch board directions and before I adhered anything I die cut the front of the bag with the leaping deer die. I stamped and heat embossed the JOY sentiment from the Honey Bee Stamps Merry and Joy sentiment builder stamp set. I took a piece of vellum and glued it to the inside of the bag, creating a little window. I finished off the bag with some sequins and that ribbon you see was a gift in my last Ellen Hutson order! They are just so sweet!
I made about 20 versions of the card you will see below. Normally I would shy away from making cards that need masking for a mass-produced card but I discovered a great way to make masks last which made the whole project easy peasy! Want to learn more about this tip and how I made this card? Check out the post in the Ellen Hutson Classroom HERE
I also created a fun die cut inlay card with the new Honey Bee Stamps Thanks and giving die set. You can see that card and more on the Honey Bee Stamps blog HERE, but below is a sneak peek!
Whew! That was a lot of projects to share! I am so glad you kept on reading because one lucky reader is going to win a $50 gift certificate to EllenHutson.com! How do you win? Easy Peasy! Leave a comment here, then pop on over to the Ellen Hutson classroom and leave a comment there too and another stop to HoneyBeeStamps.com and leave a comment there and you are entered to win!
Supplies used are found below. (affiliate links provided where available).
To shop the Honey Bee Stamps store, visit this link: HERE
Welcome to the Honey Bee Stamps November Release Honey Hop!!!
All this week we have been showing you little sneaks of our awesome new embellishments, stamp sets and dies! Well, here they all are! Everything will be available for purchase today in our shop HERE.
For my project today I am using the “Little Pickup” stamp set and the “Sending You” Sentiment set along with their coordinating die sets.
I just love this cute little truck! I knew that I wanted this cute stamp to be center stage so I gathered some scene building dies (Mountain range & stitched hills) and started assembling!
You might have seen this lil sneak on instagram when I was putting my “Little Pickup” together.
Now you don’t have to cut out all the pieces you see in this photo but it sure makes it fun. I love that the die set includes the tires and the window dies so you can make layered and interactive cards with this set. I fussy cut the fenders and popped them up with a bit of foam tape. I covered the wheels in glossy accents after die cutting them from another truck stamped image.
I had this Daniel Smith watercolor I have been wanting to use for a long time called Autumn Mystery Duochrome. I thought it gave the truck a rusty type of look while still looking oh so sparkly and pretty, The color changes slightly depending on the angle you are looking at it from.
Neat, Huh?!?!
After I got my truck assembled I glued the tree to the bed of the truck and added just a bit of the new Honey Bee Stamps exclusive glitter glass. I thought it gave the perfect icy-snowy texture. I also added the same glitter glass to the top of the mountains, and all the snowy hills. I used some Ranger Multi Medium in the Matte finish to glue on the glitter and gently pushed the glitter into the glue so it would stick very well. Once it was all dry I dusted off the excess.
I attached the truck to my scene with some foam tape. I stamped and die cut the sentiment on the front hill and attached that below the truck with a double layer of foam tape.
To finish it off I added some dots of glue and sprinkled on some glitter glass that I hand-dyed a soft blue color. *Video Coming Soon on embellishment dyeing process*
This was SO much fun to piece together. You all are going to love playing with this stamp set and all of the wonderful new releases from Honey Bee Stamps.
What’s a Honey Hop without some sweet prizes, right? One winner will win a gift certificate to purchase new goodies in the Honey Bee Stamps Store.
All you have to do to win is comment here (on my blog), on the Honey Bee Stamps blog, and again at each one of our designer’s blog by Sunday, November 13th. Winner will be announced on Monday, November 14th at Noon PST.
I am the last stop on this blog hop… but if you started with me you can just hop to the beginning, which starts with the lovely and Oh-So-Stinkin’ Talented Laura Bassin right —>HERE <—
Thank you so much for Honey Hoppin’ to my blog! I hope I inspired you to buzz on over to your crafty workspace and create something sweet! Check back on Tuesday when I will have some AH-MAZE-ING inspiration using Honey Bee Stamps with Essentials By Ellen products!
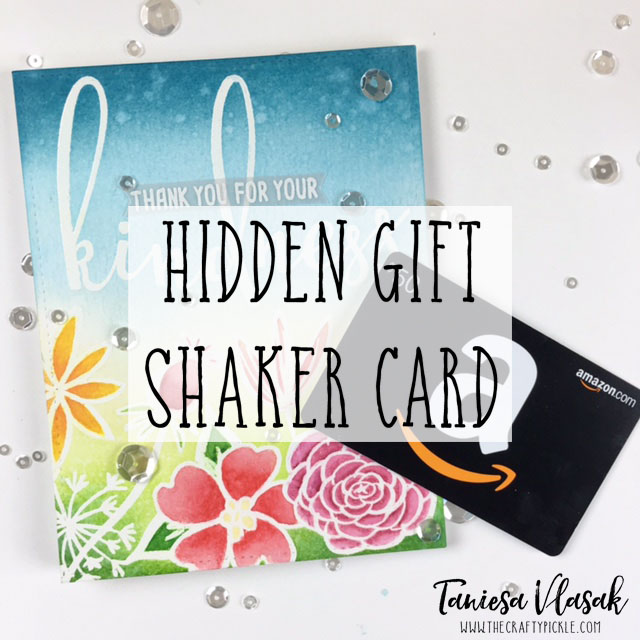
Today I am guest designing over at the Kat Scrappiness blog and shop and I am super excited to share this fun shaker card!
I absolutely love Kat’s exclusive dies. The stitched tree was just perfect to have the Lawn Fawn Frosty Fairies decorate!
To make the shaker I used the two largest double stitched rectangle dies in the set. I just nested them together and used a bit of tape to make sure they stayed in place. I die cut my cardstock frame, the acetate, and the foam as well! Came together super quick!
I used several shades of blue distress ink for my background and colored the cute little fairies with copic markers. Not a lot of shading was needed because they are small. I went over their wings and other details with a glitter pen after I was done coloring.
To get some texture on the absolutely fabulous stitched tree I used the small pine spring in the Frosty Fairy friends set and did some second (and third) generation stamping. You can see more on that in this little quick tip video.
I added my favorite white, blue and clear sequins from Kat’s shop in the shaker, I didn’t add a lot because I didn’t want it to take away from the decorated tree.
This card came together in a snap and I just love how it turned out. It is easy enough to mass produce and if you wanted to skip the shaker part it could come together even faster.
Thank you so much for stopping by. I am excited to be guest designing for Kat Scrappiness and I will have more fun projects for you soon! Check out Kat’s store at http://www.katscrappiness.com and for direct links to products used today see the links below.
I am super excited to be representing Honey Bee Stamps on the Simon Says Stamp blog this week. I have three projects to share with you, and a video that walks through all three of them.
I will be listing all of the supplies used in my projects at the end of this post. Today I will be highlighting some of the brand new products from Honey Bee Stamps!
Zen Floral and Zen Bouquet were inspired from the popular adult coloring book trend. Both sets have matching dies and the large bouquet is almost 6 inches around. I thought that these would be perfect to show off today’s project share.
You can make a diy coloring book so many different ways, so I didn’t want to bore you with a step by step tutorial. Instead, I will walk through this project on camera and talk about several possible ways you can make your own custom coloring book with supplies you may have on hand already.
This coloring book measures approx. 5×7. To make this particular cover size, you will need two pieces of 5×7 chipboard, two pieces of cover paper measured at 5 ½ x 7 ½ , and two pieces of patterned paper that will go on the inside. Cut these slightly smaller than the chipboard. Mine measured 4 ¾ x 6 ¾. I adhered all of the pieces together with Scor tape but you can use your favorite adhesive. You can even skip covering the chipboard or paint it with acrylic paint.
I chose to decorate my cover with the Honey Bee Stamps Zen floral border stamp and die. I also used the Simon Says Stamp STAMPtember stitched scallop die and the Honey Bee Stamps Color my world stamp set and die. I did some simple ink blending with distress inks then went over the letters with my Sakura black Glaze pen. I even added a little shimmer inside the letters with my spectrum noir glitter marker.
I made the inside pages slightly bigger than a standard A2 card base with a bit extra at the top for binding. The inside pages are 4 ½ x 6 ½ . I have pre stamped some card bases for my recipient to color. Pages/ bases are all on Tim Holtz watercolor cardstock, Neenah solar white, or Strathmore bristol paper. This is a great way to get more use out of your stamp collection. Consider stamping several pages in one session to make multiple books or card bases ready to color.
Another fun product that I have included is the Simon Says Stamp exclusive Suzy’s doodles. These are printed on Tim Holtz watercolor paper. I adhered each to a page in the book with temporary adhesive. This way they stay put in the book for coloring but when you’re ready to take it out and make a card it comes off easily.
I stamped each of the Honey Bee pages twice for each design. The top piece being the watercolor cardstock and then using temporary adhesive I glued that to the other stamped panel on Neenah solar white. The Bristol paper is embossed and is a separate sheet.
As a finishing touch to the coloring book I made a cute removable pallet that can go in and out of the book. I used a pack of Peerless watercolor sheets and although you can just cut these in small squares or rectangles I thought it would be fun to use the hexagon die from Simon Says Stamp perfect shapes dies to arrange the paint in a fun “Honey Bee Stamps” sort of feel. I arranged the little paint hexagons in a gate fold pallet. The pallet base is created by using a 6×9 piece of Tim Holtz watercolor paper, 6×9 piece of printed paper and a piece of heavy acetate. The acetate protects the watercolors from running into each other should the pallet be put away damp, it can also be used as a mixing surface. Each end of the paper was scored at approx. 2 ¼ inches. I created a simple belly band to keep the pallet closed using a strip of the same patterned paper using the opposite side. I die cut a circle and stamped a floral from the Zen Bouquet stamp set to tie it all together.
I bound my coloring book using the We R Memory Keepers CINCH binding machine. There are other binding machines out there but I have only used this one. You could also punch some holes with a and bind using mini album rings, or tie together with ribbon or twine. You could even use an old planner or traveler’s notebook… SO many possibilities to create a coloring book for friends or for yourself to color on the go.
I am giving this coloring book as a gift, so I placed my coloring book in a mesh bag along with a waterbrush and chamois that I picked up from my local craft store.
I also made a card that coordinates with the album. I used the huge Zen Bouquet stamp which I have cut down partially, I used my Zig Clean Color Real Brush markers to do the coloring and added little touches here and there with my glitter marker and glossy accents. I used the Simon Says Stamp A2 curved card edge die and layered striped patterned paper behind it. For the sentiment I cut apart a sentiment from Honey Bee Stamps Happy everything (You Make Me) and added the new SSS Inspire die cut in the middle instead of “make”. For the final little accent I added the bee stamp from Honey Bee Stamps Sweet as Honey stamp set and die.
Here is a bonus idea if you wanted to give coloring pens instead or in addition to the watercolors with your coloring book. These are the Kaiser craft gel pens. I am not a huge gel pen girl but these are pretty darn amazing. Especially the glitter ones. They have a really fine tip to get into small places and the ink flows really well. I just removed the sticker and took the same patterned paper I used in my coloring book to make a belly band for the case. I die cut the word create which is a new Simon Says Stamp STAMPtember release, and glued that on the belly band. I finished it off with coloring one of the white hearts red, adding two thin strips of cardstock to the top and bottom and coating the die cut with my Sakura clear Glaze gel pen.
Listed below are the links to the products (or comparable products) I have used for these projects.
I hope you found today’s project share inspiring and can think of ways to make your own personalized coloring book. Thank you to Simon Says Stamp for inviting Honey Bee Stamps and myself to share in the STAMPtember celebration!
Good Morning Honey Bees! Welcome to our August release Honey Hop!!!
You should have arrived from Melissa’s blog. If you got lost you can always start at the beginning HERE.
All this week we have been showing you little sneaks of our awesome new stamp sets and dies! TOMORROW our new release goes live and to celebrate we are showing you some beautiful projects, TODAY!!!
What’s a Honey Hop without some sweet prizes, right? This time we not only have one awesome prize pack but TWO!! One winner will win our zen florals pack (Zen florals, Zen Bouquet, and each of their matching die sets) and our second winner will win our Alpha prize pack! (Color me alpha stamp set, sentiment alpha stamp set, and color me alpha die set). All you have to do to win is comment here on the Honey Bee Stamps blog and again at each one of our designer’s blogs by Sunday August 28th. Winner will be announced on Monday August 29th at Noon PST.
So Hop along and get ready to BEE inspired!
During our preview days this week I shared two videos. One for each new Alphabet stamp set that Honey Bee Stamps is releasing this friday. I love them both and I am sure you will too.
Brand new Sentiment Alpha!
And the oh so fun Color-Me-Alpha!
and now I have two cards to share! The first one you may of saw this week on social media….
For this card I used the main floral border in the new Zen Florals stamp set. I also used the Smile stamp set and die as well as the Sweet as honey stamp set.
First I used distress ink to blend a light blue background (Tumbled Glass). Then I water colored the floral images. After the watercolor was dry I went over with a clear Spectrum sparkle pen.
I heat embossed a dot pattern on black cardstock and adhered just below the floral border strip. I also embossed the smile die cut and the sentiment that was made up from the smile stamp set as well as the sweet as honey stamp set. Everything was heat embossed using the WOW rich pale gold embossing powder. I popped the smile die cut up on some black adhesive backed foam.
As an added touch, and something I have been doing a lot lately, is taking a coordinating image from the stamp set that I used for the card and stamping it on top of my custom signature stamp. I love how this just ties the entire card together and makes it just a little more special.
I also really like to stamp the envelope to match too.
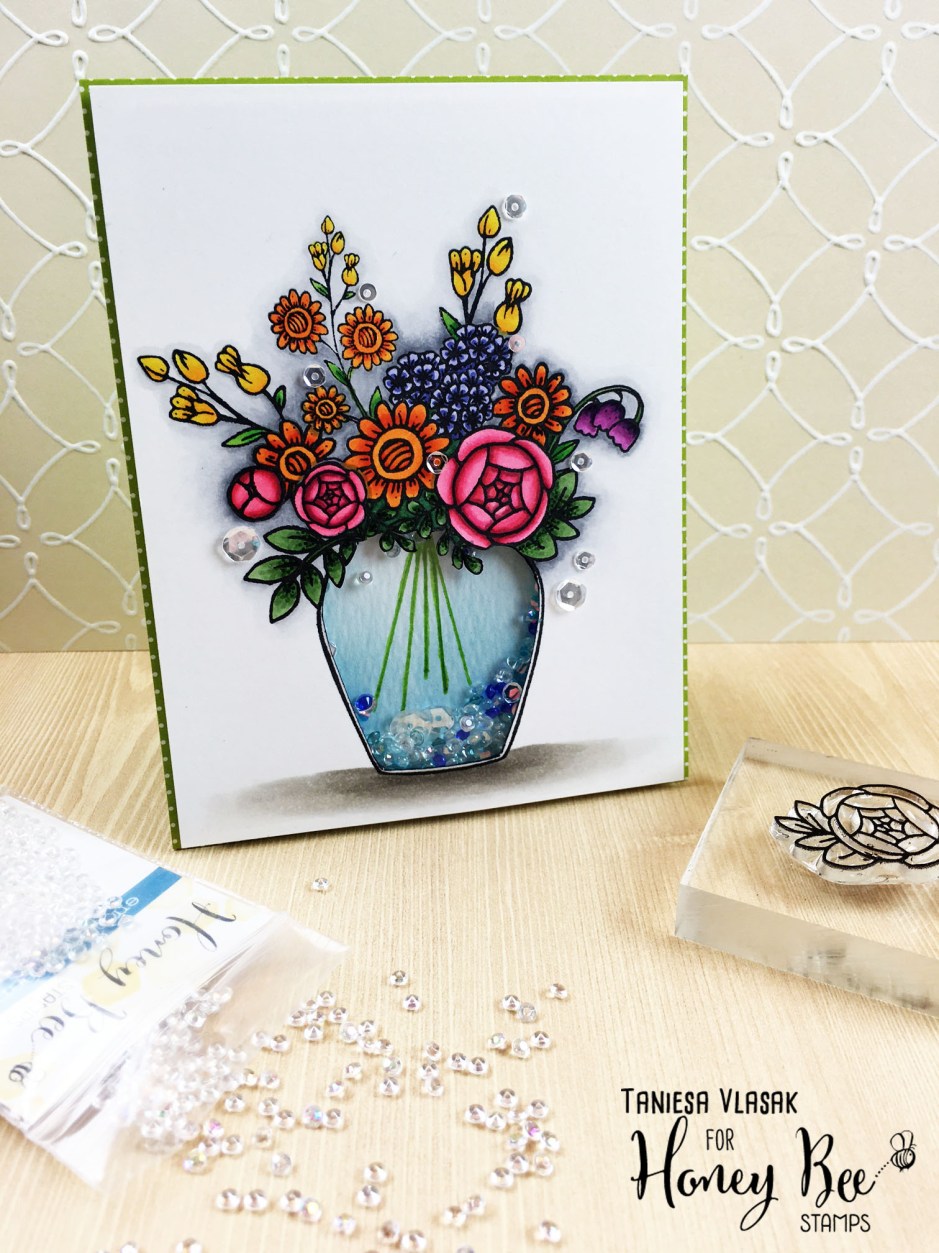
For my next card I decided to shake things up…. well, Literally. I made a fun shaker card with Honey bee stamps new Zen Bouquet set, Zen Florals set, new gems embellishment pack, and I also added in the jar from the sweet as honey stamp and die set.
I stamped out the various flowers from both zen sets into an arrangement on scratch paper first. Once I was happy with the layout I traced around the jar from the sweet as honey die set. I cut some masks for each of the florals using Simon Says Stamp masking paper. Then I stamped my arrangement using Simon Says Stamp intense black ink.
After everything was stamped. I took my Tim Holtz craft knife (best craft knife I have ever owned, I love this thing!) and I cut around the inside of the honey jar and around the overlapping florals and leaves. This leaves the window for my shaker card. I took a piece of craft foam slightly smaller than my card panel and I cut out the Honey jar from the foam in the same place as the card panel. This leaves the opening a bit larger so that my panel covers the foam completely.
Then I began coloring. I used 3 to 4 shades per color family of copics to color in my images. I used warm grays at the bottom of the jar to ground the image. Once I was finished coloring I adhered a piece of acetate to the back of the front panel to act as my window.
Now the fun part …. Wait, it’s all fun, ok ANOTHER fun part…. filling the shaker! If you have seen the sneaks, Honey Bee Stamps came out with these cute little clear gemstones to use in your shakers. I needed shaker bits to look a little bluish like water so I pulled out a tip my dear friend and fellow design team member taught me a year or so ago. You can dye your clear plastic embellishments any color you want with alcohol ink! So I thought why not these cute little gems. I took two shades of Ranger alcohol ink and a couple of plastic baggies and put some gems in each. I then put two drops of the ink in the bag and smooshed it around…. after they were coated well I poured them out on a paper towel and let them dry. here is a closer look at them….
Of course I need to buy more so I can dye these lil babies in every color of the rainbow!! I added some of these to my shaker window along with some clear sequins and some blue confetti. I covered up the opening in the back with a scrap piece of distress cardstock that I used a bit of ink blending on ( Broken china distress ink ) and that I drew in some stems with a green marker. I placed the shaker panel on a piece of Doodlebug green polka dot patterned paper and attached the completed panel to a top fold A-2 cardbase.
And that pretty much does it for my cards today. Thank you so much for hanging in there with my very long post today. I hope you were inspired.
There is lots more fun to be had. Keep on Honey Hoppin to our awesome Guest Designer’s blog, Deepti Stephens!!
Listed below are the links to the products I have used for these projects as well as postcard projects I have done in the past, and planning on doing. Affiliate links may be used, which means if you make a purchase, I receive a small commission at no additional cost to you. I really appreciate your support toward the costs of running this blog.
I know lots of you out there love to make handmade cards. One thing I don’t see too often is handmade postcards. They are super easy to send, and very inexpensive. I had the idea during TheDailyMarker.com’s 30 day coloring challenge to take my daily coloring and put it on a postcard and just send it to make someone smile. Not all my projects made it on a postcard but I did do a few and I really loved the result. Postcards can be something simple as a Hello friend! or a notification to your friends and family that you have moved.
There are some great products for making your own postcards. First product that I LOVE is the Strathmore watercolor postcards. These are preprinted 140 lb cards on watercolor paper making it so easy to color and send your postcard. I got mine at my local craft store with a coupon making them very inexpensive.
Here is a fun stamp from Amy Tangerine. This comes from her Better Together collection.
A side note about the stamp above. This stamp is Acrylic and not Photopolymer. I recommend using a stamp positioner tool or a misti to make sure you get a good impression.
There are also other great stamps out there that you can use to build your own postcard backing.
First up is a simple hello friend postcard made with Mama Elephant brushstroke florals stamps and Sunday Sentiments stamps. I stamped these florals in various shades of distress ink and softened edges with a waterbrush. I also splattered some black ink afterwards. Sentiment was stamped in Simon Says Stamp intense black ink and then I ran the card though a dotted die. This card is a standard A2 card size and not the traditional 4×6 postcard. Postcards can be a range of sizes and does not have to stick to the 4×6 but double-check if you make it larger, that you do not need extra postage.
Next we have another Hello postcard, this time with Honey Bee Stamps “Say What” stamp set as well as their “brush stroke alphabet” stamps. I did some spotlight coloring on this one with copic markers. Using grays for the outside and colors for the center circle. After I was done coloring I adhered my postcard back with multi medium matte. If you want the postcard to look seamless make sure to take some ink around the edges.
Here we have a thank you postcard that I made for my daughter’s Aunt. Small Talk Stamp set by Mama Elephant with alphabet stamps from Illustrated Faith and Studio Calico. Mostly distress ink blending on this one and zig clean color real brush markers to color in “Aunt”. I also went over the letters with a Spectrum Noir clear sparkle pen once dry.
This is a soft thank you postcard using the Not too shabby and kindness stamp sets from Honey Bee Stamps as well as the Kindness die. I die cut the white panel from Bristol cardstock and sandwiched a piece of Simon Says Stamp Audrey Blue cardstock between that panel and the postcard side. I used my Clarity Stencil Brush to apply Peacock Feathers Distress ink around the postcard. After stamping with Simon Says Stamp intense black ink, I colored the images with Zig Clean Color Real Brush Markers.
Finally we have a postcard I made for my friends and family announcing our move which is happening this September. This was made with two fabulous stamp sets, “I heart books” and “Moving Sentiments” by Three Room Studio. They were colored using Zig Clean Color real brush markers on Canson bristol cardstock. I printed off custom postcard backs that I created in Photoshop.
Another great idea is to take your premade postcards and stamp outlined sentiments like this “Thank you”. This is a great idea for kids to personalize a thank you note to family and friends when needed.
Because I made a postcard in Photoshop for my projects I thought you might enjoy using it too. Click the link below to download your copy. Print out on your favorite cardstock and cut to 4×6. You can color directly on the back or if you do it separately then adhere together with your favorite adhesive.
Thank you so much for stopping by. I sure hope you got some postcard creating inspiration today. I would love to see what you create! Please leave me a link to your project via your blog, Instagram, Flickr, or other so I can check it out!
Listed below are the links to the products I have used for these projects as well as postcard projects I have done in the past, and planning on doing. Affiliate links may be used, which means if you make a purchase, I receive a small commission at no additional cost to you. I really appreciate your support toward the costs of running this blog.
Thank you so much for stopping by today! I will be back this Thursday with the Honey Bee Stamps HONEY HOP celebrating the new release! For now, I am back to packing!
I hope your weekend is off to a fabulous start! I thought I would kick off my weekend by participating in the Pin-Sights challenge over at Ellen Hutson.com.
You can find out more by clicking the link HERE (and see some AMAZING project entries!)
The challenge was to take Essentials by Ellen product(s) and pair them with one of your favorite companies products. I have really been enjoying the latest Honey Bee Stamps release and decided to pick something from my Honey Bee stash!
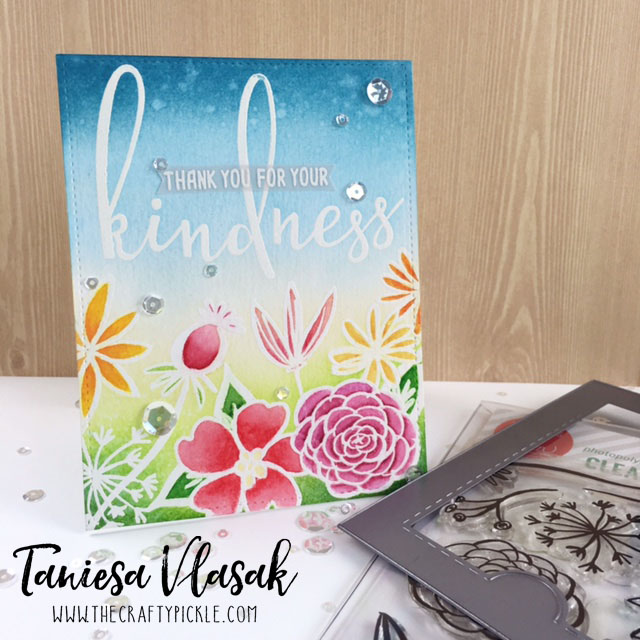
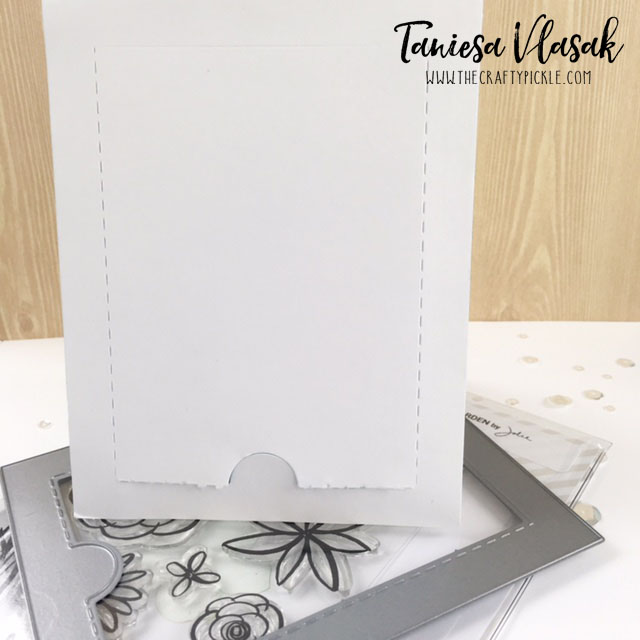
I LOVE the essentials by Ellen stamps, dies, and other papercrafting items so this was a great challenge to hop into and jumpstart my creativity. Today I will be working with the Essentials by Ellen Bohemian Garden stamps and Zipper Panel die.
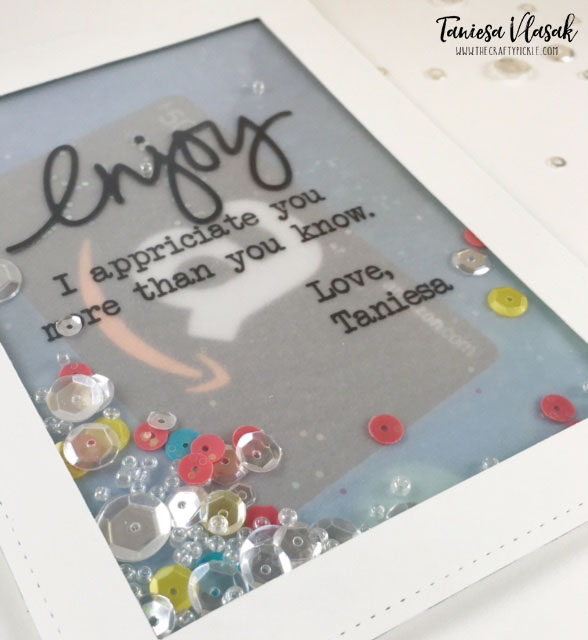
Today I wanted to mix things up a bit and I thought… “What if I used the zipper panel in the back of the card rather than the front?” This way the recipient could see the gift when they opened the card but take the gift card out when they were ready.
For the front panel I did all my stamping in Versamark ink and heat embossed with Hero Arts white embossing powder. I did ink blending at the top and at the bottom with distress ink (colors listed at the bottom of the post) and mixed some Daniel Smith watercolors to color my floral images. I did add a vellum flag out of Essentials by Ellen 40 lb vellum and heat embossed the same as the card. For the final touch on the panel I added some Sparkling clear sequins with some Ranger Multi Medium Matte.
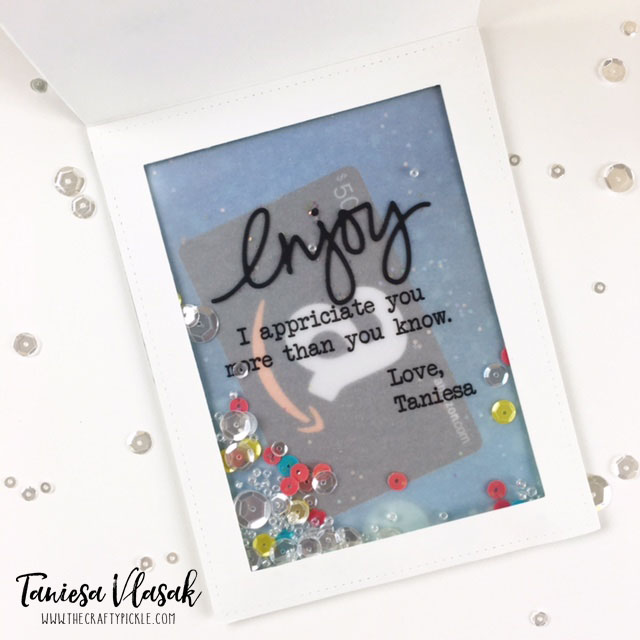
I set the front panel aside and went to work on the rest of the card. I made the shaker pocket from an Essentials by Ellen small stamp storage pocket and Be Creative tape. (I probably would have used my fuse but we are moving and it is packed up in a box at the moment). I printed my message on the same 40 lb vellum from Essentials by Ellen using my laser printer and cut it to fit inside the stamp storage pocket. I added the die cut “Enjoy” which is also apart of the zipper panel die set. Once that was dry, I added the pretty pink posh sequins, Prima beads, and Distress glitter.
I reinforced the center part of the zipper panel as Julie Ebersole has shown in her YouTube video (See bottom of post for video) with a piece of Neenah cardstock that I blended some distress ink on. I added be creative tape all around the back panel edges being careful not to cover the zipper stitched marks. I then added my gift card in the middle and placed the finished shaker pocket down on top of the tape. To hide the rough adhesive edges I made a frame from the large stitched rectangle dies from Lawn fawn and adhered that to the top of the shaker pocket.
I love that you can see the gift card through the vellum but the message still stands out. The shaker adds a fun playful confetti party like feel.
Here is the view of the back . I started lifting the bottom up……
But then I decided I wanted to show you all how cool it looks when it is opened up all the way!
What I love about putting the zipper in the back is that the front stays pretty and intact so you can still display as normal if you like.
This card was a lot of fun to make. Let me know in the comments below if you would like to see a video tutorial on how to assemble a gift card like the one shown today.
If you have never seen the zipper panel from Ellen Hutson yet. Check out this how-to video that Julie Ebersole (the designer) made. The die is just genius!
https://static.inlinkz.com/ppr.js
Thank you for stopping by. I hope you found my card project inspiring. I love giving gifts, but making gift packaging pretty is extra special!
As a lot of you probably know this past 30 days has been The Daily Marker’s 30 day coloring challenge. It was the 5th 30 day coloring challenge that has been hosted by its creator, Kathy, artist and owner of TheDailyMarker.com. The point of this challenge is to get everyone coloring, even if it’s just 5 minutes a day. Coloring can help reduce stress and just exercise your creativity.
Now I have attempted this almost every time and sadly haven’t been able to follow through on the entire 30 days, which is completely okay… Some coloring is better than none right? This time though I was able to manage something nearly every single day of the 30 days and I wanted to pull some of my coloring together in one big post to share. Some projects spanned over a couple of days and some I did in one sitting. I had a lot of fun and even my 10-year-old daughter did some coloring with me too!
I challenged myself to use several different coloring mediums. I really enjoy them all so it is hard to pick a favorite. Here is a peek at my some of my coloring and projects.
I hope you enjoyed my 30 day coloring collection. I can’t wait for the next challenge. Be sure to check out Kathy’s Instagram HERE, for news on the next coloring challenge!


 Listed below are the links to the products (or comparable products) I have used for these projects.